
[ad_1]
For customers delving into the thrilling world of DIY IoT, one frequent problem that they often discover is the best way to successfully visualize the information generated by their custom-made gadgets utilizing cellular apps or internet browsers. These gadgets, typically constructed round Arduino or ESP boards, empower makers to craft revolutionary options for a variety of purposes. Nevertheless, the lacking piece of the puzzle is to discover a easy, easy and dependable approach to visualize and work together with the sensor knowledge.
Think about that your gadget is controlling humidity with an ESP32 gadget and also you need to have the ability to visualize your knowledge in real-time pretty rapidly with the intention to take actions based mostly on particular occasions. Effectively, there are lots of methods to publish sensor knowledge. Some require time and others are quicker to arrange. On this weblog put up, we’ll go over 5 of the commonest strategies, describing their benefits and limitations. We’ll introduce the Arduino Cloud as an easy-to-use IoT resolution for all ability ranges and with zero upkeep.
5 most typical IoT knowledge visualization strategies
1. Use a cellular app to visualise knowledge related by way of Bluetooth®
Bluetooth is a well-liked alternative for connecting IoT gadgets to cellular apps. Customers can set up a Bluetooth connection, ship knowledge from their IoT gadget to the cellular app, and visualize it in real-time.
Quite a few examples of cellular apps and libraries particularly designed for this function can be found.
Following a few of these examples could be straightforward for medium ability programmers, however it might probably change into a bit tough when requiring a extra superior visualization resolution. Prepared-to-use apps are too generic and never versatile sufficient if you happen to want a {custom} dashboard.
Native options, like Bluetooth, require you to be bodily near your IoT gadget to entry knowledge, which limits distant monitoring and management.
2. Embed an online server within the gadget
Embedding an online server contained in the IoT gadget means that you can visualize the information utilizing an online browser. It requires the gadget to have community connectivity, and it’s normally applied connecting the gadget to a Wi-Fi entry level or with the gadget creating its personal WiFi hotspot.
Though creating your personal internet server implementation could be finished, some of the widespread options is to utilize the library ESPAsyncWebServer. It permits your IoT gadget to serve {custom} HTML pages presenting the information. This can be a very versatile and customizable resolution, but complicated and largely appropriate for expert customers.
There are many insightful examples like the next ones:
The scope of this resolution is often native — it’s essential to be on the identical community because the gadget — though with a extra superior configuration by enabling port forwarding within the router, the gadget might be accessed remotely from wherever.
One of many fundamental benefits is its low latency, as the information proven within the internet web page comes straight from the gadget with none processing.
Then again, it’s a resolution that requires a excessive programming ability stage and moreover, as a result of immutable nature of the firmware, each change in a dashboard requires code recompilation and firmware reflashing.
Moreover, embedding an online server or a Bluetooth stack inside the gadget could be resource-intensive. This may increasingly restrict the gadget’s capabilities or require a extra highly effective microcontroller, rising each value and complexity.
3. Ship knowledge to an exterior system with plotting capabilities
IoT gadgets can ship knowledge to exterior methods utilizing completely different protocols, akin to MQTT or HTTP. Though there are lots of HTTP based mostly implementations, those based mostly on MQTT are the preferred ones, and it has change into the de-facto customary in IoT communication resulting from its light-weight, environment friendly, and publish-subscribe mannequin, making it well-suited for resource-constrained gadgets and scalable, real-time IoT purposes.
Sending knowledge to exterior methods depends on exterior infrastructure. No less than, the next elements are wanted:
- A server that receives (and shops if wanted) the information
- An online server implementing the applying that enables the consumer to entry and visualize the information
Each elements could be operating on the identical machine or on completely different machines. These machines can usually be self-hosted or cloud-hosted.
- Self-hosted platforms: You personal the infrastructure — usually in your house or premises — and the machines the place the monitoring utility runs. There are normally two alternative ways to implement these methods:
– Deploy an (open-source) utility in your machines that can be utilized straight away.
– Construct your full system by yourself. - Cloud-hosted platforms: The infrastructure and the machines are in a cloud owned by the applying supplier.
Whatever the resolution you go for, some methods supply the flexibility to combine with exterior methods, providing the chance to disseminate knowledge throughout numerous platforms. One frequent method is to facilitate knowledge switch to platforms akin to IFTTT, a extensively adopted alternative. IFTTT can additional facilitate actions like storing knowledge in a MySQL database or appending rows to a Google Sheet.
Let’s deep dive into three examples: Two self-hosted and one cloud-hosted.
3.1. Use a ready-to-use self-hosted system
Self-hosted ready-to-use options are highly regarded and include deploying an open-source monitoring utility on a machine (normally Linux-based) which is positioned in your house or premises. For this, it’s essential to construct and keep the infrastructure and assure that the machine the place the applying can be operating is obtainable 24/7.
Some highly regarded open-source examples are Domoticz, openHAB or Dwelling Assistant. They’re extraordinarily versatile and filled with add-ons or extensions contributed by the group.
Putting in these methods is usually a easy course of on the really helpful platforms ({hardware} plus Working System) however it might probably change into a bit tough if you wish to set up them on methods which are already operating, as conflicts with the Working System (OS) or the libraries of the system normally come up and they’re normally not very straightforward to resolve. So it might probably change from a straightforward job {that a} newbie can do to a fancy job solely appropriate for expert customers.
Coping with software program updates for the applying or the Working System can change into an advanced job as normally conflicts between dependencies come up.
Because the add-ons and extensions are developed by the group, they’re typically not maintained and to allow them to be buggy and should not work correctly throughout completely different variations of the applying.
Accessing the system remotely from the web requires opening your router ports and configuring port forwarding, which is one thing not very intuitive for novices and that may create safety threats in your community.
3.2 Create your personal MQTT-based visualization system
This self-hosted resolution is essentially the most complicated of all those described to this point, but essentially the most versatile one.
For instance, think about that you just wish to create your personal monitoring system utilizing MQTT to populate the information, a database to retailer it and a visualization platform to plot it. In that case, it’s essential to have one or a number of machines operating:
- The MQTT dealer. One of the vital in style open-source ones is Eclipse Mosquitto.
- The applying that may subscribe to the information within the dealer and retailer it in a database. Utilizing time-series databases (TSDB) like InfluxDB is gaining recognition.
- The visualization platform that may will let you create dashboards accessible by way of an online browser. Grafana is without doubt one of the hottest open-source platforms to realize this.
Moreover, you additionally need to configure the community in order that the machines and the companies can discuss to one another and in order that they are often accessible remotely from the web. As within the earlier methodology, this implies opening your router ports and creating safety holes in your community.
And final however not least, it’s important to configure and keep the total infrastructure of servers and community.
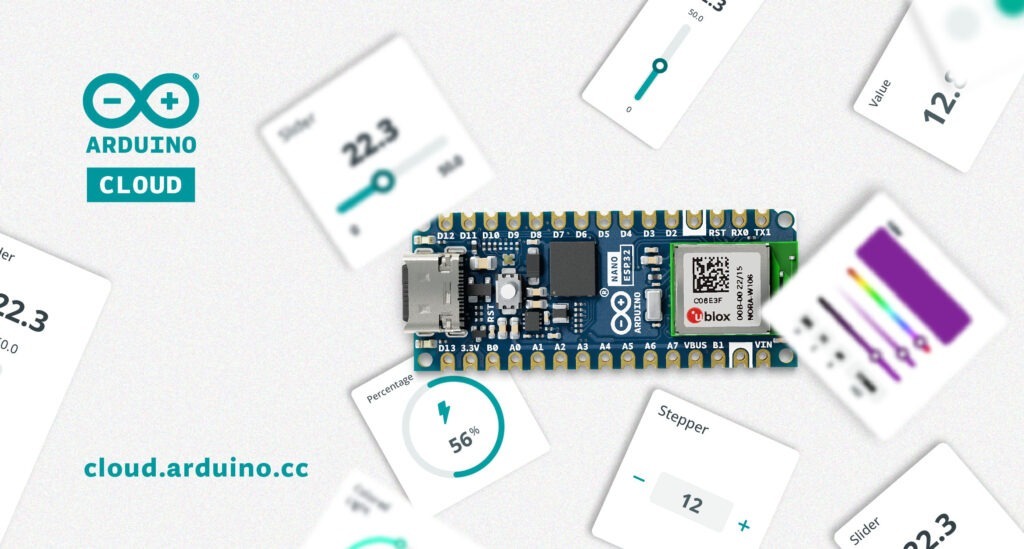
3.3. Use Arduino Cloud to retailer and visualize your gadgets knowledge
The Arduino Cloud is a cloud-hosted platform that gives a user-friendly atmosphere to develop the software program of the IoT gadgets and to create customizable insightful dashboards used to observe and management your IoT gadgets.
The principle options are:
- On-line editor or Arduino IDE growth: You may develop your initiatives on-line from wherever. No configuration is required from the consumer to make use of the web growth atmosphere. However, though on-line growth could be very handy for a lot of customers, the growth with the favored and well-known Arduino IDE is equally legitimate. You may select the appropriate one for you.
- Code storage and backup: Whether or not you develop offline or on-line, storing your code within the cloud eliminates the necessity for handbook backups and allows growth from wherever.
- Customizable dashboards: You may create and customise your dashboards with an intuitive interface utilizing drag-and-drop widgets. They supply actual time interplay along with your IoT gadgets and insightful historic info that may be moreover downloaded for offline evaluation. The nice factor is you could share them with mates, colleagues and household in addition to arrange real-time alerts.
- IoT Distant app: Your dashboards are all the time at your fingertips with the cell phone app.
- Work collaboratively: You may share your code and dashboards with others.
- Out-of-the field integrations: You’ve seamless integration with in style platforms like IFTTT, Zapier, Google Providers, or Alexa.
- Big selection of appropriate gadgets: You may join not solely Arduino or ESP-based boards, but in addition any gadget programmed utilizing Python, JavaScript or MicroPython.
It’s free to make use of for small-sized initiatives. If it’s essential to join extra gadgets or have to entry premium options akin to prolonged knowledge storage, help for bigger initiatives, over-the-air updates, real-time notifications, you possibly can join a month-to-month or yearly plan (beginning at $2 monthly). .
The principle limitation of this technique is that you just require web connectivity to visualise your gadget’s knowledge.
Different options
These are just a few examples, however there are in fact many extra. It’s price noting that some customers discover hybrid options the place they keep their very own Cloud-hosted infrastructure. Nevertheless, these options incur within the issues highlighted for each self-hosted and cloud-hosted options. Others use websockets to stream knowledge on to their internet pages or purposes.
Conclusion
IoT knowledge visualization doesn’t need to be a fancy, costly, or location-dependent job. The collection of the appropriate resolution for you is dependent upon your use case and particular wants.
On this weblog put up, 5 in style options have been offered and they’re summarized within the following desk:
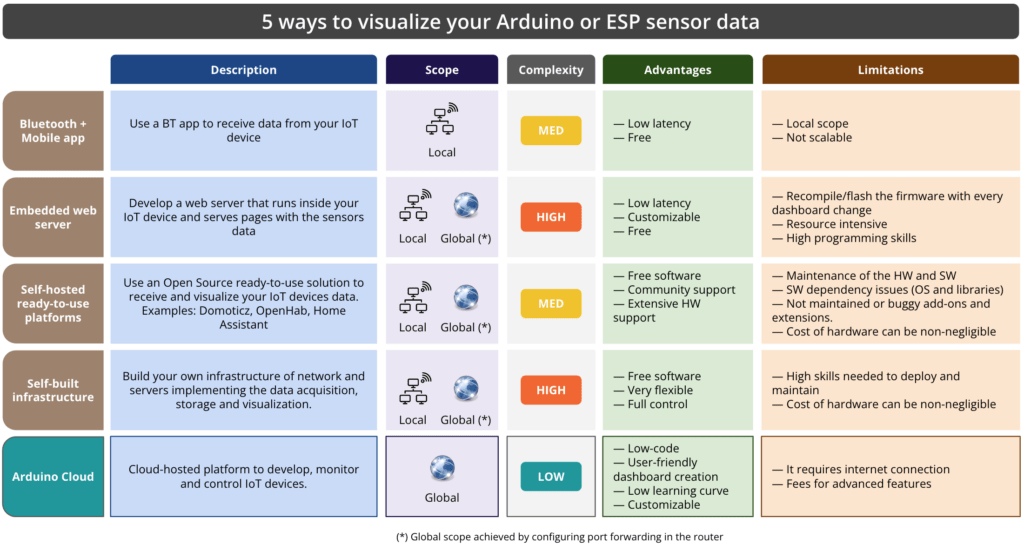
Some ideas extracted from the desk:
- Native scope options, like Bluetooth or embedded internet servers, require you to be bodily near your IoT gadget to entry knowledge, which limits distant monitoring and management. Offering full world entry for a few of these options requires your router port forwarding configuration, which can create safety breaches in your community.
- Embedding an online server or a bluetooth stack inside the gadget could be resource-intensive. This may increasingly restrict the gadget’s capabilities or require a extra highly effective microcontroller, rising each value and complexity.
- Self-hosted ready-to-use platforms have been historically essentially the most extensively adopted due to its open-source nature, flexibility, group help and big selection of add-ons and extensions. These options demand that you just construct and keep the infrastructure, making them generally complicated and time-consuming. Moreover, though the software program is free to make use of, the {hardware} the place they run is changing into more and more costlier and troublesome to search out.
All these limitations have contributed to the recognition enhance of cloud-hosted options primarily due to their handy unattended nature, but in addition as a result of they simplify the event of the gadgets firmware, their scalability and the customization choices accessible. The principle limitations of those options are their dependency to an web connection and that they might incur some prices when superior options are required.
On this weblog put up, we now have launched the Arduino Cloud, a cloud-hosted platform designed to simplify the complete course of, from firmware growth to monitoring and controlling gadgets from wherever. The Arduino Cloud was created with the purpose of democratizing IoT, very like how Arduino has empowered makers to create with ease. As we now have explored, the Arduino Cloud’s on-line growth options, code storage, and intuitive dashboards make it an interesting alternative for IoT lovers.
Begin with Arduino Cloud without cost
Getting began with the Arduino Cloud couldn’t be simpler. You solely need to observe these steps:
1. Arrange an Arduino Cloud account.
2 Join your IoT gadget to the Arduino Cloud.
3. Create your Factor and add your software program to learn your sensors knowledge.
4. Create dashboards for knowledge visualization.
And that’s it. It’s prepared to make use of and it’s free. You may discover the premium options for enhanced performance.
So, if you happen to’re seeking to streamline your IoT knowledge visualization, contemplate giving the Arduino Cloud a attempt to unlock its full potential on your initiatives.
You may observe any responses to this entry via the RSS 2.0 feed.
You may depart a response, or trackback from your personal website.
[ad_2]