
[ad_1]
Information Science
How-To’s
Plugins
Python
Tutorials

It is a visitor weblog publish by Adrian Boguszewski, creator of OpenCV Picture Viewer Plugin.
The typical programmer makes 70 errors per 1,000 strains of code and spends 75% of their time on debugging (supply). In laptop imaginative and prescient (CV), this course of might contain not solely fixing the code but additionally checking that the visible impact produced by the algorithm has been utilized to photographs accurately. To facilitate the inspection of this visible impact, the related picture have to be displayed utilizing the quickest and easiest way potential. On this article, we’ll present you 4 fast methods to show an OpenCV picture whereas debugging.

Laptop imaginative and prescient is a discipline of synthetic intelligence (AI) that empowers computer systems to interpret and perceive visible info from the world, enabling them to understand, analyze, and make selections based mostly on photographs or movies in a lot the identical manner that the human eye does. It encompasses duties like object recognition, picture evaluation, and scene understanding, and has functions in areas corresponding to autonomous autos, healthcare, and augmented actuality.
OpenCV, which is brief for Open Supply Laptop Imaginative and prescient Library, is an open-source software program library that gives a complete set of instruments and features for laptop imaginative and prescient and picture processing duties. It enjoys widespread use in functions like picture and video evaluation, object detection, facial recognition, and robotics, enabling builders to work with visible information effectively and successfully.
After any transformation of the picture, corresponding to resizing or altering its brightness or shade area, it’s a good suggestion to test whether or not the algorithm has been accurately applied. In spite of everything, any errors in processing photographs can considerably influence laptop imaginative and prescient fashions. If photographs are incorrectly preprocessed or comprise artifacts, corresponding to noise or distortion, this could imply options are extracted or represented incorrectly and should hamper the mannequin’s skill to acknowledge patterns and objects successfully. What’s extra, inconsistent or biased preprocessing strategies throughout datasets can introduce biases and make the mannequin much less in a position to cope with real-world variations by hindering generalization. Mainly, picture processing errors can compromise the mannequin’s efficiency, reliability, and its skill to make correct predictions in sensible functions.
Displaying and visually inspecting photographs is the quickest and simplest way of checking that transformations have been utilized with none errors. This implies it’s extremely helpful to study easy methods to show the OpenCV picture throughout debugging. Under, we’ll be taking a look at 4 completely different strategies that may enable you to in your every day laptop imaginative and prescient work with OpenCV photographs.
Save the picture to the exhausting drive
The primary visible debugging technique includes saving the picture to your exhausting drive.
To do that, you will need to enter the next code on the level the place the variable you wish to test modifications:
cv2.imwrite("path/to/file.png", img)
When you’ve carried out that, run your utility till you attain the road proven above. Now, change home windows and test the saved picture within the IDE or within the listing you specified as the primary argument.
Professionals
The picture is saved completely on the disk. You possibly can test it at any time.
Cons
- This technique makes use of exhausting disk area, which is an issue when there are numerous massive picture recordsdata.
- Everytime you wish to view a picture, it’s important to sort the above snippet of code.
- In case you’re utilizing a debugger, you’ll must cease it quickly after which restart it to avoid wasting the picture.
- The extra code will now not be required on the manufacturing stage and so have to be eliminated as soon as debugging is accomplished.
Add a code snippet to show the picture
This technique is quite much like the one above. However this time the picture isn’t saved to the exhausting disk – it seems on display in a popup window as an alternative.
To make use of this technique for displaying the OpenCV picture, merely sort the next code fragment on the line the place you want to see what the picture will appear to be after the related modifications have been made.
cv2.imshow("img", img)
cv2.waitKey(0)
Professionals
- No disk area is used.
- There’s no want to modify between functions. The picture robotically seems on the display.
Cons
This technique has the identical cons because the earlier one, specifically having so as to add code snippets to view the photographs which is able to have to be faraway from the code base, and interrupting the debugger.
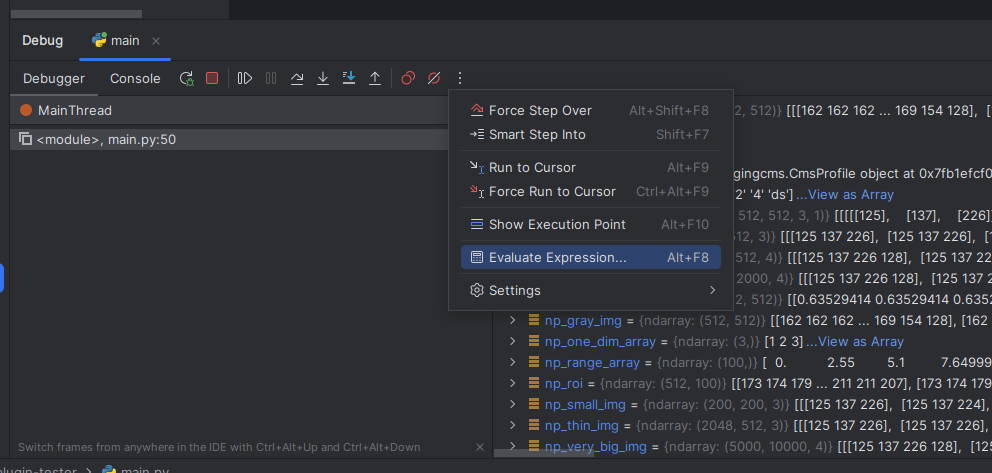
Run the code wanted to show the picture within the debugger
This feature includes utilizing PyCharm’s native debugger. This technique is cleaner than the above two strategies, because it doesn’t require you so as to add any code fragments that gained’t be wanted on the manufacturing stage.
All code is entered within the Consider Expression window, which is known as by the keyboard shortcut Alt+F8 (Home windows and Linux) or ⌥ F8 (macOS). This implies there’s no want to write down any code in this system that’s working the debugging. When the evaluator is closed, the code disappears.
To indicate the picture, merely enter the next code (identical as above) into the evaluator:
cv2.imshow("img", img)
cv2.waitKey(0)
Professionals
- No non permanent code needs to be eliminated throughout the deployment of the manufacturing model.
- There’s no must cease the debugging course of after which restart it to show the picture.
Cons
- The code disappears each time you run the code and shut the evaluator. To see the following picture, you’ll need to enter the code once more.
- Numerous steps have to be accomplished as a way to open the picture. These are as follows:
- Open the evaluator;
- Write the code;
- Show the picture (by clicking Consider);
- Shut the evaluator;
- Shut the picture by clicking any key when there’s concentrate on the picture.
You’ll additionally need to repeat all these steps every time you want to show a picture.
Use the OpenCV Picture Viewer plugin
This plugin combines the benefits of every of the above options whereas concurrently eliminating their disadvantages. To begin utilizing the OpenCV Picture Viewer plugin, first set up it from the Market. Then, the following time you begin the debugger, will probably be prepared to make use of. After set up, a View as Picture possibility shall be added to the context menu, which might be clicked to preview the picture with out interrupting the debugging course of. Alternatively, you possibly can click on the mouse wheel or use the Alt+I shortcut (Home windows and Linux).

Professionals
- There’s no must cease debugging.
- The variety of steps wanted to view photographs is decreased.
- There’s no must name the
imshowperform – a single click on is all it takes. - There are two picture show choices (dialog and popup window).
- It’s appropriate with completely different programming languages (C++, Python, Java, Kotlin, and Android).
Cons
- TensorFlow, PyTorch, and PIL photographs are usually not but supported.
- Superior options are nonetheless being applied.
In laptop imaginative and prescient, picture show is the premise for debugging. Because of this, it’s price utilizing one of many above strategies to rapidly and successfully test that any transformations made meet your expectations. All 4 strategies have their particular execs and cons, so strive every and determine which is finest for you!
The snippets of code given in factors 1–3 are written in Python. Nonetheless, after adjusting the syntax, they can be utilized in C++, Java, and Kotlin.
In regards to the creator

Subscribe to Weblog updates

[ad_2]