
Building an Offline Speech-to-Text Transcription Tool with DeepSpeech and Python
Introduction & Motivation
Think about it—voice is at the heart of how we communicate as human beings. Whether we’re chatting with friends, listening to a lecture, or attending a big meeting, spoken words carry the weight of most of our interactions. It’s fast, natural, and effortless for us. Now, imagine taking all those conversations and automatically turning them into written text. Suddenly, you have meeting notes you can search through in seconds, videos with automatic subtitles for better accessibility, or transcripts that help people with hearing difficulties stay connected. The possibilities are endless.
Sure, there are plenty of cloud-based speech-to-text services out there—like Google Speech-to-Text, Amazon Transcribe, and Microsoft Azure Speech Service. And don’t get me wrong—they’re powerful, accurate, and feature-rich. But here’s the catch: they often rely on a stable internet connection, come with recurring costs, and raise potential privacy concerns because your data leaves your device and goes to the cloud. That’s where offline transcription tools come in. With an offline solution, everything runs locally on your computer or server, eliminating the need for an internet connection. No internet required. Your audio never leaves your machine, which means better privacy. Plus, you avoid the latency issues that come with sending data back and forth to the cloud.
In this project, we’re going to build our very own offline speech-to-text transcription tool using Mozilla DeepSpeech and Python. We’ll break it all down step by step:
- How DeepSpeech actually works under the hood
- Setting up the environment on your system
- Downloading the pretrained models you need
- Writing the transcription script to convert speech into text
- And even exploring real-time streaming so transcription can happen as you speak
By the time we’re done, you’ll have a working offline speech recognition system right on your machine—fast, private, and completely under your control.
What is DeepSpeech?
So, what exactly is DeepSpeech?
Think of it as a smart little engine that listens to your audio and turns it into written words—all automatically. It was originally developed by Mozilla, and the idea behind it came from a research paper published by Baidu called “Deep Speech.”
Under the hood, DeepSpeech uses something called a recurrent neural network (RNN)—a type of AI model that’s really good at working with data that comes in sequences, like audio or text. The model was trained on thousands of hours of transcribed speech, so it can recognize patterns in human speech and predict the corresponding text with impressive accuracy.
Here’s why DeepSpeech became such a big deal:
-
Open-source: It’s free. You can use it, modify it, and even build your own projects on top of it without worrying about licenses.
-
Offline capability: It runs right on your computer or server. No internet needed, so your audio stays private.
-
Cross-platform: Windows, macOS, Linux, and even tiny devices like Raspberry Pi can run DeepSpeech.
-
Pretrained models: You don’t need to spend weeks training your own AI model. Just download the ready-made model and start transcribing.
-
Real-time support: You can even stream audio and watch the transcription appear as you speak—super handy for live captions or meetings.
Now, here’s a little update: Mozilla archived the DeepSpeech project in 2022, which means they’re no longer actively developing it. But don’t worry—the latest stable version (0.9.3) still works great, and there’s also a community-driven fork called Coqui STT if you want more recent updates or new features.
For our project, DeepSpeech 0.9.3 is more than enough to build a fully functional offline speech-to-text tool that runs on your machine without any extra hassle.
Project Scope & Architecture
Before we jump straight into writing code, let’s take a moment to clearly define what we’re building and how everything fits together.
At the heart of it, our goal is simple:
-
We’ll take an audio file—let’s say a
.wavrecording— -
Run it through DeepSpeech on our own computer (no cloud involved),
-
And get back the spoken words as text.
That’s it. Clean, simple, and offline.
Now, to make that happen, here’s how the architecture looks in everyday terms:
-
Input Audio – This is where it all begins. You can either record your voice through a microphone or use an existing audio file saved on your computer.
-
DeepSpeech Model – This is the brain of our system. It’s a pre-trained AI model from Mozilla that listens to the audio and figures out the words being spoken.
-
Language Model (.scorer file) – This part gives our AI some “common sense” about language. Without it, the output might just be a stream of words. With the language model, it can predict more accurate phrases and grammar.
-
Python Script – This is the glue holding everything together. It loads your audio file, sends it to DeepSpeech for processing, applies the language model, and then grabs the output.
-
Output – Finally, we save or display the transcribed text so you can read, edit, or use it however you like.
But we don’t have to stop there. Once we have the basic version working, we can make it even cooler with some optional features:
-
Real-time transcription: Imagine speaking into the mic and watching the words appear instantly, like magic.
-
A simple GUI: For people who aren’t comfortable with code, a clean graphical interface can make it easy to use.
-
Multilingual support: By using or fine-tuning different models, we could transcribe other languages too.
Next up, before coding anything, we need to set up the environment—basically, install the tools and libraries so our system is ready to run DeepSpeech smoothly.
Setting Up Your Python Environment for DeepSpeech
Alright, now that we know what we’re building, let’s roll up our sleeves and set up our environment so we can actually run DeepSpeech. Don’t worry—I’ll guide you step by step.
Step 1: Install Python
First things first: DeepSpeech 0.9.3 works best with Python versions 3.7 to 3.9.
So, open your terminal or command prompt and check your Python version:
python –version
If you already have Python in that range, great—you can skip ahead.
If not, head over to python.org and grab the right version for your system. It’s a quick install.
Step 2: Create a Virtual Environment
Next, let’s keep our project nice and clean by creating a virtual environment. Think of it as a separate little bubble where all your project dependencies live, so they don’t mess up your global Python installation.
Run this command:
python -m venv venv
Now, activate it:
On macOS/Linux:
source venv/bin/activate
On Windows:
venv\Scripts\activate
Once activated, you’ll notice (venv) appear in your terminal—that means you’re working inside your virtual environment.
Step 3: Upgrade pip
Before installing anything else, let’s make sure pip (Python’s package manager) is up to date:
python -m pip install –upgrade pip
This helps avoid weird install errors later.
Step 4: Install DeepSpeech
Now for the fun part—let’s install DeepSpeech itself.
If you’re on a regular CPU machine, just run:
pip install deepspeech==0.9.3
Got a powerful GPU with CUDA installed? Then go for the GPU version for blazing-fast inference:
pip install deepspeech-gpu==0.9.3
Step 5: Download the Pretrained Models
DeepSpeech needs pretrained models to actually recognize speech. Mozilla has made them available for free.
Download both files:
The model file: deepspeech-0.9.3-models.pbmm
The scorer file (for better accuracy): deepspeech-0.9.3-models.scorer
Keep them in your project folder because our Python script will need to point to these files.That’s it! 🎉
Your environment is now ready, and we’re one step closer to building our offline speech-to-text tool.
Building the Transcription Script (Human-Friendly Explanation)
Alright, our environment is ready, the models are downloaded, and now it’s time for the fun part: writing the actual Python script that turns speech into text.We’ll keep it simple so you can get a working version quickly, then I’ll point out where you can add cool features later.
Step 1: Create a new Python file
Open your favorite code editor and create a new file called:
transcribe.py
Step 2: Import the necessary libraries
- We’ll need a few things:
- wave to read .wav audio files
- numpy for working with audio data
- deepspeech for the speech-to-text engine
Step 3: Load the DeepSpeech model
We point the script to the model (.pbmm) and language scorer (.scorer) files you downloaded earlier. These files do the heavy lifting for speech recognition.
Step 4: Handle audio preprocessing
DeepSpeech expects audio in 16kHz mono WAV format. If the file isn’t in that format, it won’t work properly. So, we’ll make sure the audio meets the requirements.
Step 5: Run the transcription
Finally, we feed the audio into DeepSpeech and print out the transcribed text.
Here’s the full code:
# transcribe.py
import wave
import numpy as np
from deepspeech import Model
# Paths to your model and scorer files
MODEL_FILE = “deepspeech-0.9.3-models.pbmm”
SCORER_FILE = “deepspeech-0.9.3-models.scorer”
# Load the DeepSpeech model
print(“Loading DeepSpeech model…”)
model = Model(MODEL_FILE)
model.enableExternalScorer(SCORER_FILE)
print(“Model loaded successfully!”)
# Function to read and validate WAV files
def read_wav_file(filename):
with wave.open(filename, ‘rb’) as w:
rate = w.getframerate()
frames = w.getnframes()
buffer = w.readframes(frames)
if rate != 16000:
raise ValueError(“Audio file must be 16kHz mono WAV for DeepSpeech.”)
return np.frombuffer(buffer, dtype=np.int16)
# Transcribe a given audio file
def transcribe_audio(audio_file):
print(f”Transcribing {audio_file}…”)
audio_data = read_wav_file(audio_file)
text = model.stt(audio_data)
return text
if __name__ == “__main__”:
audio_file = “audio_sample.wav” # Replace with your file name
transcription = transcribe_audio(audio_file)
print(“\nTranscription:”)
print(transcription)
# Optional: Real-time streaming example
# This is just a simple demo using the same file in chunks
print(“\nStreaming transcription demo…”)
stream = model.createStream()
# Feed in audio chunks (simulate real-time streaming)
audio_data = read_wav_file(audio_file)
stream.feedAudioContent(audio_data)
# Get final text output
stream_text = stream.finishStream()
print(“Streaming Transcription:”)
print(stream_text)
Download Offline Speech-to-Text Transcription Tool with DeepSpeech and Python code
Download audio.wav file
How to run it:
- Save this file as transcribe.py in the same folder as your model and scorer files.
- Put your test audio file (e.g., audio_sample.wav) in the same folder.
- Activate your virtual environment (if not already).
- Run the script:
- python transcribe.py
Results Offline Speech-to-Text Transcription Tool with DeepSpeech and Python
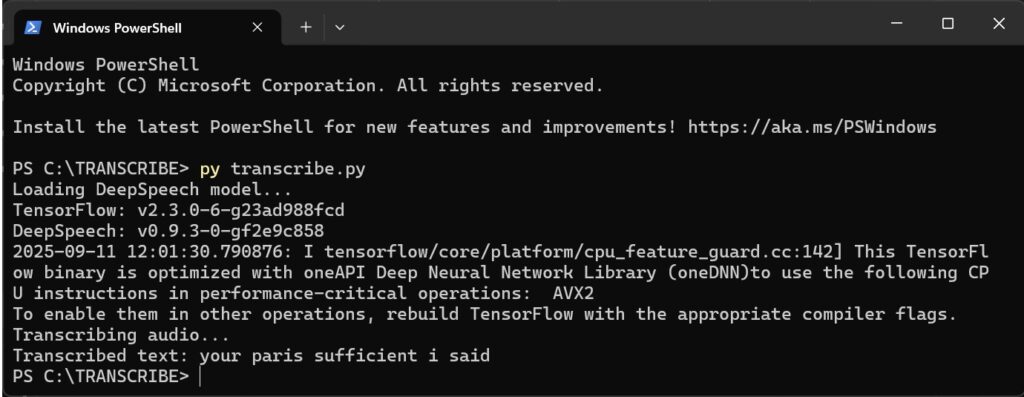
FIGURE 2 Sample output of Offline Speech-to-Text Transcription Tool with DeepSpeech and Python
Performance Tips
- Use GPU if possible for big speed improvements.
- Clean audio = better accuracy (less background noise).
- Shorter clips process faster than long recordings.
- The language scorer really helps with grammar and context.
Where to Go Next
- Add a GUI using Tkinter or PyQt if you want a user-friendly interface.
- Expose it as a web API with Flask or Django.
- Try real-time microphone streaming for live captions.
- Explore alternatives like Coqui STT, Vosk, or OpenAI Whisper for more features.
Version 2 How I Added a User-Friendly GUI and File Browser to My DeepSpeech Speech-to-Text Tool
Frequently Asked Questions (FAQs)
1. What is DeepSpeech?
DeepSpeech is an open-source speech-to-text engine developed by Mozilla. It uses machine learning models trained on thousands of hours of audio to convert speech into text. Even though Mozilla archived the project in 2022, it’s still widely used and works great for offline transcription.
2. Why should I use offline transcription instead of cloud services?
Offline transcription keeps everything local on your computer. That means:
-
No internet dependency: Works anywhere, even with poor or no internet.
-
Better privacy: Your audio never leaves your machine.
-
No recurring costs: Unlike cloud services, you don’t pay per minute or per request.
3. Which Python version works best with DeepSpeech 0.9.3?
DeepSpeech 0.9.3 works best with Python 3.7 to 3.9. Newer versions like 3.10 or above may cause compatibility issues.
4. What audio format does DeepSpeech require?
DeepSpeech expects audio in 16kHz mono WAV format. If your audio isn’t in this format, you’ll need to convert it first using tools like Audacity, FFmpeg, or Python scripts.
5. Can I use DeepSpeech for real-time transcription?
Yes! DeepSpeech comes with a streaming API that allows you to feed audio chunks and get text output in real-time. This is perfect for live captions, voice assistants, or meeting transcriptions.
6. Is GPU support available for faster processing?
Absolutely. If you have a CUDA-enabled NVIDIA GPU, you can install the GPU version with:
pip install deepspeech-gpu==0.9.3
This makes transcription much faster than running on CPU alone.
7. What are some alternatives to DeepSpeech?
Since Mozilla stopped active development, you might want to explore:
-
Coqui STT: A community-driven fork of DeepSpeech.
-
Vosk: Lightweight and fast, works offline on many platforms.
-
Whisper by OpenAI: High accuracy, supports multiple languages, open-source.
8. Can I transcribe multiple languages?
Yes, but you need language-specific models. DeepSpeech itself mostly supports English out of the box, but with custom or fine-tuned models, you can handle other languages.
9. How accurate is DeepSpeech?
Accuracy depends on:
-
Audio quality (clear speech, minimal noise)
-
Speaker accents
-
Domain-specific vocabulary (you can train a custom language scorer to improve this)
10. Can I build a GUI for non-technical users?
Definitely! You can use Tkinter, PyQt, or even a web interface with Flask/Django so users can drag and drop audio files and get instant transcripts without touching code.
11. How do I integrate microphone input for live captions?
You can use Python libraries like pyaudio or sounddevice to capture real-time audio and feed it to DeepSpeech’s streaming API. This allows you to build live transcription tools easily.
12. What’s next after building the basic transcription tool?
You can:
-
Build searchable transcripts for podcasts or meetings.
-
Add speaker identification with extra AI models.
-
Integrate with chatbots or virtual assistants.
-
Support mobile devices using lighter models or frameworks.