
[ad_1]
There are many running a blog platforms on the market that you should use out of the field. Nevertheless, constructing your personal weblog from scratch with Django is a good way to maintain management over your content material. Even should you’re simply getting began with Django, its user-friendly options will assist you to give attention to designing and posting your content material.
On this tutorial, you’ll learn to:
- Arrange a brand new Django undertaking
- Create and edit weblog posts
- Show posts to the consumer
- Assign classes to posts
- Enable customers to touch upon posts
Alongside the best way, you’ll leverage the Django admin web site and discover methods to work with types in Django. This is a perfect undertaking to dip your toes into the world of Django, however it is best to have a strong basis in Python fundamentals.
On the finish of this tutorial, you’ll be capable of share your data via a working weblog that you simply’ve constructed from scratch. For those who’re interested by how the ultimate supply code appears to be like, then you possibly can click on the hyperlink beneath:
Set Up the Growth Atmosphere
Everytime you’re beginning a brand new internet improvement undertaking, it’s a good suggestion to first arrange your improvement setting. Create a brand new listing in your undertaking to dwell in, and cd into it:
When you’re contained in the django-blog/ listing, it’s a good suggestion to create a digital setting to handle dependencies. Choose your working system beneath and use your platform-specific command to arrange a digital setting:
This command will create a venv/ folder in your working listing. Inside this listing, you’ll discover a number of recordsdata, together with a duplicate of the Python commonplace library. Later, if you set up new dependencies, this listing will retailer them too. Subsequent, you might want to activate the digital setting by operating the next command:
With the above instructions, you create and activate a digital setting named venv by utilizing Python’s built-in venv module. The parenthetical (venv) in entrance of the immediate signifies that you simply’ve efficiently activated the digital setting.
Now that you simply’ve created and activated a digital setting, it’s time to put in Django. You are able to do this utilizing pip:
When you’ve arrange the digital setting and put in Django, now you can dive into creating your Django undertaking.
Begin Your Django Venture
A Django internet software is made up of a undertaking and apps. A Django undertaking holds some configurations that apply to the net software as a complete, akin to undertaking settings, URLs, shared templates, and static recordsdata. Every Django app can have its personal URLs in addition to its personal HTML templates and static recordsdata, akin to JavaScript and CSS.
To create your Django undertaking, be sure to’re within the django-blog/ listing along with your digital setting activated. Then, run the next command to create the personal_blog undertaking:
Don’t overlook so as to add the dot (.) on the finish of the command above. The dot prevents Django from making a nested undertaking listing in your portfolio undertaking. In any other case you’d find yourself with a personal_blog/ folder that incorporates a personal_blog/ subdirectory.
By operating the startproject command as proven above, you’ve informed Django to create one personal_blog/ folder within the django-blog/ listing. Your listing construction ought to look one thing like this:
django-blog/
│
├── personal_blog/
│   ├── __init__.py
│   ├── settings.py
│   ├── urls.py
│   └── wsgi.py
│
├── venv/
│
└── handle.py
As soon as your file construction is ready up, now you can begin the Django improvement server and test that your setup was profitable. Within the console, run the next command:
Then, in your browser, go to http://localhost:8000, and it is best to see the next:
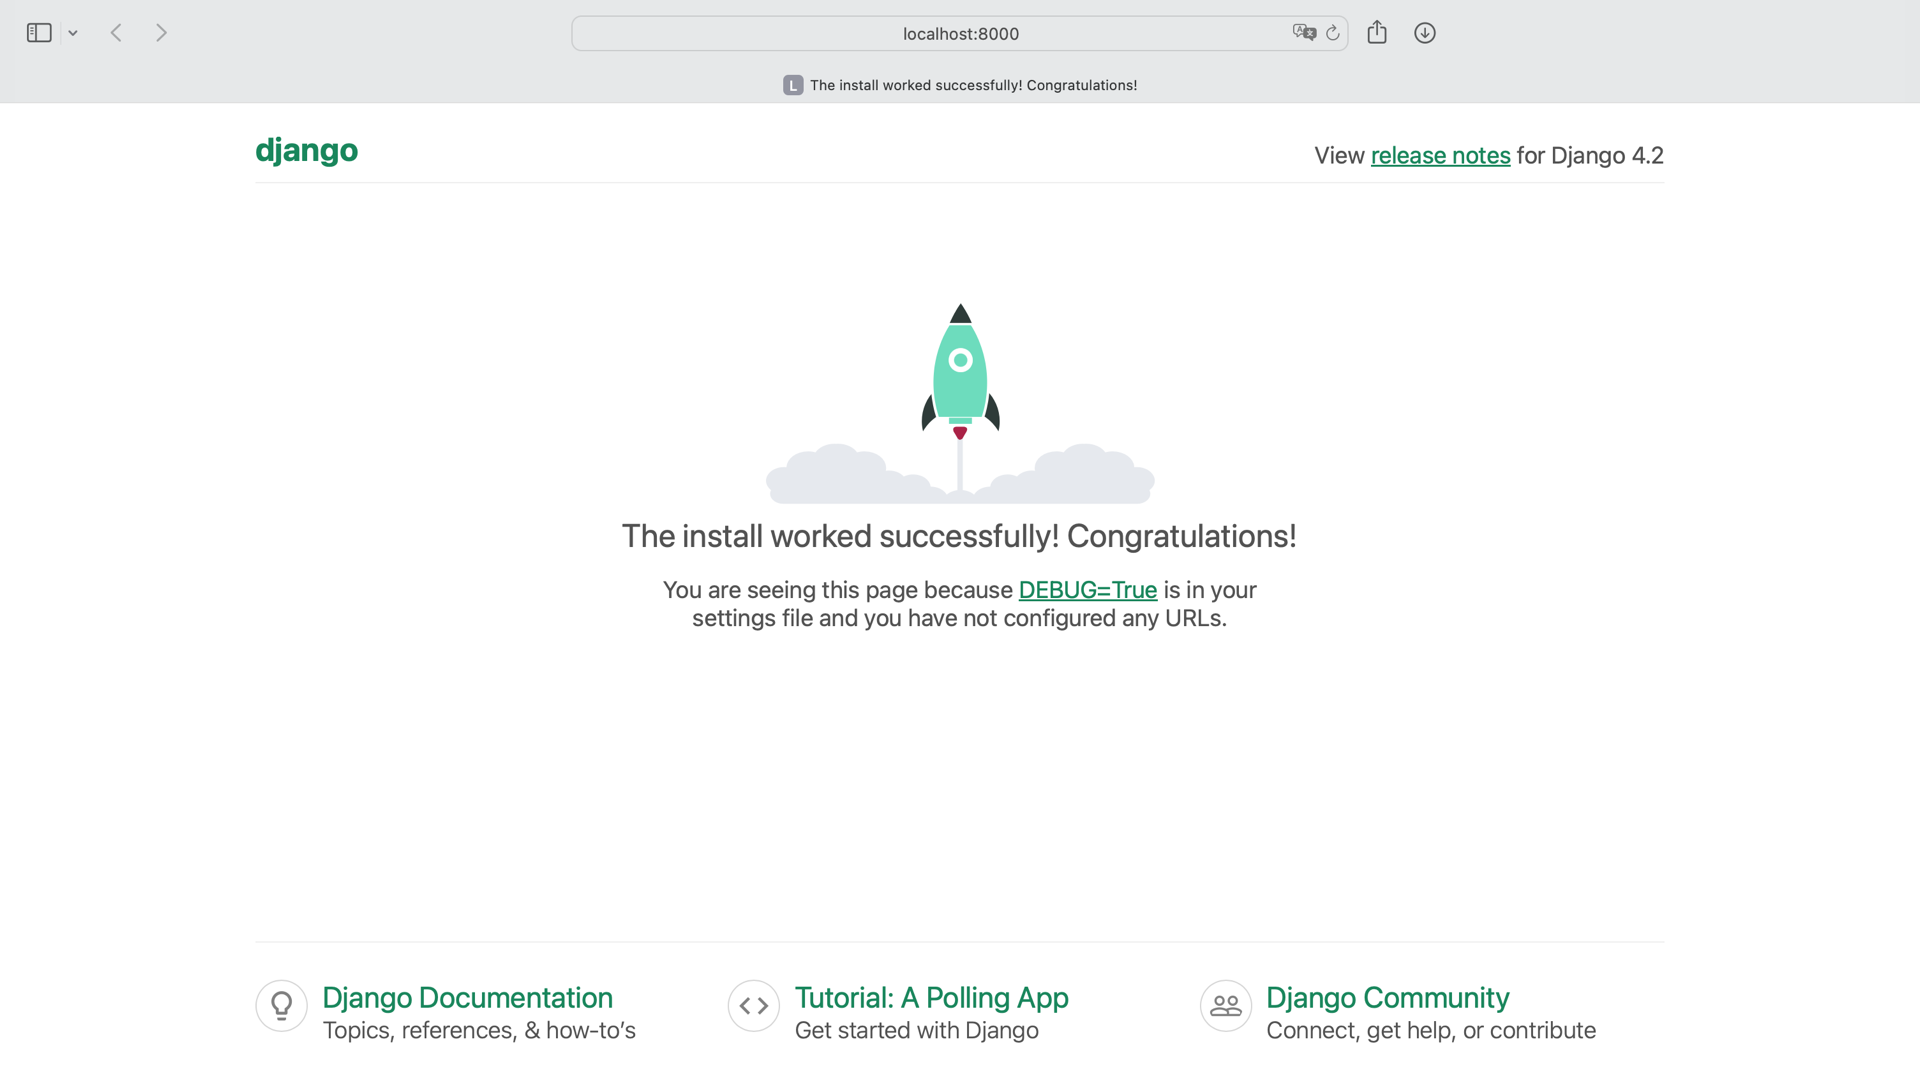
Congratulations, you’ve created a Django web site! The following step is to create the weblog app so to add views and performance to your web site.
Add the Weblog App That You’ll Construct From Scratch
Earlier than you get into constructing out the performance of this a part of your web site, create a brand new Django app named weblog:
When you’ve created the app, you might want to set up it in your undertaking. In django-blog/personal_blog/settings.py, add the next line of code beneath INSTALLED_APPS:
To incorporate an app in a Django undertaking, you might want to add a reference to its configuration class in the beginning of the INSTALLED_APPS record in settings.py.
By including weblog.apps.BlogConfig, you let Django know that the weblog app you simply created exists. You’re one huge step nearer to efficiently constructing a weblog from scratch! The following step is to create the fashions to outline the logic on methods to retailer your weblog content material in a database.
Outline Fashions to Characterize Database Tables
If you wish to retailer knowledge to show on a web site, you then’ll want a database. Sometimes, if you wish to create a database with tables and columns inside these tables, you then’ll want to make use of SQL to handle the database. However if you use Django, you don’t must study a brand new language as a result of it has a built-in object relational mapper (ORM).
An ORM is a program that permits you to create courses that correspond to database tables. Class attributes correspond to columns, and cases of the courses correspond to rows within the database. So, as a substitute of studying a complete new language to create your database and its tables, you possibly can simply write some Python courses.
While you’re utilizing an ORM, fashions are the courses you construct that signify database tables. In Django, these dwell within the fashions.py module of every Django app.
You’re going to want three separate fashions for the weblog:
PublishClassRemark
Begin with the code for the Class and Publish fashions within the fashions.py file of your weblog app:
The Class mannequin could be very primary. All that it wants is a single CharField during which you retailer the title of a class in your weblog posts. To maintain your class names quick, you set a most size of thirty characters.
The title and physique fields on the Publish mannequin additionally comprise textual content. You want a CharField for the title to retailer a brief string for the publish title. The physique of a publish must be a long-form piece of textual content, so you employ a TextField.
The following two fields, created_on and last_modified, are Django DateTimeFields. These retailer a datetime object containing the date and time when the publish was created and modified, respectively.
For created_on, the DateTimeField takes the argument auto_now_add=True. This assigns the present date and time to this subject everytime you create an occasion of this class.
For last_modified, the DateTimeField takes the argument auto_now=True. This assigns the present date and time to this subject every time an occasion of this class is saved. Meaning everytime you edit an occasion of this class, date_modified is up to date.
The ultimate subject on the Publish mannequin creates a relationship between a publish and classes. Right here you hyperlink your fashions for classes and posts in such a manner that you could assign many classes to many posts. Django offers a ManytoManyField subject sort for this sort of relationship.
The ManyToManyField takes two arguments. The primary is the mannequin that it applies to—on this case, Class. The second permits you to entry the connection from a Class object, despite the fact that you haven’t added a subject there. By including a related_name of posts, you possibly can entry class.posts to get an inventory of posts with that class. You’ll see how this works later within the tutorial.
The third and last mannequin that you might want to add is known as Remark:
The primary three fields on this mannequin ought to look acquainted. There’s an writer subject for customers so as to add a reputation or alias, a physique subject for the physique of the remark, and a created_on subject that’s equivalent to the created_on subject on the Publish mannequin.
On line 9, you employ one other relational subject, the ForeignKey subject. That is just like the ManyToManyField however as a substitute defines a many-to-one relationship. The reasoning behind that is that many feedback could be assigned to one publish. However you possibly can’t have a remark that corresponds to many posts.
The ForeignKey subject takes two arguments. The primary is the opposite mannequin within the relationship—on this case, Publish. The second tells Django what to do when a publish is deleted. If a publish is deleted, you then don’t need the feedback associated to it hanging round. As an alternative, you delete the feedback as nicely. That’s what on_delete=fashions.CASCADE is for.
Now that you simply’ve created your Venture class, you want Django to create the database. By default, the Django ORM creates databases in SQLite, however you should use different databases that use the SQL language, akin to PostgreSQL or MySQL, with the Django ORM.
To start out the method of making a database, you might want to create a migration. A migration is a file containing a Migration class with guidelines that inform Django what modifications it must make to the database.
To create the migration, sort the next command within the console, ensuring that you simply’re within the django-blog/ listing:
It’s best to see that weblog/ now incorporates migrations/, together with a file named 0001_initial.py. This file incorporates the directions that Django ought to carry out on the database.
Now that you simply’ve created a migration file, you might want to apply the migrations set out in that file and create your database utilizing the migrate command:
Now that you simply’ve created the fashions, you can begin so as to add some posts and classes to your weblog. To take action, you’ll learn to use the Django admin web site, which is able to assist you to create cases of your mannequin courses in a pleasant internet interface.
Leverage the Django Admin Web site
The Django admin web site is a unbelievable instrument and one of many nice advantages of utilizing Django. The Django admin web site permits you because the weblog administrator to create, replace, and delete cases of your mannequin courses from the consolation of a pleasant internet interface.
To entry the Django admin web site, you might want to add your self as a superuser. Django comes with built-in consumer fashions and a consumer administration system that may assist you to log in to the admin.
Earlier than you possibly can create a superuser, you might want to apply some present migrations that Django has already ready for you:
Wanting on the record of utilized migrations provides you an impression of the options that Django already comes full of. For instance, Django offers consumer authorization and the admin web site.
After making use of all of the migrations, you possibly can add your self as superuser utilizing the next command:
While you run the createsuperuser administration command, Django prompts you to decide on a username, present an e-mail deal with, and set a password. Use your personal knowledge for these fields and ensure to recollect them.
Navigate to http://localhost:8000/admin and log in with the credentials that you simply simply used to create a superuser. You’ll see a web page just like the one beneath:
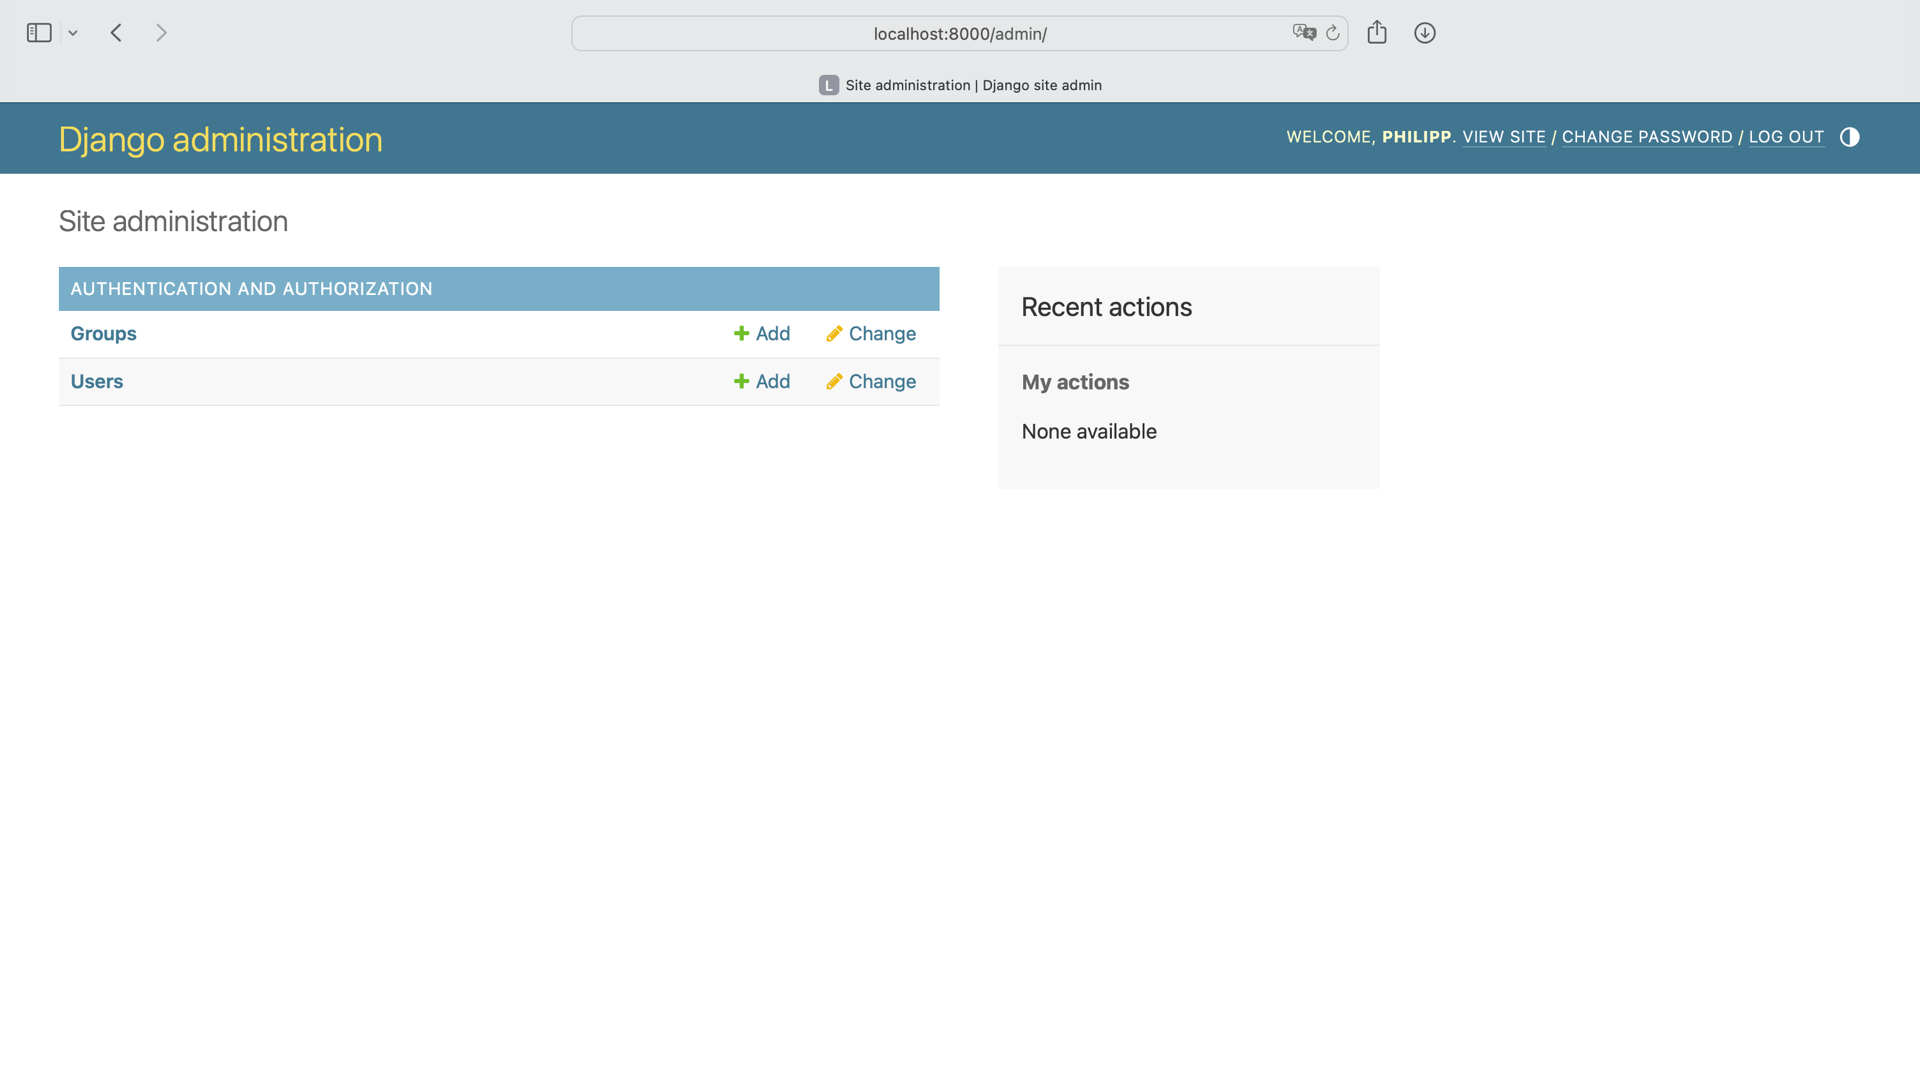
The Person and Teams fashions ought to seem, however you’ll discover that there’s no reference to the Class, Publish, or Remark fashions that you simply’ve created your self. That’s as a result of you might want to register your fashions contained in the Django admin web site first.
Within the weblog listing, open the admin.py file and add the next traces of code:
On line 4, you import the fashions that you simply need to register on the admin web page.
From line 6 to line 13, you outline empty CategoryAdmin, PostAdmin, and CommentAdmin courses. For the needs of this tutorial, you don’t want so as to add any attributes or strategies to those courses. Their function is to customise what the admin pages present. For this tutorial, the default configuration is sufficient.
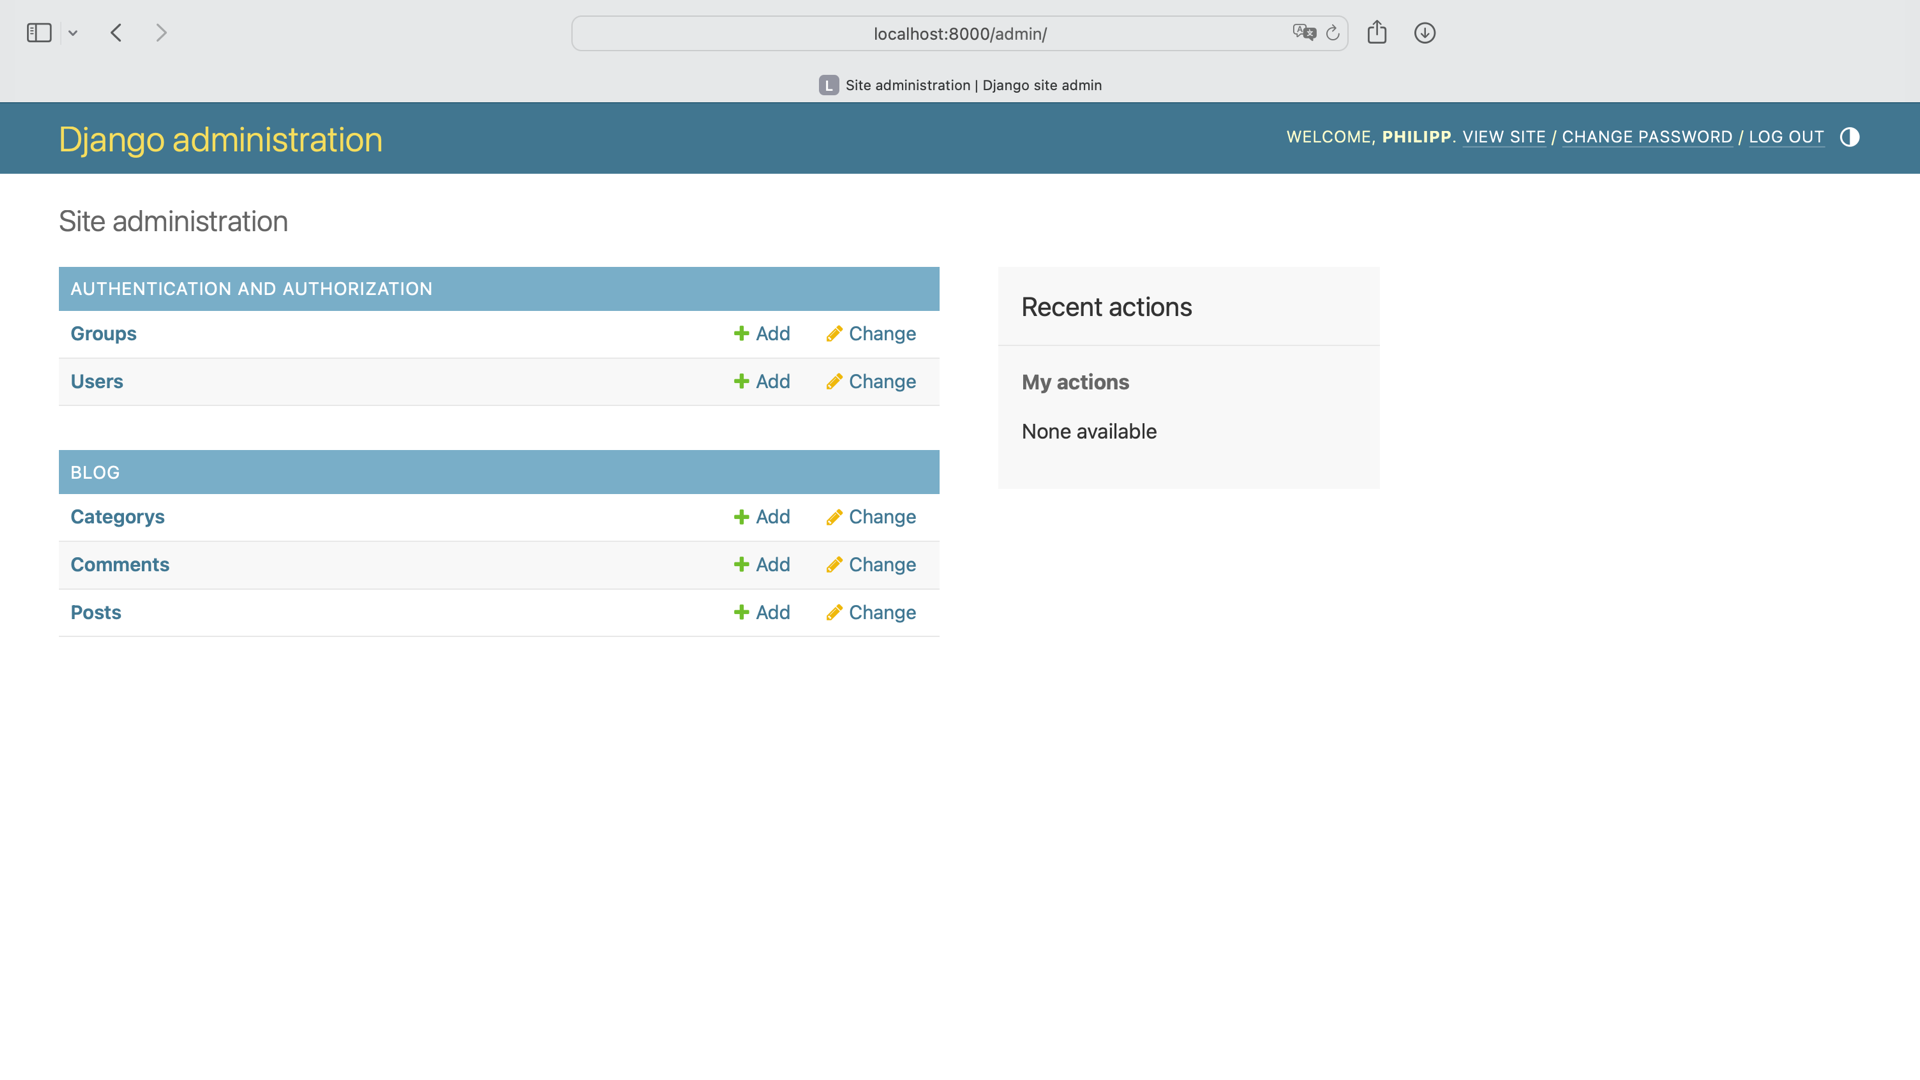
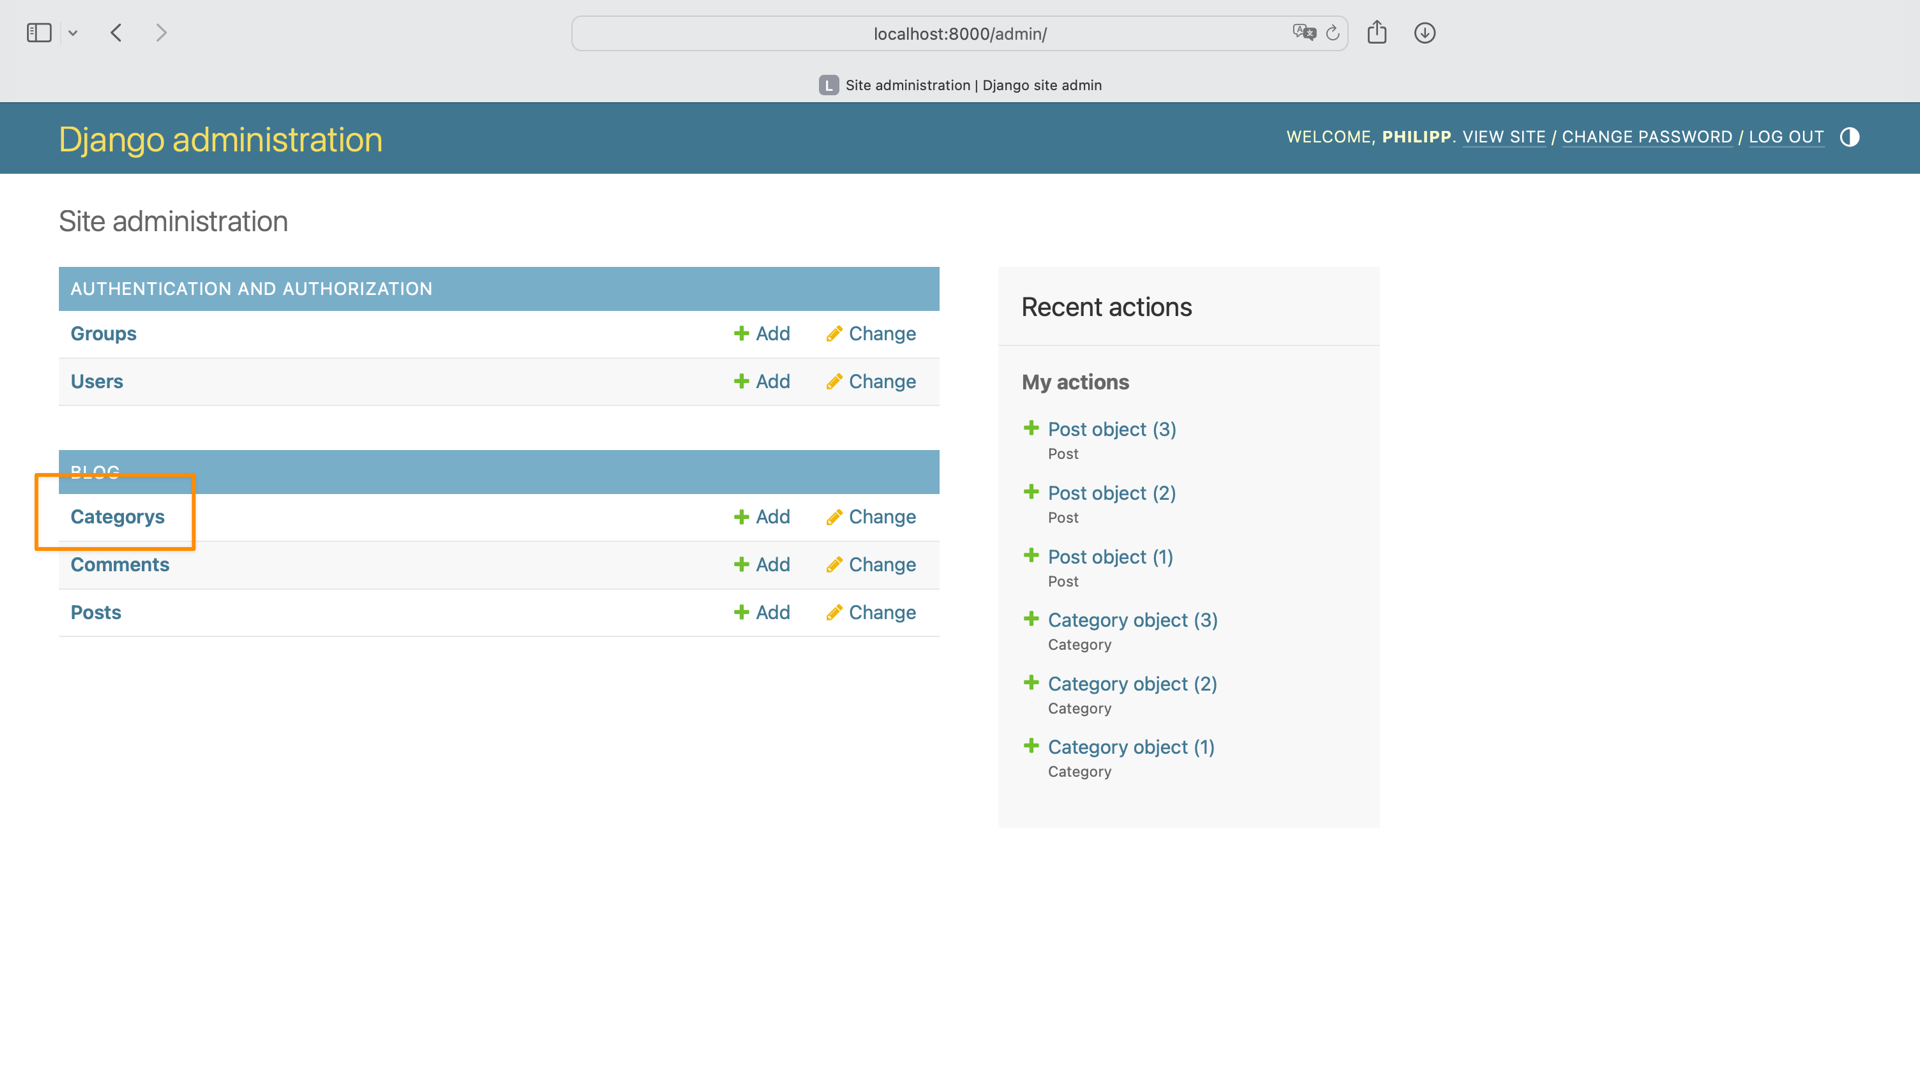
Within the final three traces, you register the fashions with the admin courses. For those who go to http://localhost:8000/admin, then it is best to see that the Publish and Class fashions at the moment are seen:
For those who click on into Posts, then you possibly can add new posts for the weblog that you simply’re constructing from scratch. For those who don’t need to give you titles and textual content proper now, you possibly can create placeholder posts by utilizing some lorem ipsum dummy textual content:
Create a few faux posts and assign them faux classes earlier than transferring on to the subsequent part. That manner, you’ll have posts and classes that you could work with within the subsequent part.
Management the Mannequin Illustration
Presently, there are two shortcomings within the Django admin web site that you simply’ll deal with on this part. Each relate to the illustration of your fashions. Jump over to http://localhost:8000/admin and see if you will discover them. Moreover, you possibly can click on the collapsible beneath:
The primary shortcoming is the hyperlink to your Class mannequin. In the meanwhile, the textual content says “Categorys” as a substitute of the proper “Classes”:
The opposite shortcoming is that the weblog posts and classes present their object illustration as a substitute of their titles:
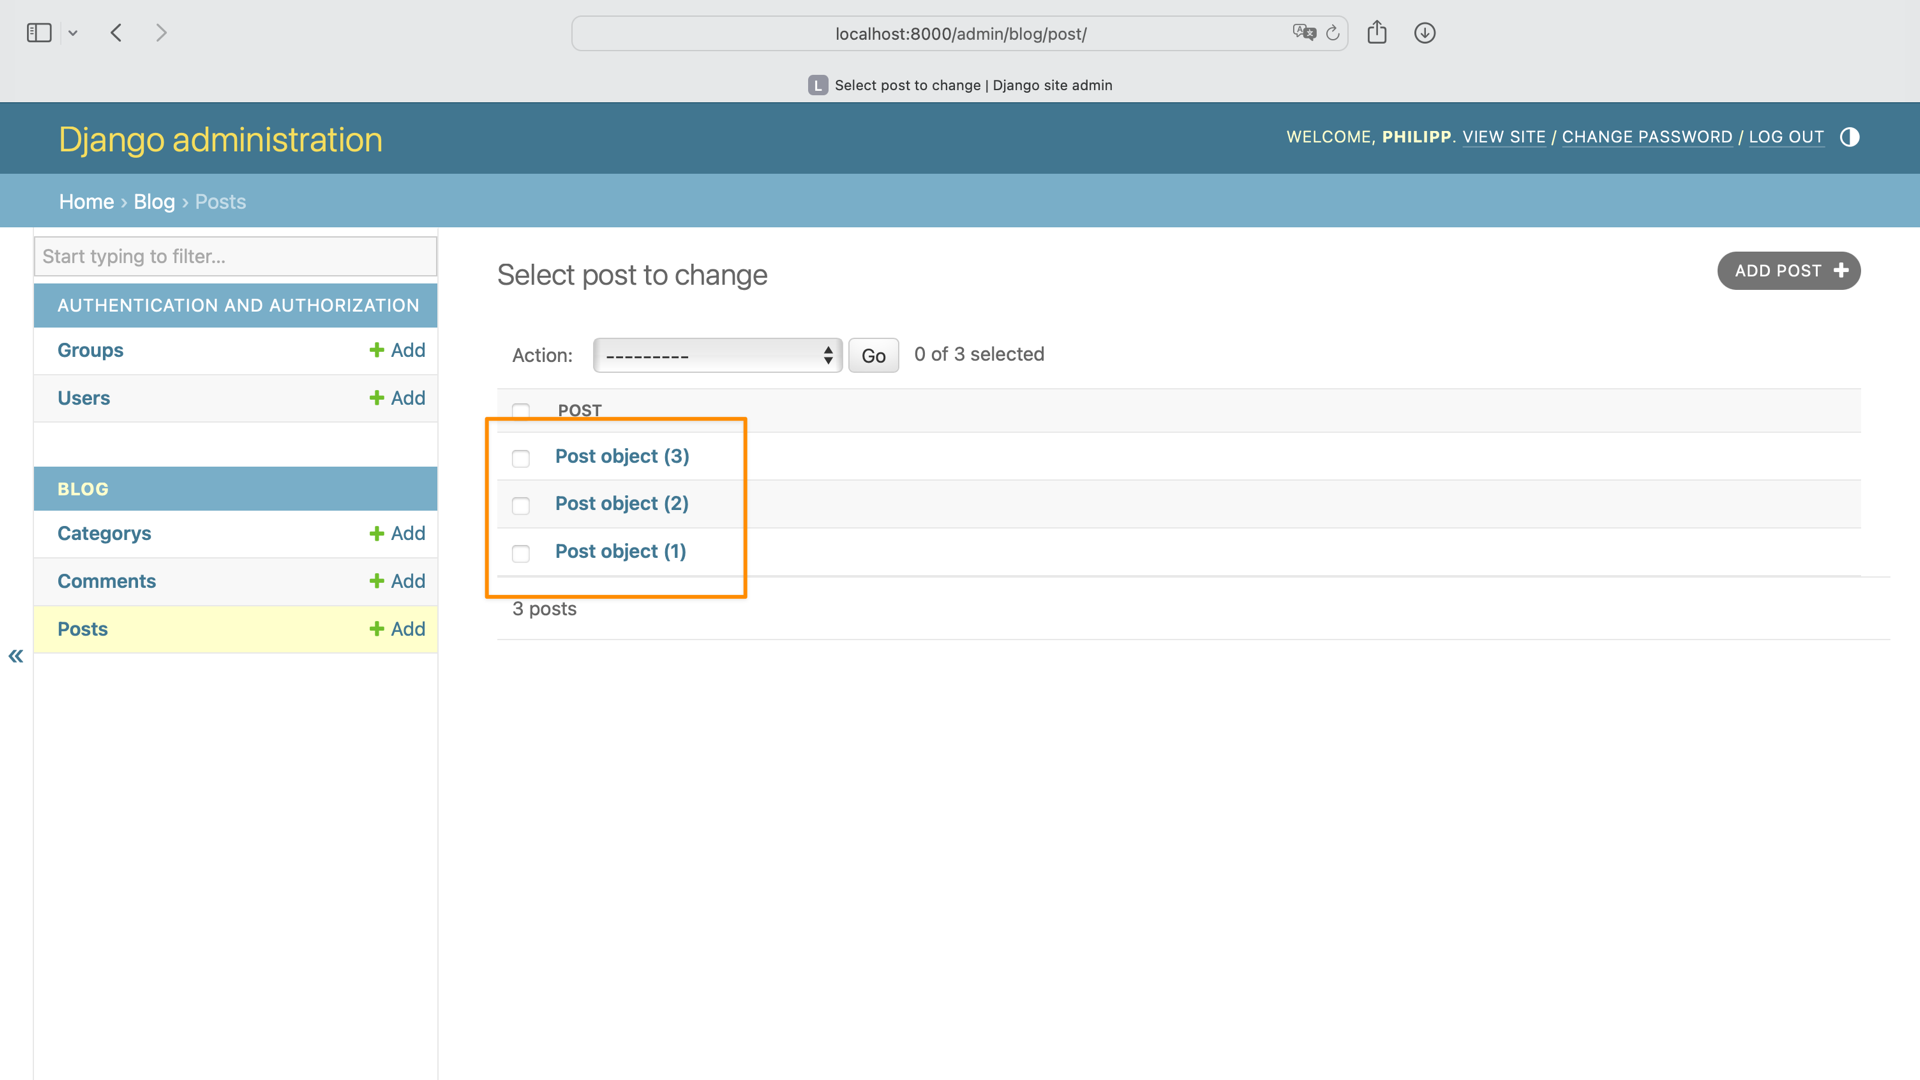
A mannequin illustration like this makes it onerous to inform which publish or class you might want to click on if you need to make some edits.
To enhance the illustration of your fashions, open fashions.py and add the highlighted code beneath:
Identical to with frequent Python courses, you possibly can add a .__str()__ methodology to mannequin courses to offer a greater string illustration of your objects. For classes, you need to show the title. For posts, you need the title. For feedback, present the title of the commenter and the publish that they’re commenting on.
To repair the wrong plural type of your Class class, you add a Meta class to regulate the plural title of the category. By default, Django simply provides a lowercase s on the finish of a mannequin title. For the plural of publish, this works completely. For classes, you might want to explicitly outline verbose_name_plural with the proper spelling.
To confirm that your modifications work, go to http://localhost:8000/admin once more:
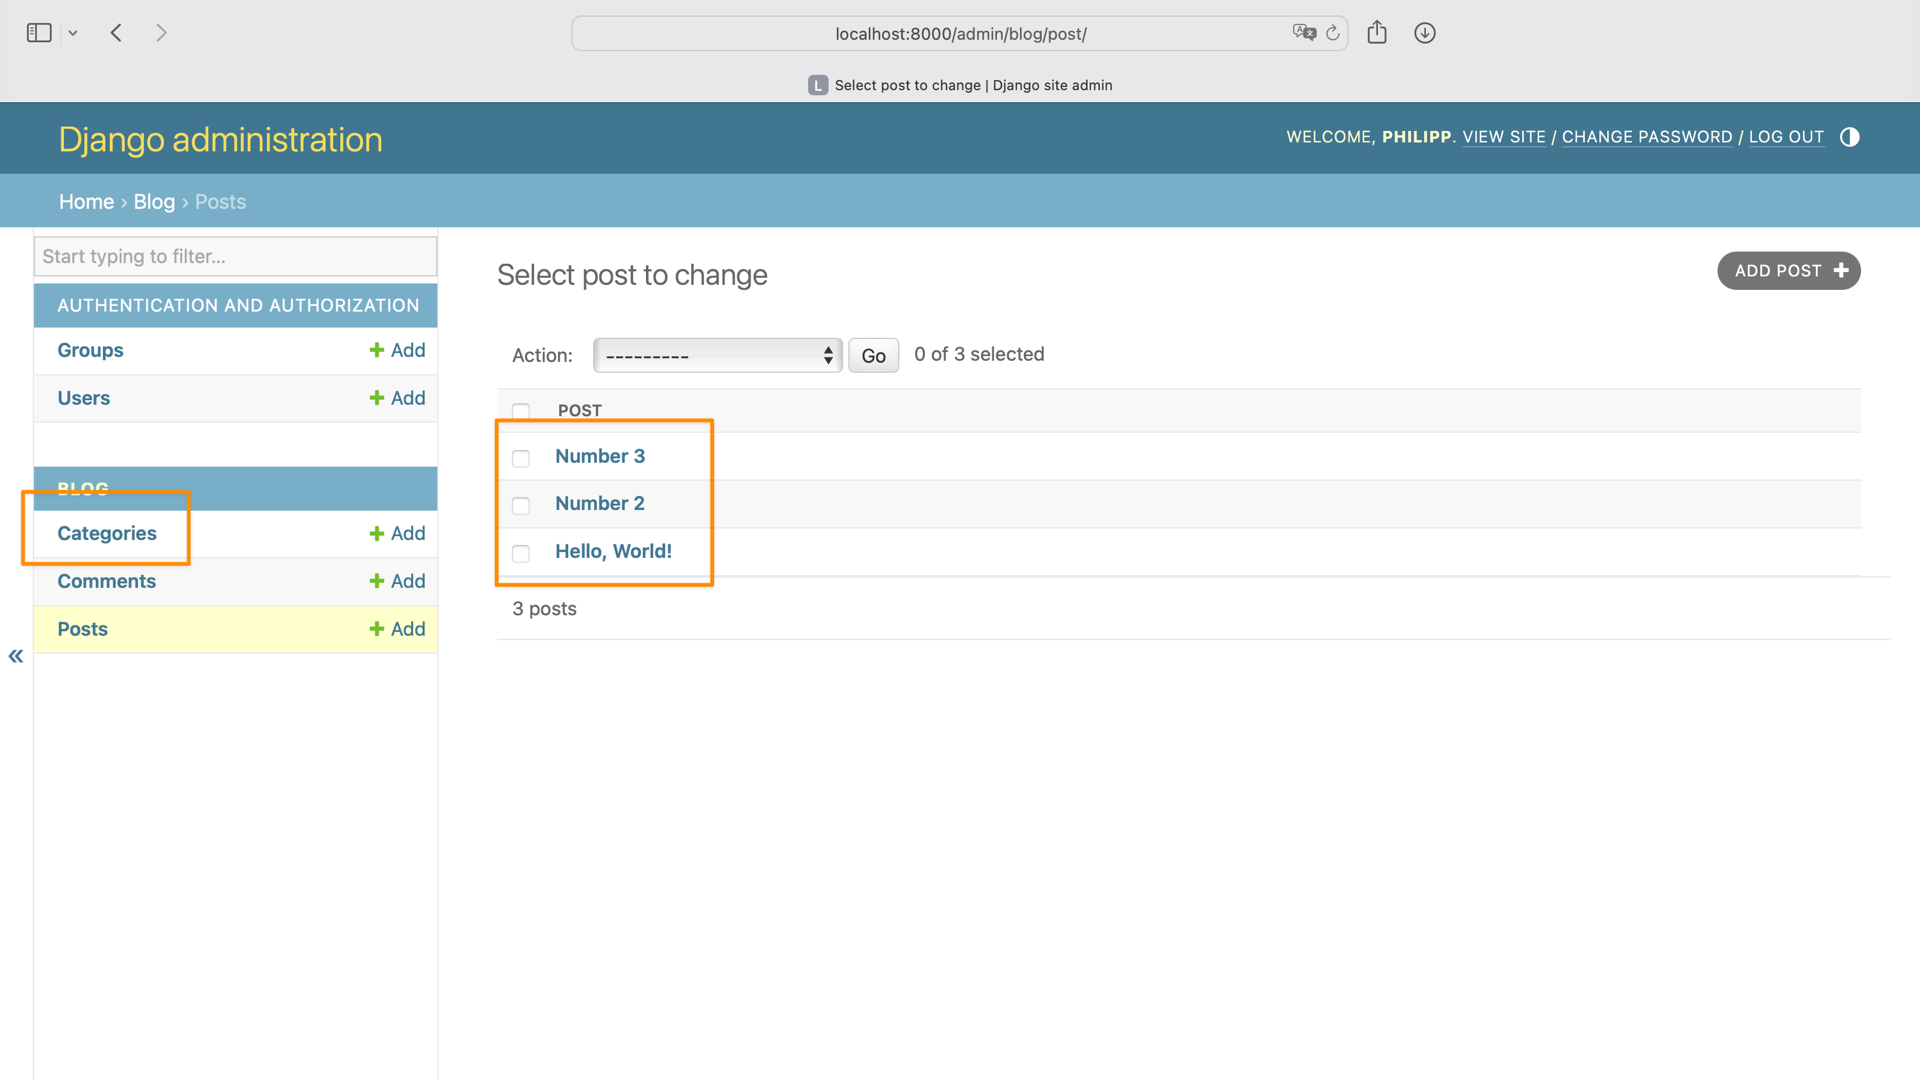
Properly executed! You fastened each shortcomings, and the fashions are represented in a human readably manner. Subsequent, you’ll transfer from the admin space to the user-facing a part of your weblog.
Deal with Logic With Views
A view in Django is a group of capabilities or courses contained in the views.py file in an app’s listing. Every perform or class handles the logic that will get processed every time your consumer visits a distinct URL.
You’ll must create three view capabilities in your weblog within the views.py file within the weblog/ listing:
blog_index()will show an inventory of all of your posts.blog_detail()will show the complete publish. Later, this view will even present present feedback and a type to permit customers to create new feedback.blog_category()can be just likeblog_index, however the posts proven will solely be of a selected class that the consumer chooses.
Begin by including the mandatory imports and the blog_index() perform to views.py:
On line 4, you import the Publish and the Remark fashions. On line 7, contained in the view perform, you acquire a Queryset containing all of the posts within the database. A Queryset is a group of all of the objects within the database that match the question.
Including the .order_by() methodology to the Queryset arranges the objects in response to the argument given. The minus signal (-) tells Django to begin with the biggest worth quite than the smallest. That manner, you get the just lately created posts first.
Lastly, you outline a context dictionary and render a template named index.html. Don’t fear about Django templates but. You’ll get to creating these within the upcoming part.
Subsequent, you possibly can create the blog_category() view. This view perform might want to take a class title as an argument and question the Publish database for all of the posts within the given class:
On line 6, you employ a Django Queryset filter. The argument of the filter tells Django what circumstances must be true to retrieve an object. On this case, you solely need posts whose classes comprise the class with the title comparable to what’s given within the argument of the view perform. Once more, you’re utilizing .order_by() in line 8 to order posts beginning with the newest.
You then add these posts and the class to the context dictionary and render a class.html template.
The final view perform so as to add is blog_detail():
The blog_detail() view perform takes a main key worth, pk, as an argument and, on line 6, retrieves the thing with the given pk. The first key’s the distinctive identifier of a database entry. Meaning you’re requesting a single publish with the particular main key that you simply present.
On line 7, you retrieve all of the feedback assigned to the given publish by utilizing Django filters once more. For those who haven’t created any feedback within the Django admin web site, then the QuerySet is empty. That’s high quality for now.
Lastly, you add each publish and feedback to the context dictionary and render a element.html template. Identical to the opposite templates that you simply reference in your views, this template doesn’t exist but. Within the subsequent part, you’ll create the lacking templates.
Construct the Templates
Templates are HTML recordsdata with the potential of rendering dynamic content material despatched over out of your Django views. There are fashionable template engines like Jinja. However should you’re not planning on doing something fancy in your templates, then you should use Django’s built-in template language.
The render() perform of your views appears to be like for HTML templates in a listing named templates/ inside your app listing. Since templates of various apps can have the identical names, it’s additionally greatest observe so as to add a subdirectory with the app’s title contained in the templates/ listing.
Create the template/ listing, in addition to a subdirectory named weblog/, after which the template recordsdata inside it:
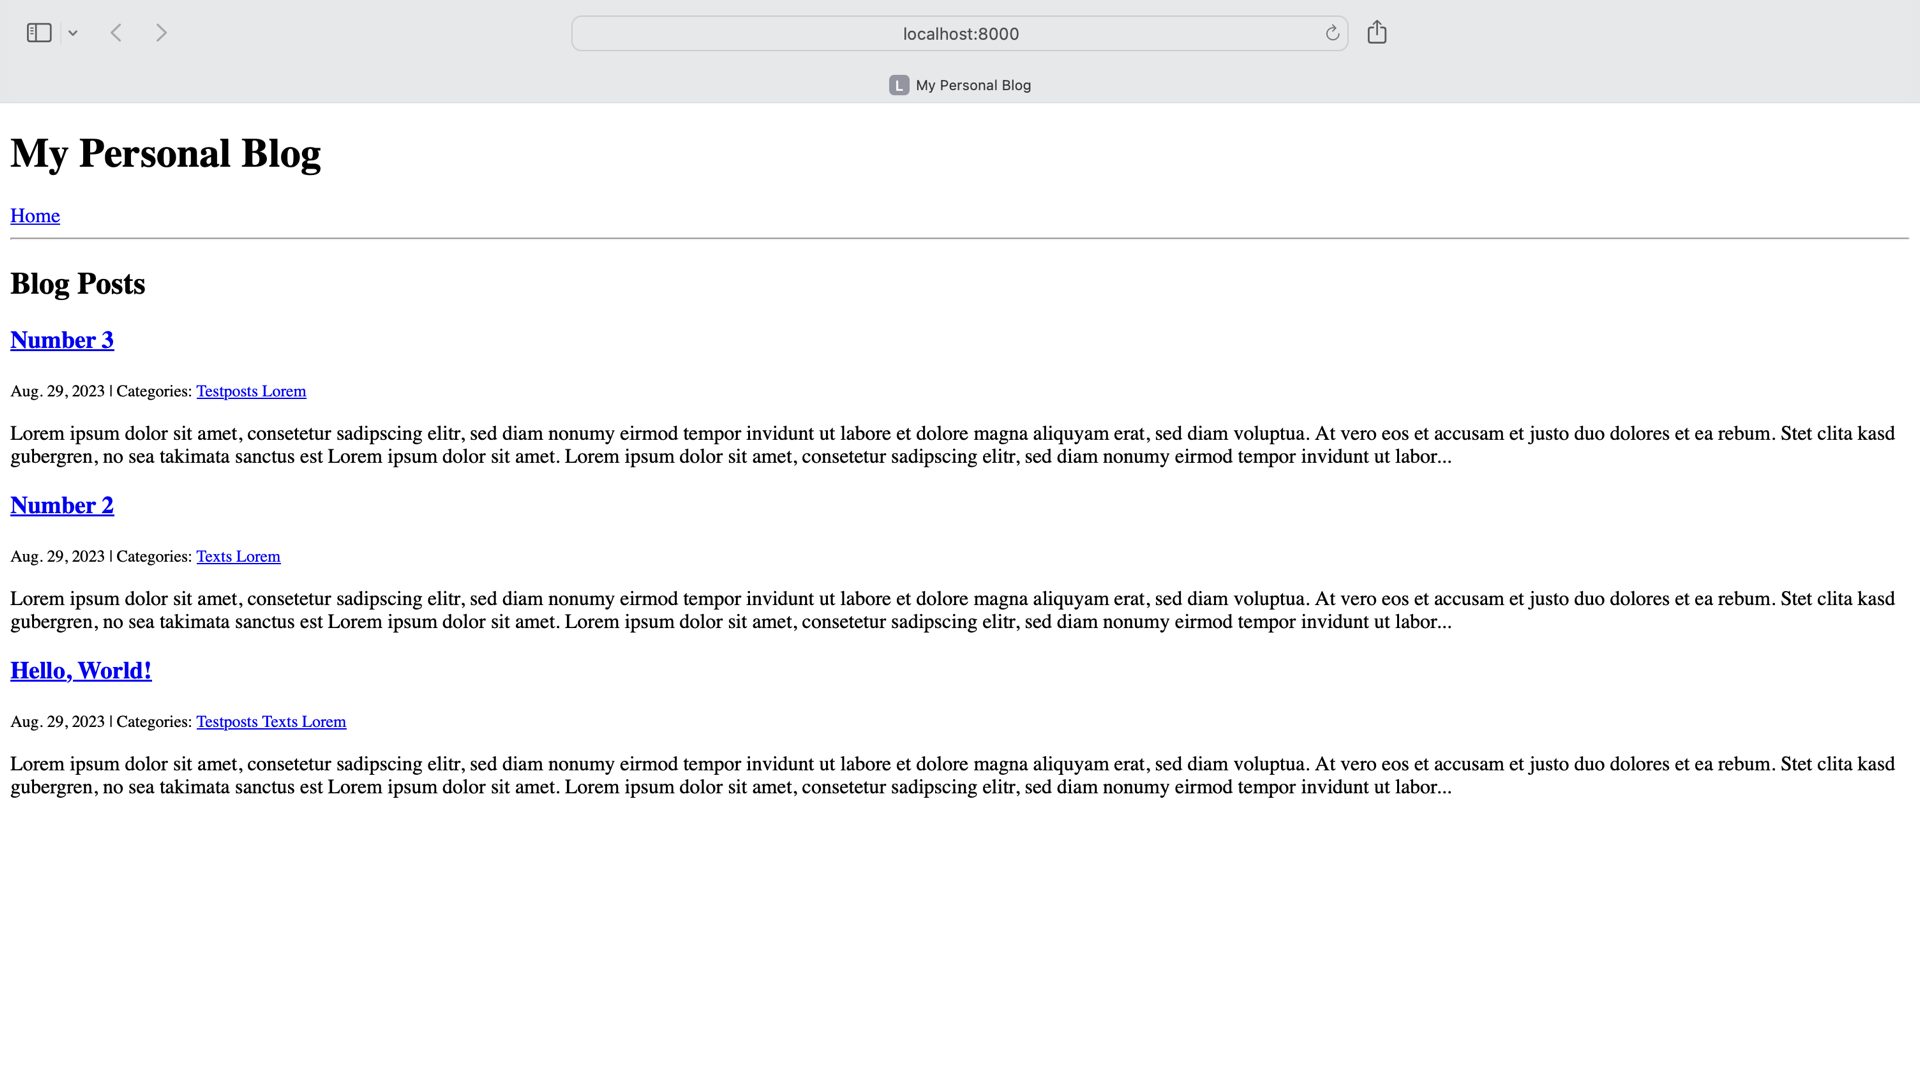
The primary template that you simply’ll work on is index.html. You’ll use a for loop to loop over all of the posts. For every publish, you’ll show the title and a snippet of the physique:
Chances are you’ll discover that the template wouldn’t render as a a sound HTML web page. For this, required HTML components like <html> and <head> are lacking. You’ll care for this later. For now, give attention to how you’re employed with the context dictionary in a Django template.
On line 9, you’re looping via the posts values. Meaning you possibly can entry keys of context in a Django template straight, as this dictionary is already unpacked for you.
Contained in the for loop, you possibly can then entry the attributes of publish, like .title on line 10. You wrap a publish’s title in a hyperlink that factors to the URL named blog_detail, which takes an integer as its argument. This integer is the distinctive main key worth, pk, of the publish.
Beneath the title, you show the .created_on attribute of the publish in addition to its classes. On line 13, you employ one other for loop to loop over all of the classes assigned to the publish.
On line 19, you employ the template filter slice to chop off the publish physique at 4 hundred characters in order that the weblog index is extra readable. To study extra about template filters, take a look at the tutorial about built-in tags and filters.
One other fascinating bit within the index.html template is the usage of {% block %} template tags. With this template tag, you possibly can outline content material blocks that you should use or override in little one templates that stretch the mum or dad template.
A baby template of index.html is class.html. This template ought to look nearly the identical. Any posts that the template receives from the view ought to be listed. Meaning the one distinction in class.html is the headline:
To increase a mum or dad template, you will need to use the {% extends %} tag in the beginning of a kid template. Contained in the {% extends %} tag, you then outline the template that you simply need to prolong.
When you’ve referenced the mum or dad template, you possibly can resolve which blocks you need to inherit or override. For those who don’t reference a block in a baby template, you then inherit the mum or dad’s block as it’s. Alternatively, you possibly can reference a mum or dad’s block with new content material.
Right here, you solely override the title block, however not the posts block of index.html. Because you don’t reference the posts block of the mum or dad template, you inherit the content material from index.html for this block. That’s precisely what you need to show all of the posts that the blog_category() view offers.
The final template is element.html template. On this template, you’ll show the title and full physique of a publish.
Between the title and the physique of the publish, you’ll show the date the publish was created and any classes:
The primary few traces of the template—during which you show the publish title, date, and classes—is identical logic as for the earlier templates. This time, when rendering the publish physique, you employ a linebreaks template filter. This tag registers two consecutive line breaks as new paragraphs, so the physique doesn’t seem as one lengthy block of textual content.
Notice: You’re not working with the feedback on this template but. You’ll introduce them later within the template. However for now, it’s good to know that you simply don’t want to make use of gadgets in a template simply since you’ve added them to the context dictionary.
Along with your templates in place, there’s just one puzzle piece lacking to truly be capable of view the weblog that you simply’re constructing from scratch: routes. Within the subsequent part, you’ll create the routes in your views to have the ability to go to your weblog within the browser.
Embody Routes for URLs
To truly see your weblog up and operating, you might want to hook up the routes for them in your Django undertaking. Typically talking, a route is the URL that you simply’ll enter in your browser’s deal with bar.
In Django, you create routes with patterns. As an alternative of manually making a URL for each weblog publish, you possibly can create a rule to entry any present weblog publish.
To take action, you’ll must create an urls.py file inside weblog/ and add the URLs for the three views:
As soon as the blog-specific URLs are in place, you might want to add them to the undertaking’s URL configuration in personal_blog/urls.py utilizing embrace():
With this arrange you’ll have the next route logic:
| Route sample | Instance URL | Description |
|---|---|---|
"" |
http://localhost:8000/ |
Weblog index |
"publish/<int:pk>/" |
http://localhost:8000/publish/1 |
Weblog element view of a publish with pk=1 |
"class/<class>/" |
http://localhost:8000/class/python |
Weblog index view of all posts with class python |
Go forward and go to http://localhost:8000/. Then, click on round and see the completely different URLs within the deal with bar and the templates that you simply load:
Up to now, the weblog appears to be like quite primary. Within the subsequent part, you’ll improve the appear and feel of your weblog by including some fashion to your weblog.
Make Your Weblog Look Good
Earlier than you get began with the styling your undertaking, you’ll create a base template that you simply’ll prolong in your little one templates from earlier than. That manner, you possibly can construction your HTML templates in a single place and let different templates inherit the content material.
Begin by making a listing named templates/ within the django-blog/ folder and a file named base.html inside the brand new listing:
As you noticed beforehand, every Django undertaking can encompass a number of apps that deal with separate logic, and every app incorporates its personal templates/ listing to retailer HTML templates associated to the applying. For templates that the entire undertaking shares, it’s a good suggestion to create a templates/ listing within the root listing.
Inside base.html, add the next traces of code:
With the code above, you create the skeleton of a sound HTML doc. You additionally outline a My Private Weblog title and headline that any little one template will inherit.
As you discovered earlier than, you might want to add an {% extends %} tag in the beginning of a kid template. Open index.html and add the highlighted line beneath:
By including {% extends "base.html" %} to index.html, the template will inherit the construction of base.html.
Proceed with element.html and make it a baby template of base.html:
With template inheritance, you don’t should repeat markup in your templates. As an alternative, you prolong your little one templates. Django then robotically merges them collectively when serving them within the view.
Keep in mind that classes.html already extends index.html. Since templates go via their inheritance, you don’t want so as to add any further tags on this template.
Earlier than you possibly can see the bottom template in motion, you might want to inform your Django instance undertaking that base.html exists. The default settings register templates/ directories in every app, however not within the root listing itself. In personal_blog/settings.py, replace TEMPLATES:
You’ve already outlined the fixed BASE_DIR in settings.py, and it factors to your undertaking’s root listing. Subsequent, you be part of the trail with the ahead slash operator (/) from pathlib to level to the templates/ listing and add it to the "DIRS" record.
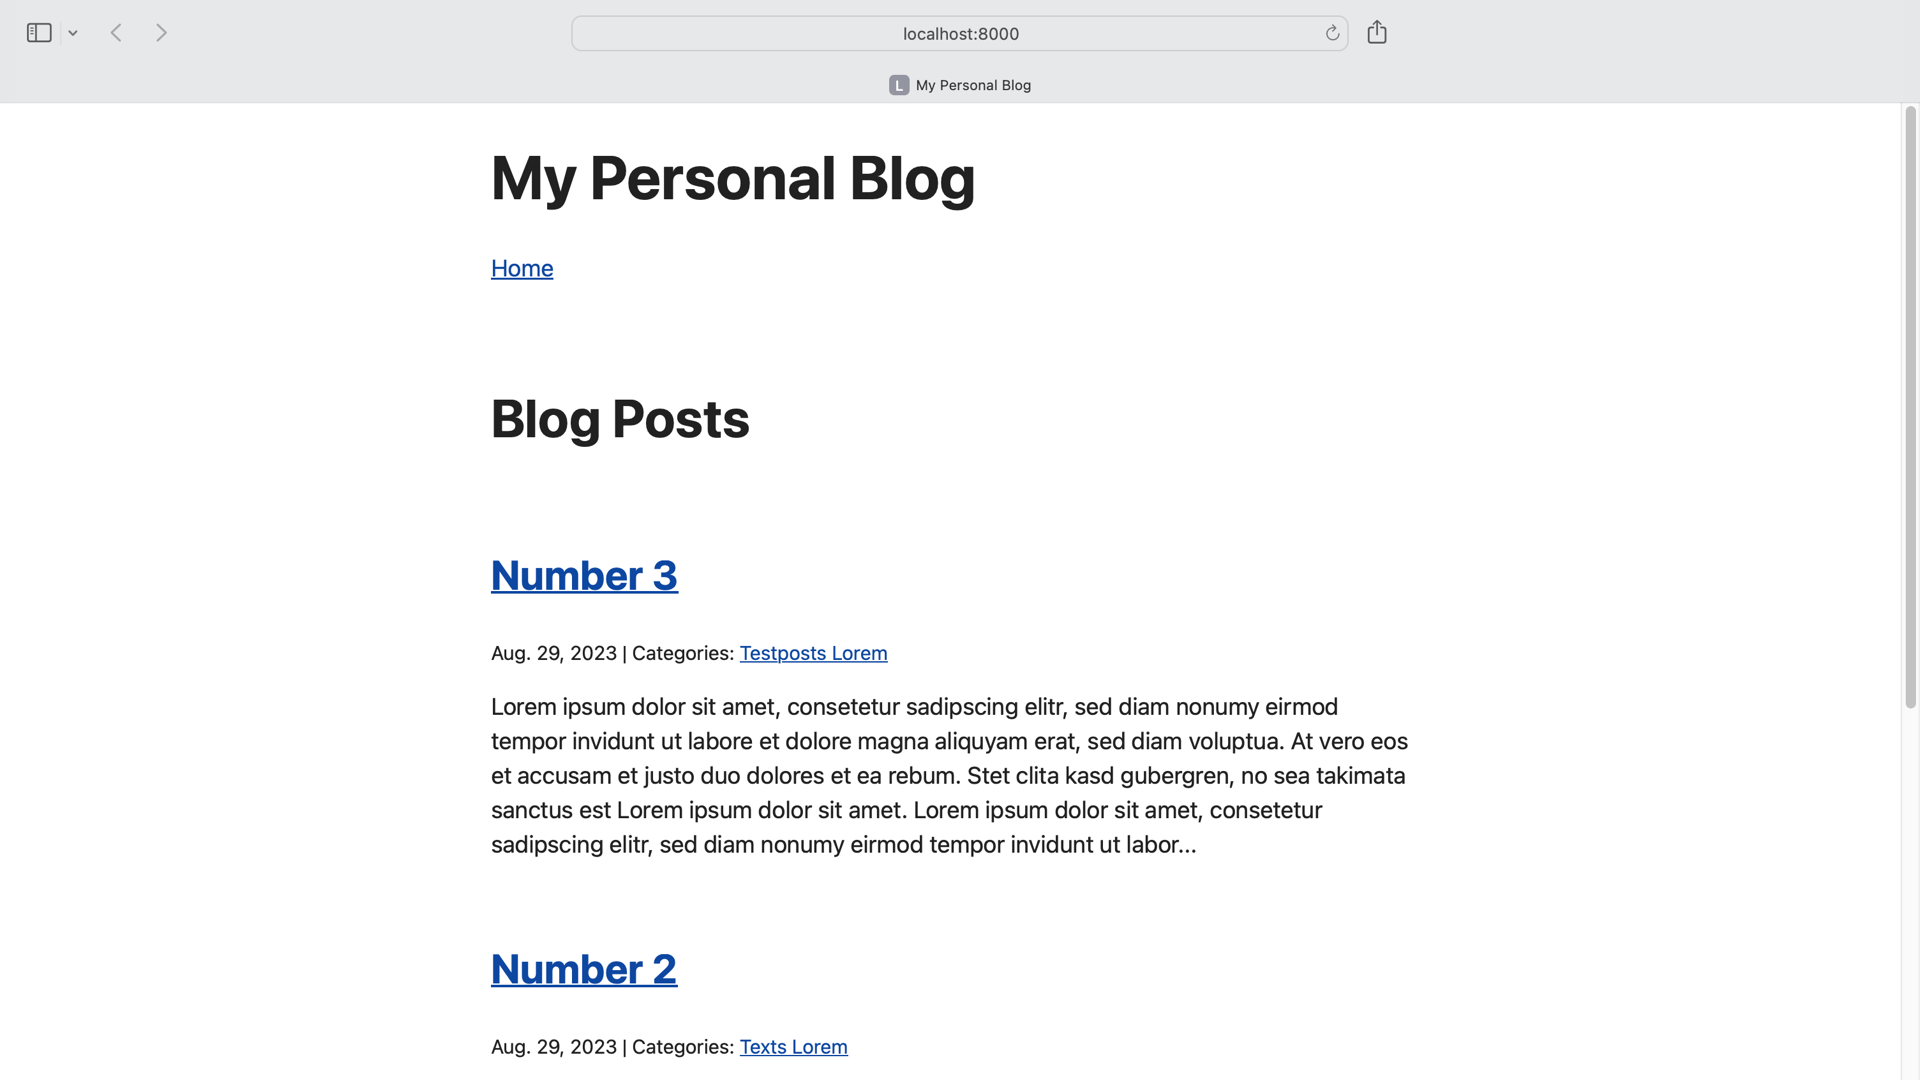
Jump over to your browser and go to http://localhost:8000/:
While you go to your weblog, the primary headline exhibits on each web page. That signifies that the inheritance works. However with none styling, your weblog nonetheless appears to be like very primary.
As an alternative of going into CSS styling with this tutorial, you’ll add an exterior CSS framework to your undertaking. Utilizing exterior CSS frameworks can prevent a number of work throughout internet improvement. That being stated, should you don’t know CSS, it’s price studying the fundamentals should you’re into internet improvement.
Open base.html once more and add a hyperlink to the Easy.css framework:
Just like the Python import approach, you possibly can import an exterior CSS library to your web site.
In line 8, you’re loading an exterior CSS file.
This exterior CSS file offers styling with out the necessity so that you can add any courses to your HTML components.
Open http://localhost:8000/ and go to a classes web page to confirm that your little one templates inherit the fashion:
Loading a stylesheet in your base template is all that you might want to add exterior CSS kinds to your undertaking. All templates prolong base.html and can inherit styling robotically.
Your weblog is nearly completed. The final function that you simply’ll implement is the flexibility so as to add feedback to your weblog posts.
To be able to make feedback work in your weblog, you might want to add a type to the publish web page. Earlier than you achieve this, you’ll must create a Django type. Django types are similar to fashions. A type consists of a category the place the category attributes are type fields. Django comes with some built-in type fields that you should use to shortly create the shape you want.
Create a brand new file named types.py within the weblog/ listing:
Inside types.py, add the CommentForm class with the 2 fields writer and physique:
For each writer and physique, you employ a CharField class. To manage how the shape component ought to be rendered on the web page, you go in a widget argument.
The writer subject has the types.TextInput widget. This tells Django to load this subject as an HTML textual content enter component within the templates. The physique subject makes use of a types.TextArea widget as a substitute, so the sector is rendered as an HTML textual content space component.
These widgets additionally take the argument attrs, which is a dictionary that permits you to specify some CSS courses. It will assist with formatting the template for this view later. It additionally permits you to add some placeholder textual content.
When you’ve created the Django type for feedback, take a look at how a type travels via requests:
- When a consumer visits a web page containing a type, they ship a
GETrequest to the server. On this case, there’s no knowledge entered within the type, so that you simply need to render the shape and show it. - When a consumer enters info and clicks the Submit button, they ship a
POSTrequest, containing the info submitted with the shape, to the server. At this level, the info goes for processing, and two issues can occur:- The shape is legitimate, and the consumer is redirected to the subsequent web page.
- The shape is invalid, and the empty type exhibits up as soon as once more. The consumer is again at step 1, and the method repeats.
The view perform that should resemble this habits is the blog_detail() view. Replace blog_detail() with the highlighted code beneath:
In line 3, you import HttpResponseRedirect, which helps you redirect the request in line 22. You’ll have a better take a look at line 22 in a second. First, comply with the request via the physique of blog_detail().
No matter your request sort, you’re taking CommentForm(), which you imported in line 6, and make an occasion of it in line 12. That manner, you make sure that there’s at all times an empty type current in your view.
Then in line 13, you test should you’ve obtained a POST request. In that case, you replace type with the info of the POST request in line 14. That’s the info that the consumer entered into the shape.
After that, you validate the shape utilizing .is_valid() in line 15 to test that the consumer has entered all of the fields appropriately.
Notice: If a type isn’t legitimate, you possibly can output the errors to the consumer. That is past the scope of this tutorial, however you possibly can learn extra about rendering type error messages within the Django documentation.
If the shape is legitimate, you then create a brand new occasion of Remark in traces 16 to twenty. You may entry the info from the shape utilizing type.cleaned_data, which is a dictionary. Earlier than passing in user-submitted knowledge to your database queries, it’s good observe to clear up type knowledge. That manner, you guarantee that any enter is constant and secure.
The keys of type.cleaned_data correspond to the shape fields, so you possibly can entry the writer utilizing type.cleaned_data["author"] in line 17 and the remark’s physique with type.cleaned_data["body"] in line 18.
To correctly create a Remark object in your database, you will need to join it to an present Publish in line 19. You seize the associated publish with the first key of the view in line 11.
When you’ve created the remark from the shape, you reserve it utilizing .save() in line 21 and redirect the consumer to the URL that request.path_info incorporates in line 22. In your case, that’ll be the URL of a weblog publish.
This implies, in different phrases, that if you transmit a sound type to blog_detail() with a POST request, then Django will name blog_detail() once more after saving your remark. This time, Django will name the view perform with a GET request, and the weblog publish will load with an emptied type and your remark within the record of feedback.
For these GET requests or when the shape isn’t legitimate, the remainder of blog_detail() will do that:
- Line 24 queries the database for any present feedback in your publish.
- Traces 25 to 29 create the
context, together with the info for the publish, the filtered feedback, and the shape. - Line 30 renders the
element.htmltemplate withcontext.
Now that context additionally incorporates feedback and the type knowledge, you possibly can replace your element.html template:
Beneath the publish, you show your type. For those who don’t outline a type’s motion attribute, then the shape motion factors to the web page you’re at present on. You then add a csrf_token, which offers safety and renders the physique and writer fields of the shape, adopted by a submit button.
Lastly, you loop over all of the feedback on the given publish. As an alternative of displaying the complete timestamp, you solely show the date for the .created_on attribute of a remark.
Jump over to http://localhost:8000/ and see your updates in motion:
With these modifications in place, you’ve made your weblog actually interactive. Now your readers can share their suggestions straight beneath every publish.
Implementing feedback with Django’s type function in your weblog app was the final step on this tutorial. If you wish to examine your code with the ultimate code of this tutorial, then you possibly can click on the hyperlink beneath:
Conclusion
Congratulations, you’ve lined rather a lot on this tutorial. By constructing and increasing your personal weblog with Django, you possibly can preserve management over your content material and hone your expertise as an internet developer.
On this tutorial, you’ve discovered methods to:
- Arrange a brand new Django undertaking
- Create and edit weblog posts
- Show posts to the consumer
- Assign classes to posts
- Enable customers to touch upon posts
As well as, you’ve discovered concerning the Django admin web site and used Django types to work together with customers.
Did you give you concepts on methods to enhance your Django undertaking whereas studying by instance on this tutorial? In that case, share your concepts with the Actual Python group within the feedback beneath.
[ad_2]