

[ad_1]
On this article, I’ll present you tips on how to use trendy CSS methods to create fancy CSS ribbon shapes with minimal code. As an additional bonus, our ribbons can have hover animations!
CSS ribbons are all over the place, and you’ll find a ton of articles about them, however the ones we’ll create listed below are a bit particular. We’re going to depend on a single ingredient to create every of the shapes, and CSS variables to simply management them. We aren’t going to depend on mounted dimensions or magic numbers. The shapes will match their content material so that you don’t have to fret in regards to the textual content inside.
I’ve made a set of CSS ribbon shapes with lots of cool examples, and on this article, we’re going to review two forms of them, pictured under.
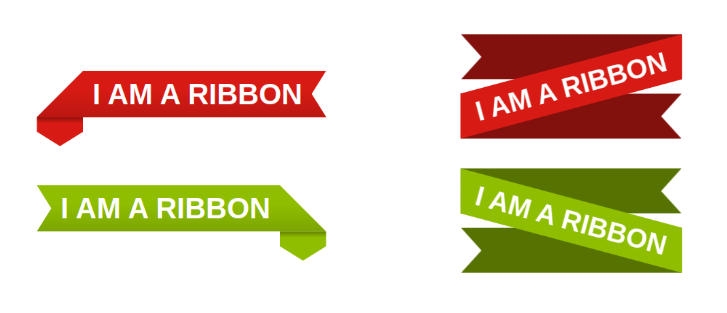
I’ll be calling the left one the “folded ribbon” and the appropriate one the “rotated ribbon”.
Making a CSS Folded Ribbon Form
Step one in creating our folded CSS ribbon is to outline the variables of our form.
.ribbon {
  --r: 20px;
  --s: 20px;
  --c: #d81a14;
}
Two variables will management the form, and one variable will management the colour.
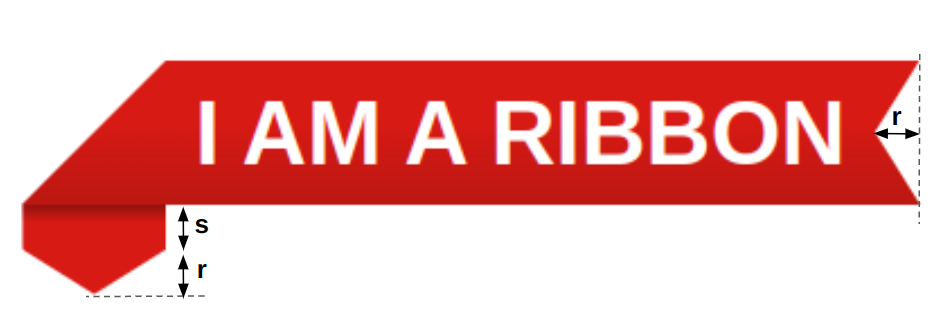
Now let’s transfer to the code. We’re primarily going to depend on clip-path. The picture under illustrates the polygon form we’re going to make use of.
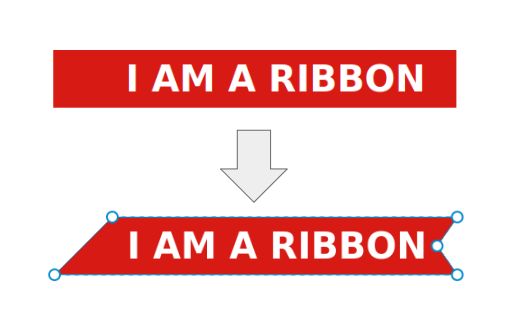
We add some padding to keep away from chopping the textual content, then we apply the clip-path:
.ribbon {
  --r: 20px;
  --s: 20px;
  --c: #d81a14;

  line-height: 1.6;
  padding-inline: 1.2lh calc(var(--r) + .2lh);
  background: var(--c);
  clip-path: polygon(1lh 0,100% 0,calc(100% - var(--r)) 50%,100% 100%,100% 100%, 0 100%,0 100%);
}
Utilizing the CSS lh unit
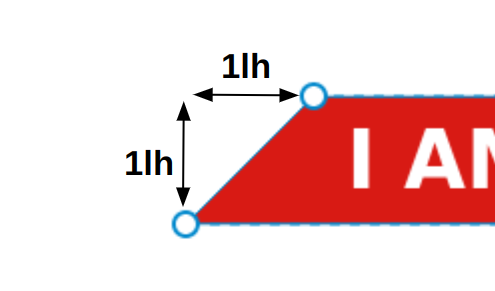
You might be questioning what’s occurring with the lh unit. It’s a brand new unit that corresponds to the line-height worth. Since we’re utilizing one line of textual content, the line-height setting is what controls the peak, so 1lh is equal to the peak of the ingredient, which is tremendous helpful. (You’ll be able to learn extra in regards to the lh unit in An Overview of CSS Sizing Items.)
In clip-path, I want to chop the form of an isosceles triangle, and to do that I must know the peak of the ingredient. 1lh is the same as that peak.
Now, to create the folded half, we’re nonetheless going to make use of clip-path and replace the earlier polygon. The cool factor about clip-path is that it may possibly lower “exterior” the boundaries of the ingredient. It could sound stunning or perhaps ineffective, provided that we now have nothing exterior, nevertheless it means we will embody issues like box-shadow, define, pseudo-elements, and so forth.
In our case, we’ll depend on box-shadow. The picture under illustrates the trick.
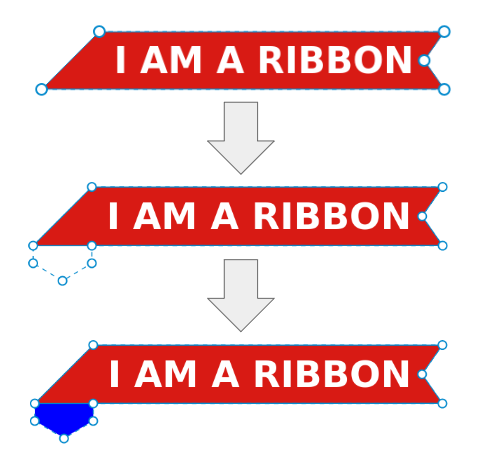
Notice how I’m updating the clip-path to incorporate 4 new factors, three of that are exterior the ingredient. For the reason that half we’re chopping is exterior, it’s not seen, but when we add an enormous box-shadow we make if seen. I’ve used a blue shade as an instance the concept above, however within the code we’ll use the identical shade because the background:
.ribbon {
  --r: 20px;
  --s: 20px;
  --c: #d81a14;

  line-height: 1.6;
  padding-inline: 1.2lh calc(var(--r) + .2lh);
  background: var(--c);
  clip-path: polygon(1lh 0,100% 0,calc(100% - var(--r)) 50%,100% 100%,1lh 100%,1lh calc(100% + var(--s)),.5lh calc(100% + var(--s) + var(--r)),0 calc(100% + var(--s)),0 100%);
  box-shadow: 0 0 0 999px var(--c);
}
Lastly, we add a contact of shadow impact by introducing a gradient and one other box-shadow and we’re performed. Our CSS ribbon form is ideal!
You’re in all probability questioning tips on how to create the second ribbon (the inexperienced one). We do the identical factor however with a special polygon. We take the primary polygon and we invert it.
A polygon might be written like so:
clip-path: polygon(X1 Y1, X2 Y2, ..., Xn Yn)
To get the other form, you modify all Xi by 100% - Xi. So simple as that! Earlier than checking my code, attempt to do it alone utilizing the polygon of the primary ribbon.
Within the demo above, hover the shapes to note a pleasant animation. To realize it, we have to replace the polygon on hover by offsetting some factors. I gained’t re-write the entire polygon on hover, however I’ll outline a CSS variable that may management the offset.
In the event you give attention to the animation, you’ll discover that we now have three factors shifting to the left and three factors shifting down and to the left as nicely.
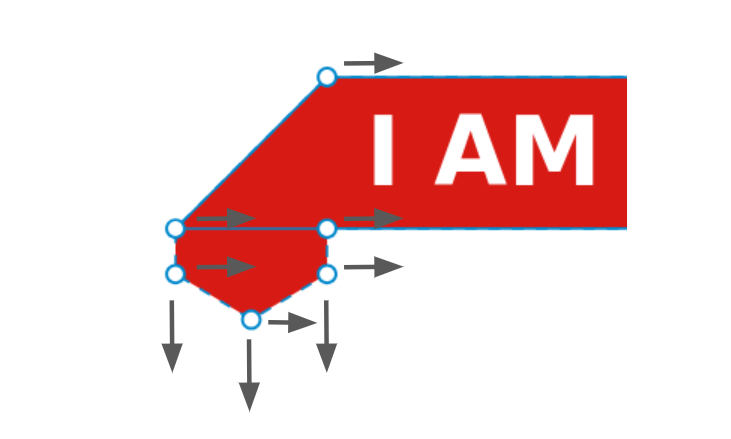
We replace the Xi of the factors shifting to left with Xi + d and we replace the Yi of the factors shifting doing with Yi + d. Then we merely replace the variable d to regulate the motion:
.ribbon {
  --d: 0px;
  clip-path: polygon(calc(1lh + var(--d)) 0,100% 0,calc(100% - var(--r)) 50%,100% 100%,calc(1lh + var(--d)) 100%,calc(1lh + var(--d)) calc(100% + var(--s) + var(--d)),calc(.5lh + var(--d)) calc(100% + var(--s) + var(--r) + var(--d)),var(--d) calc(100% + var(--s) + var(--d)),var(--d) 100%);
}
.ribbon:hover {
  --d: .2lh;
}
In the event you see such a polygon for the primary time, you could get confused, because it seems a bit scary. However in actuality, it’s not that complicated. We began with a easy polygon and we slowly added extra factors and extra calculations till we reached this complicated one.
Making a Rotated CSS Ribbon Form
Let’s deal with the second form. For this one, we’ll use the brand new trigonometric features together with CSS variables and calc() just like the earlier one. To grasp the logic behind this form, let’s rotate it and preserve the textual content in a straight line.
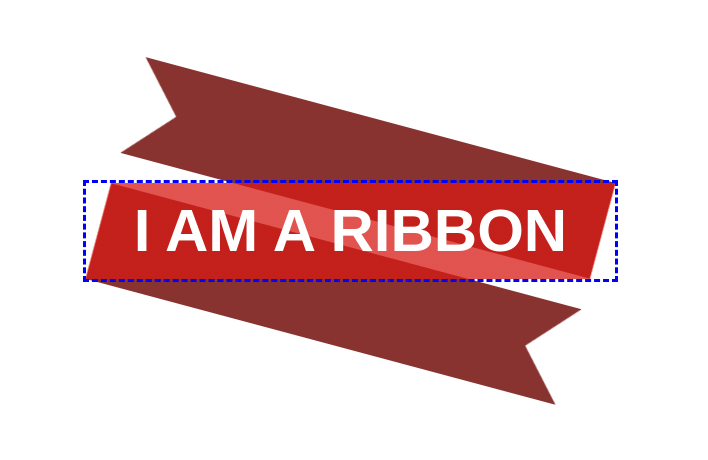
I’m including a little bit of transparency to see the components behind the principle ingredient. I’ll be utilizing pseudo-elements to create them. I’ve additionally added the blue define as an instance the realm of the ingredient. This form might be managed with two variables:
.ribbon {
  --r: 30px;
  --a: 15deg;
}
The r is doing the identical job as with the earlier form. The a will management the rotation of the principle ingredient and lots of different issues.
Let’s begin with the principle ingredient. We are able to see from the determine that we have to lower it from both sides, so you could logically consider using clip-path, however not this time. We’ll depend on a gradient coloration, the place the half we have to lower can have a clear shade:
.ribbon {
  --r: 30px;
  --a: 15deg;

  background:
    linear-gradient(calc(90deg + var(--a)),
      #0000 calc(1lh*sin(var(--a))),
      var(--c) 0 calc(100% - 1lh*sin(var(--a))),
      #0000 0
    );
}
Right here comes the geometry.
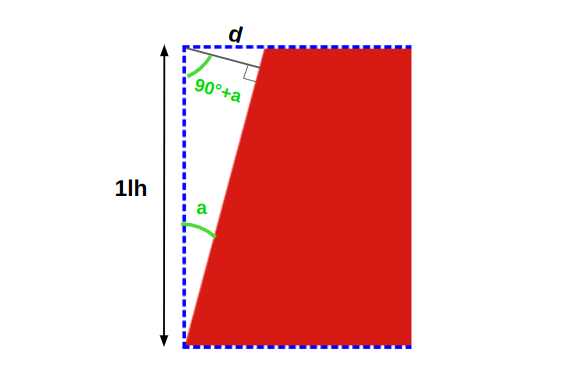
The a is the angle variable we outlined. Contemplating this, the gradient must have an angle equal to 90deg + a, and the clear shade ought to begin at 0 and cease at d. Performing some math, d is the same as 1lh*sin(a). If we apply the identical logic on the opposite aspect, we get the next code:
background:
  linear-gradient(calc(90deg + var(--a)),
    #0000 0% calc(1lh*sin(var(--a))),
    var(--c) calc(1lh*sin(var(--a))) calc(100% - 1lh*sin(var(--a))),
    #0000 calc(100% - 1lh*sin(var(--a))) 100%
  );
We do some optimization by eradicating the 0% and 100% (they’re implicit), and when we now have two consecutive shade stops which can be equal, we will exchange the second with 0:
background:
  linear-gradient(calc(90deg + var(--a)),
    #0000 calc(1lh*sin(var(--a))),
    var(--c) 0 calc(100% - 1lh*sin(var(--a))),
    #0000 0
  );
We’re performed with the principle ingredient, so let’s transfer to the pseudo-elements. Right here as nicely, we’d like some geometry methods to establish the dimensions.
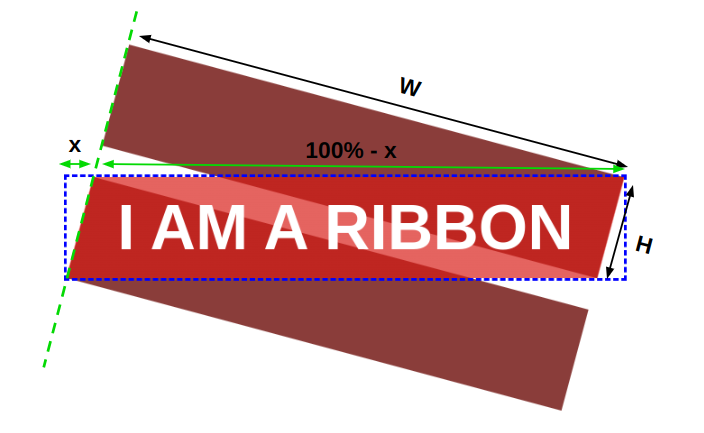
We are able to simply discover the peak H from the earlier determine we used to establish the gradient configuration. It’s equal to 1lh/cos(a). For the width W, it’s equal to (100% - x)*cos(a), the place 100% is the width of the principle ingredient and x is that small half the place we now have the transparency. It’s equal to 1lh*tan(a).
Each pseudo-elements have the identical dimension, so our code is as follows:
.ribbon:earlier than,
.ribbon:after {
  content material: "";
  place: absolute;
  peak: calc(1lh/cos(var(--a)));
  width: calc(100%*cos(var(--a)) - 1lh*sin(var(--a)));
}
In the event you’re not comfy with the maths and also you’re a bit misplaced with the components, it’s high-quality. You don’t must precisely perceive them. The purpose is to have the ability to regulate the form utilizing CSS variables. The formulation are right here to make issues simpler and keep away from us coping with hard-coded values and magic numbers.
After the dimension, we should always accurately place every pseudo-element, rotate it, and use clip-path for the cutout half:
.ribbon:earlier than,
.ribbon:after {
  content material: "";
  place: absolute;
  remodel: translate3d(0,0,-1px);
  rotate: var(--a);
  peak: calc(1lh/cos(var(--a)));
  width: calc(100%*cos(var(--a)) - 1lh*sin(var(--a)));
  background: color-mix(in srgb,var(--c),#000 40%);
}
h1:earlier than {
  proper: 0;
  high: 0;
  transform-origin: high proper;
  clip-path: polygon(0 0,100% 0,100% 100%,0 100%,var(--r) 50%);
}
h1:after {
  left: 0;
  backside: 0;
  transform-origin: backside left;
  clip-path: polygon(0 0,100% 0,calc(100% - var(--r)) 50%,100% 100%,0 100%);
}
The code ought to be self-explanatory and the clip-path worth ought to be straightforward to grasp. We used extra complicated polygons with the primary form.
Notice using color-mix(), which permits me to create a darkish model of the principle shade. I’m additionally utilizing a 3D translate with a destructive worth on the z-axis to deliver the pseudo-elements behind the principle ingredient. You would possibly suppose that that is the job of z-index, nevertheless it gained’t work resulting from some stacking context points that I’ve detailed in this Stack Overflow thread.
Now, if we rotate the ingredient in the other way, we get our CSS ribbon form.
As with the earlier instance, I’ll allow you to dissect the code of the inexperienced ribbon and see what modifications I made to get the other form.
Conclusion
It was a enjoyable train, don’t you suppose? We explored some trendy CSS options like CSS variables, calc(), and trigonometric features, and we mixed them to create fancy ribbon shapes.
If you’d like extra, go try my full assortment of ribbon shapes. Attempt to construct a few of them alone earlier than checking the code. It will likely be a superb train to observe what you’ve discovered right here.
[ad_2]