

[ad_1]

On this Django REST framework tutorial, you’ll create a rental platform API. The tutorial demonstrates find out how to use Python and Django REST framework in PyCharm to develop APIs.
By the point you full the tutorial, it is possible for you to to reply the next questions:
- What are Django REST framework serializers and the way do I create them out of Django fashions?
- How do I write concise and idiomatic views with the assistance of Django REST framework?
- How do I check APIs by utilizing PyCharm’s Endpoints instrument window and the built-in HTTP Shopper?
- What’s the browsable API?
- How do I arrange authentication and permissions for an API?
Conditions
To efficiently full the Django REST framework tutorial, you’ll want the next:
- PyCharm Skilled (a free 30-day trial is offered). This tutorial has been created in PyCharm Skilled 2023.2.1
- Basic understanding of the idea of RESTful APIs
- Earlier expertise with Python and Django (you can begin with our Django tutorial)
Yow will discover the complete code of the challenge on this repository.
Establishing a challenge
Click on New Undertaking on PyCharm’s Welcome display screen or choose File | New Undertaking from the principle menu. When the New Undertaking window opens, select Django because the challenge kind within the left-hand pane and do the next:
- Specify the challenge listing, which may also be used because the challenge identify (apiTutorial in our instance).
- Select the kind of digital atmosphere in your challenge (we are going to use virtualenv).
- Develop the Extra Settings part and supply the appliance identify (rental).
You additionally must disable the Allow Django admin checkbox. We are going to create the admin person manually later.
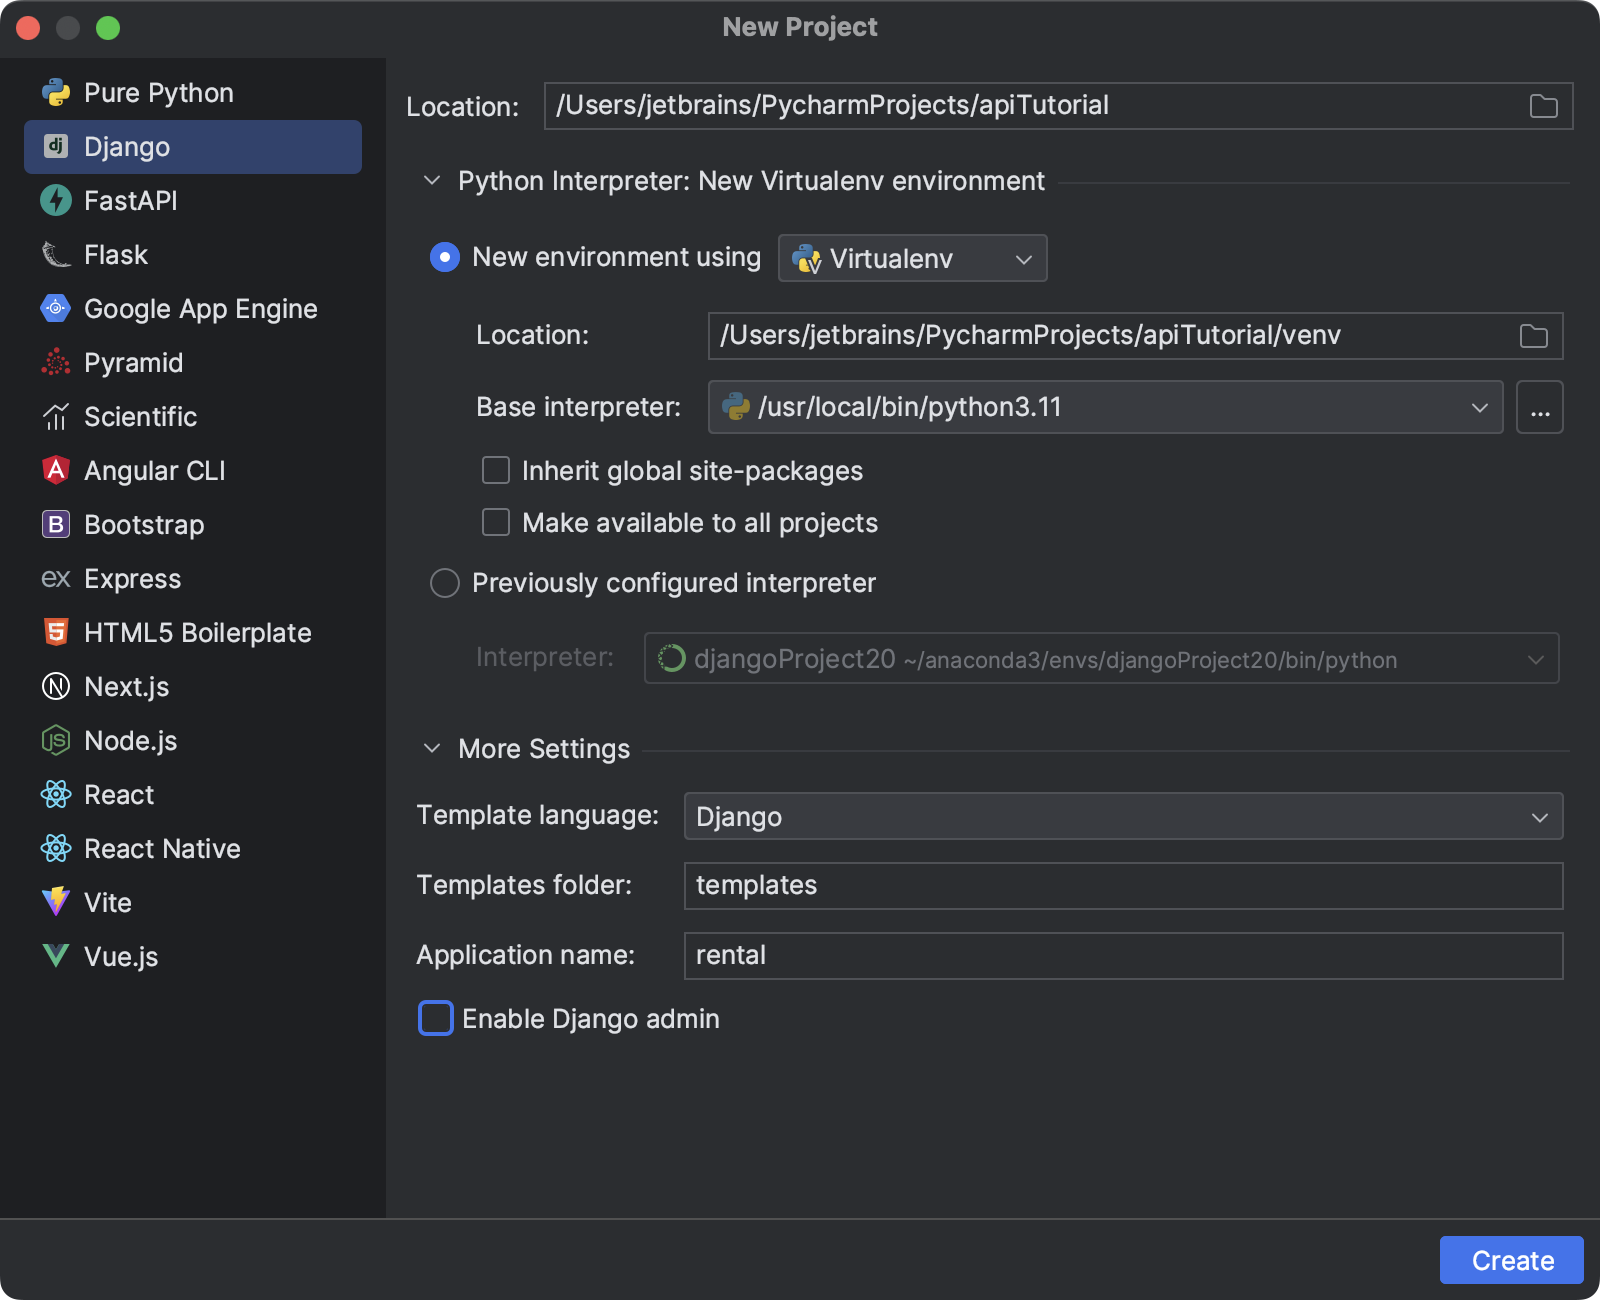
While you click on Create, PyCharm will arrange the challenge and set up Django within the challenge atmosphere.
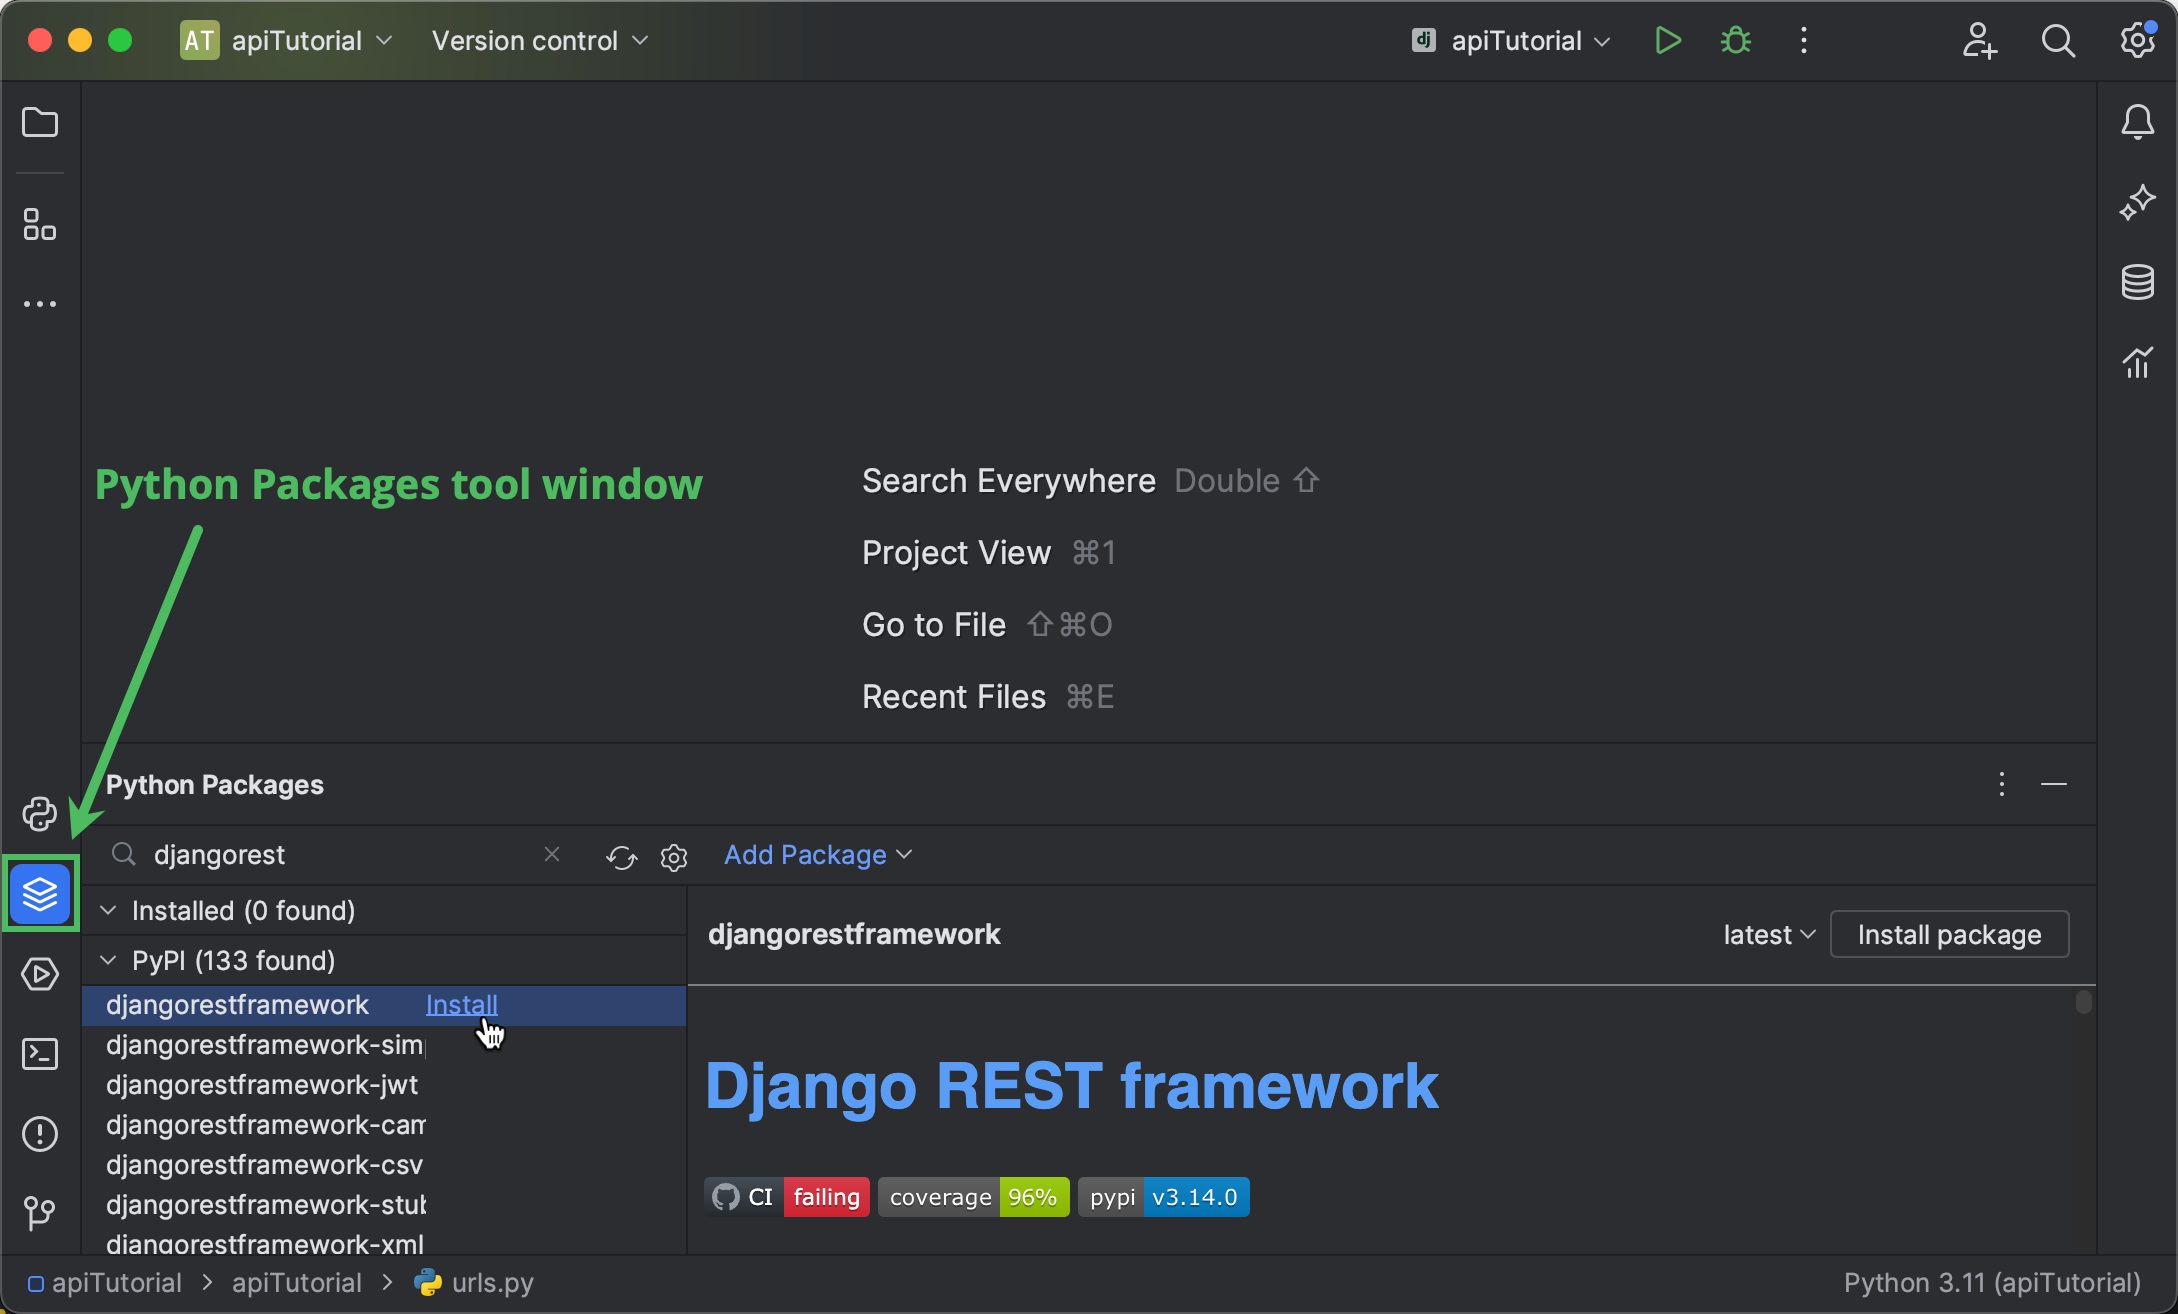
The Django REST framework bundle must be put in manually. Open the Python Packages instrument window by clicking its icon on the left. Seek for the djangorestframework bundle and set up the most recent model. On this tutorial, we’ve used model 3.14.0.
Now we have to replace INSTALLED_APPS in settings.py. Right here’s PyCharm’s shortcut for that:
- Open Search All over the place by urgent ⇧ (Shift) twice.
- Press Tab a number of occasions till you’re on the Symbols tab.
- Kind the primary letters of the specified image (variable, class, and so forth.) to search out it, for instance, “insapp”.
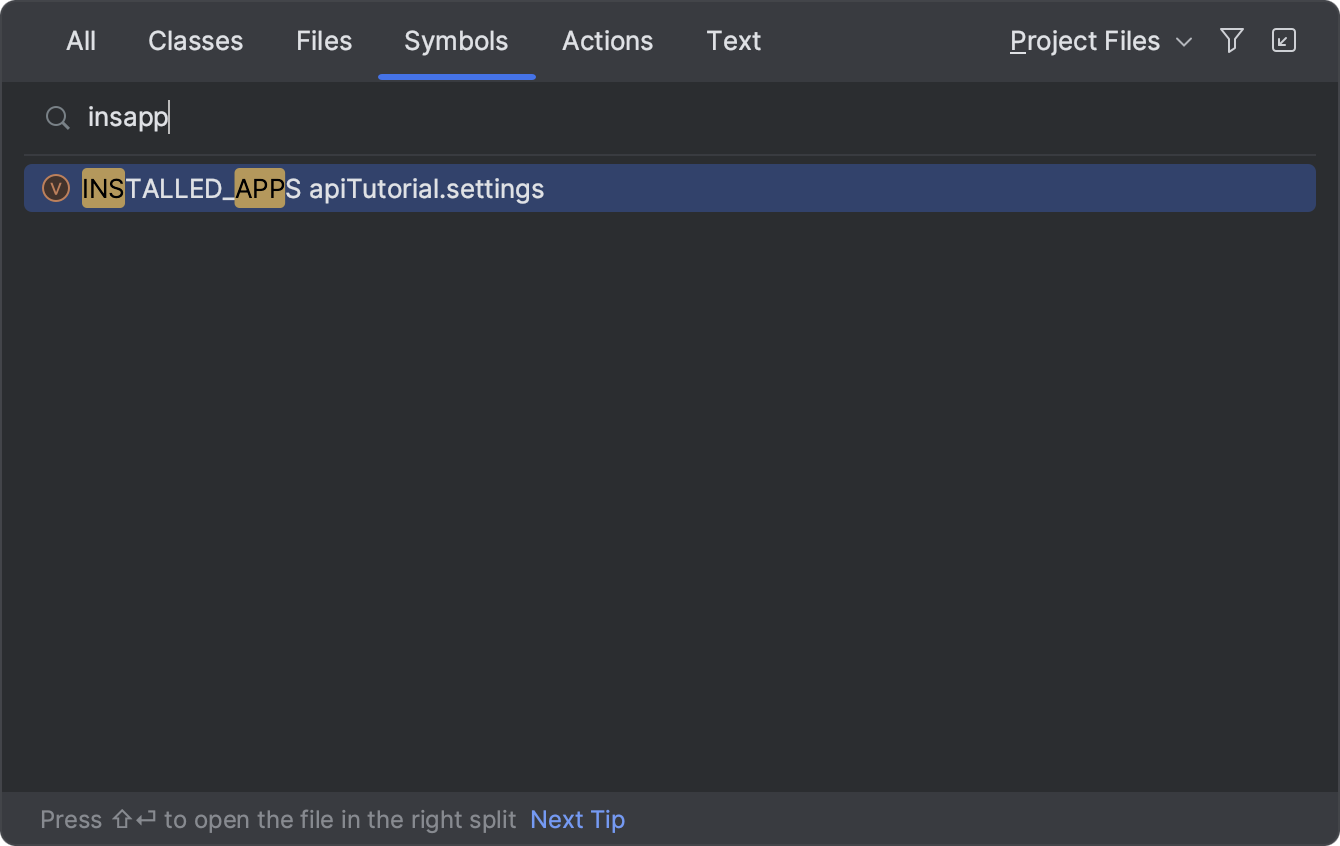
- Press Enter to leap to the specified image and add ‘
rest_framework’ toINSTALLED_APPS.

Creating serializers
What are Django REST framework serializers?
Typically, serializers are used to “translate” Django mannequin situations or querysets into different codecs, normally JSON or XML, in order that they are often despatched within the physique of an HTTP response. Serializers additionally present deserialization when textual content knowledge from an HTTP request is parsed, validated, and transformed right into a mannequin occasion.
The processes of serialization and deserialization are essential for any API, and Django REST framework can take it over utterly. Due to its ModelSerializer class, we will generate a serializer for any mannequin in simply two traces of code.
However we nonetheless must create a mannequin. Let’s try this.
Writing a model-based serializer
Use Search All over the place (double Shift) or the Undertaking instrument window (⌘1 / Alt+1) to open rental/fashions.py, and replica the next code into the editor:
from django.db import fashions

SIZE_CHOICES = [
    ('ST', 'Studio'),
    ('1BR', '1 bedroom'),
    ('2BR', '2 bedrooms'),
    ('3BR', '3 bedrooms'),
    ('MBR', '3+ bedrooms'),
]
TYPE_CHOICES = [
    ('H', 'house'),
    ('APT', 'apartment'),
]


class Provide(fashions.Mannequin):
    created = fashions.DateTimeField(auto_now_add=True)
    handle = fashions.CharField(max_length=100, clean=True, default="")
    measurement = fashions.CharField(selections=SIZE_CHOICES, default="1BR", max_length=100)
    kind = fashions.CharField(selections=TYPE_CHOICES, default="APT", max_length=100)
    value = fashions.PositiveIntegerField(default=0)
    sharing = fashions.BooleanField(default=False)
    textual content = fashions.TextField(default="")

    class Meta:
        ordering = ['created']
Be aware that every one fields of the Provide mannequin have defaults, which signifies that we will create an occasion with out offering any subject values. Moreover, we’ve offered selections for the measurement and kind fields.
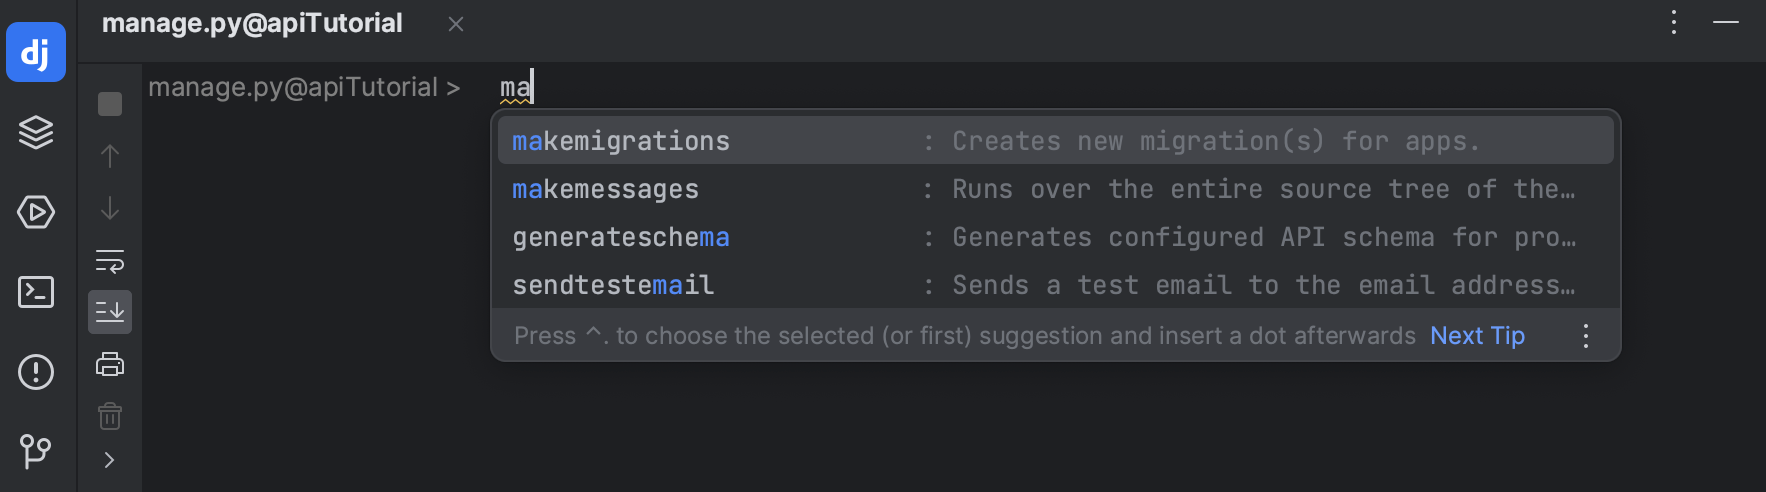
Now let’s run migrations. Open PyCharm’s handle.py console by urgent ⌥R/ Ctrl+Alt+R and kind “makemigrations” adopted by “migrate”. Code completion is offered, so that you don’t must kind out the entire instructions.
We have to create serializers.py within the rental listing. Choose the listing within the Undertaking instrument window (⌘1 / Alt+1), press ⌘N / Alt+Insert, choose Python File, and specify “serializers” because the file identify.
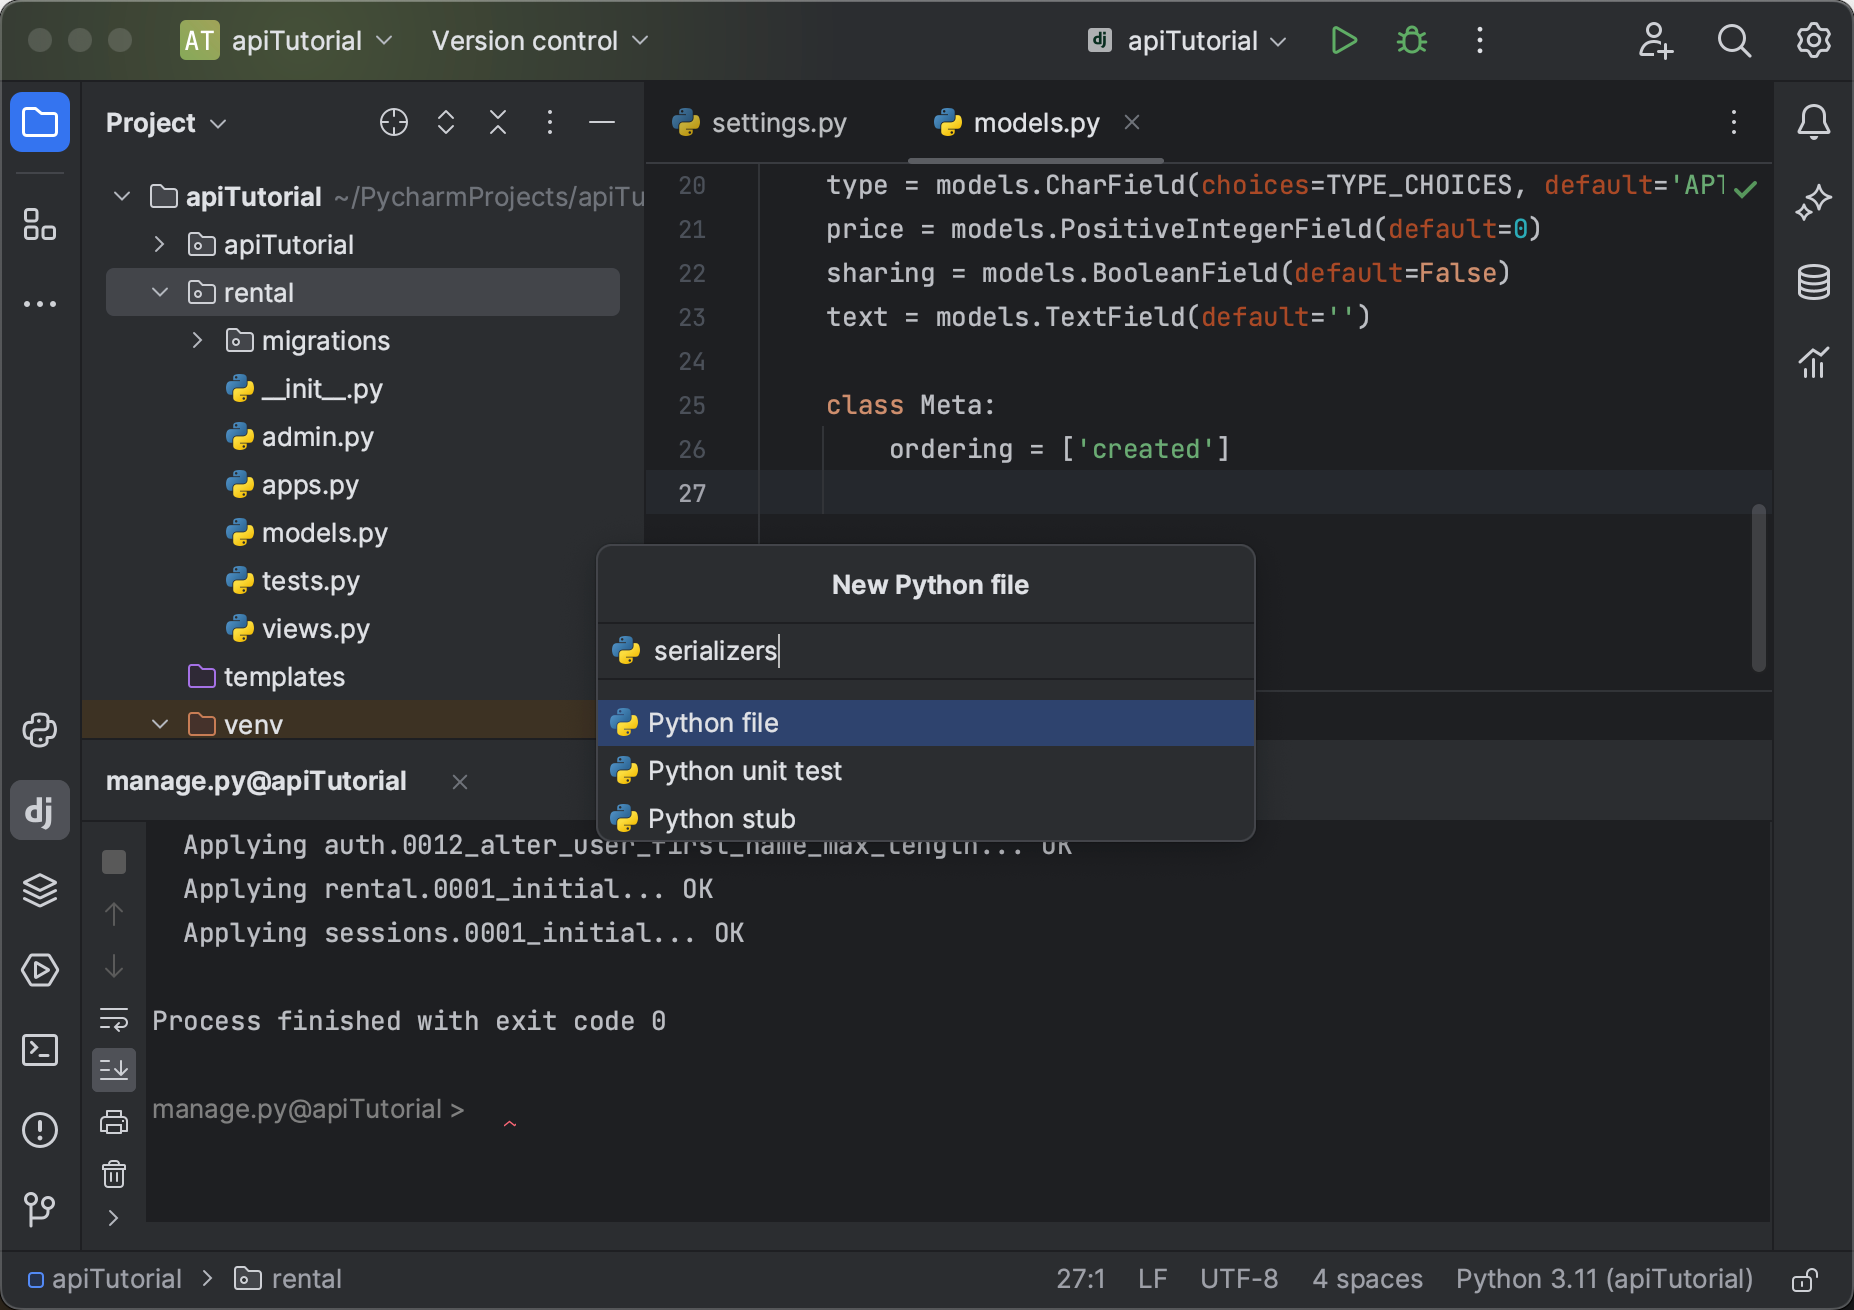
The newly created file opens within the editor. Fill it with the next code:
from rest_framework import serializers
from rental.fashions import Provide


class OfferSerializer(serializers.ModelSerializer):
    class Meta:
        mannequin = Provide
        fields = ['id', 'address', 'size', 'type', 'price', 'sharing', 'text']
As you’ll be able to see, OfferSerializer inherits from the ModelSerializer offered by Django REST framework and is outlined with solely two traces of code. On line 7 we’ve specified the bottom mannequin (which is imported from rental/fashions on line 2), whereas line 8 comprises the record of mannequin fields to be serialized.
For extra details about Django REST framework serializers, see https://www.django-rest-framework.org/api-guide/serializers/.
Utilizing the serializer to avoid wasting knowledge
Let’s use the newly created serializer so as to add knowledge into the database. Open the Python console by clicking the corresponding icon on the left and run the next code in it:
from rental.fashions import Provide
supply = Provide(textual content="A comfortable house in "loft" fashion.nPerfect for younger {couples}")
supply.save()
supply = Provide(textual content="A heat home for a giant household")
supply.save()
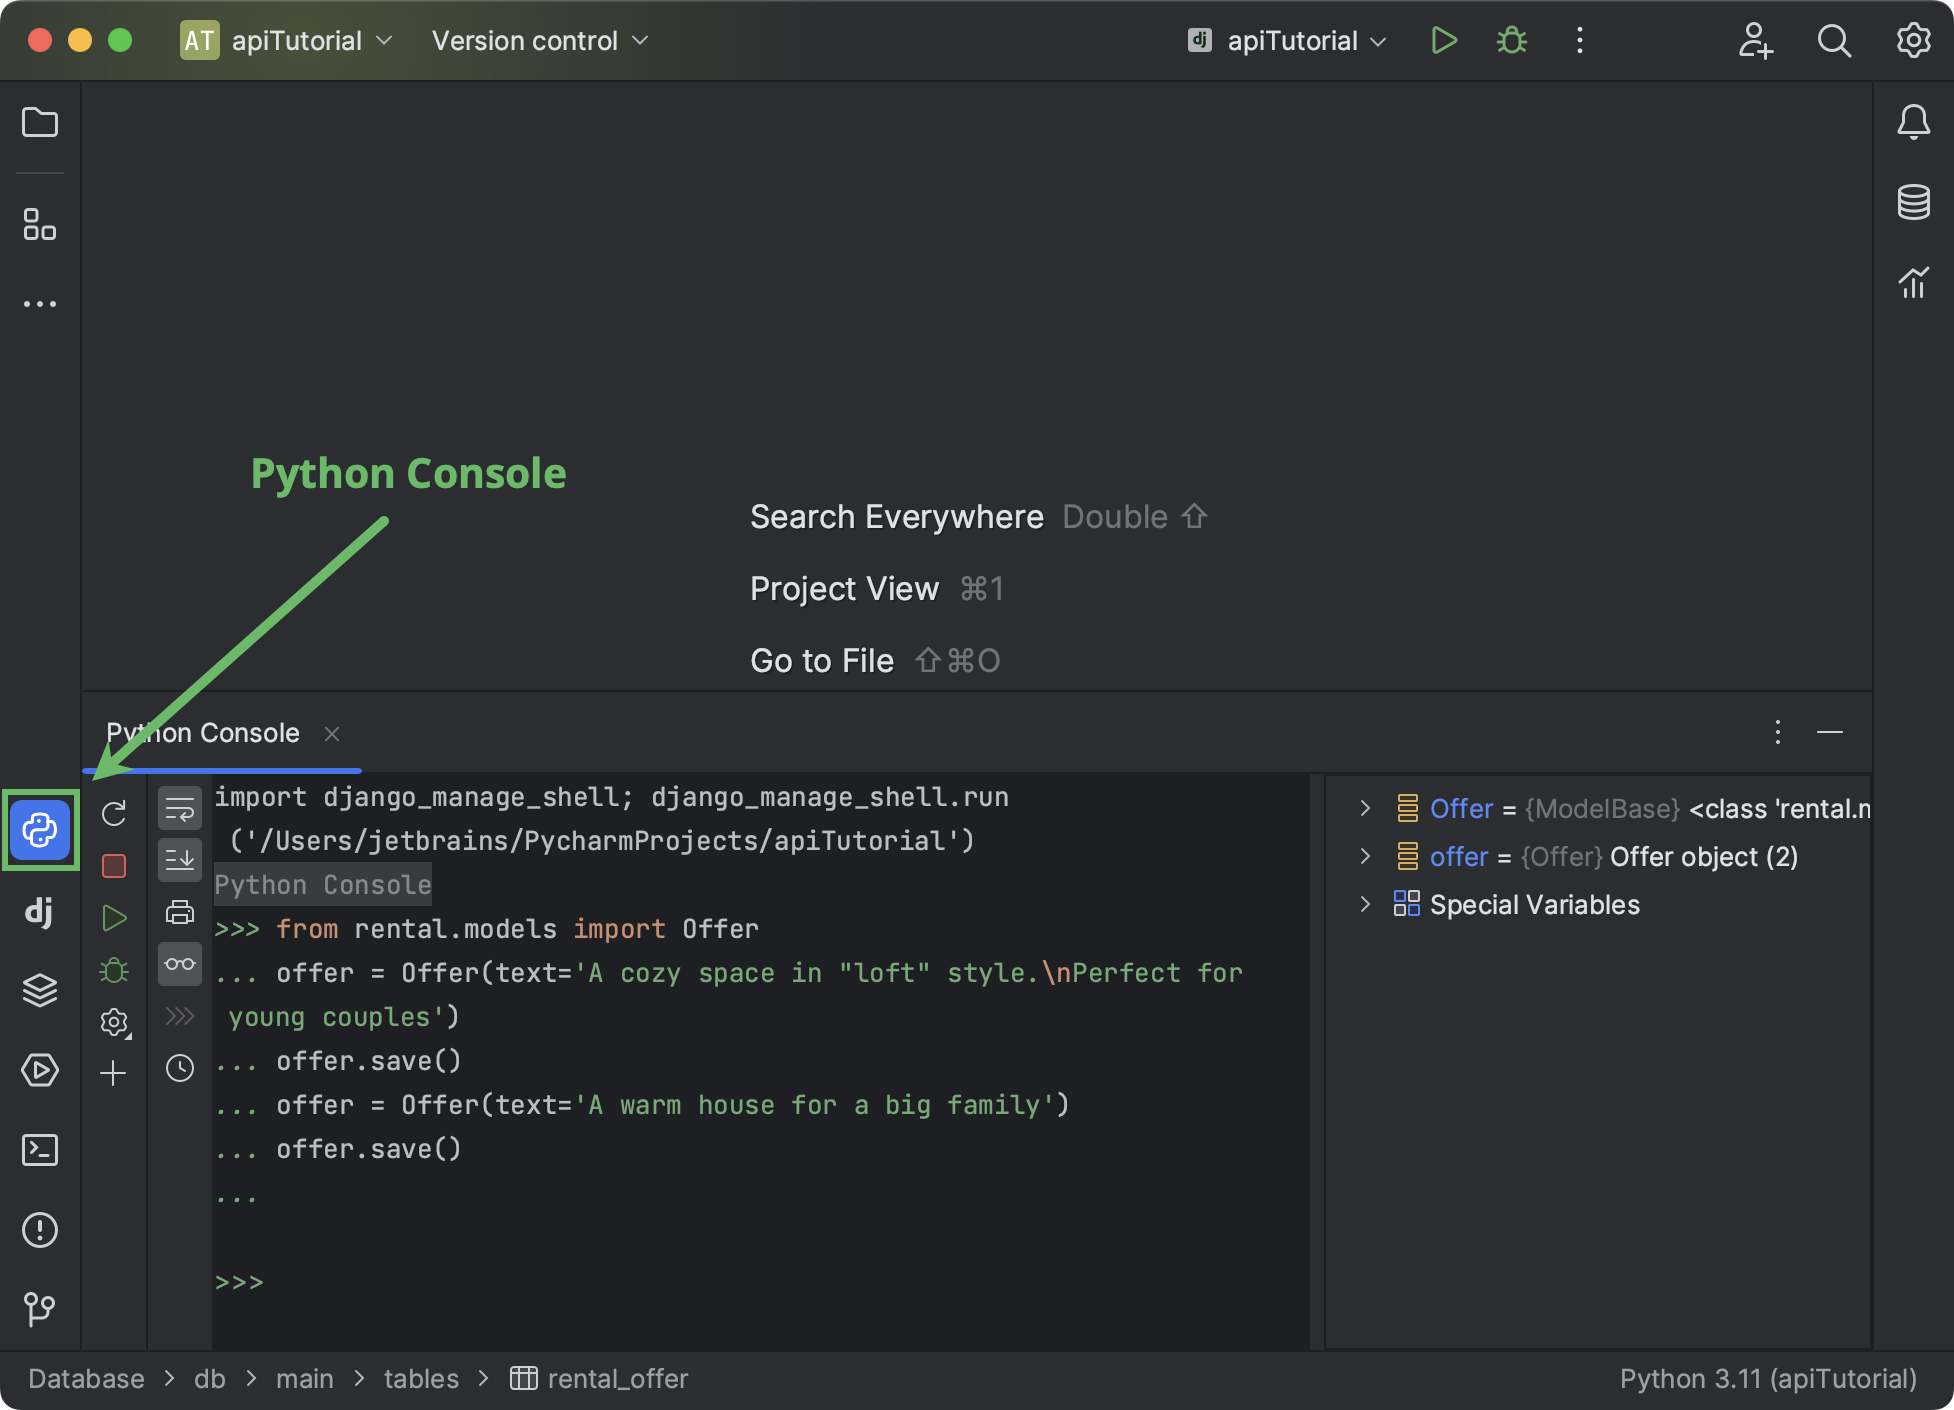
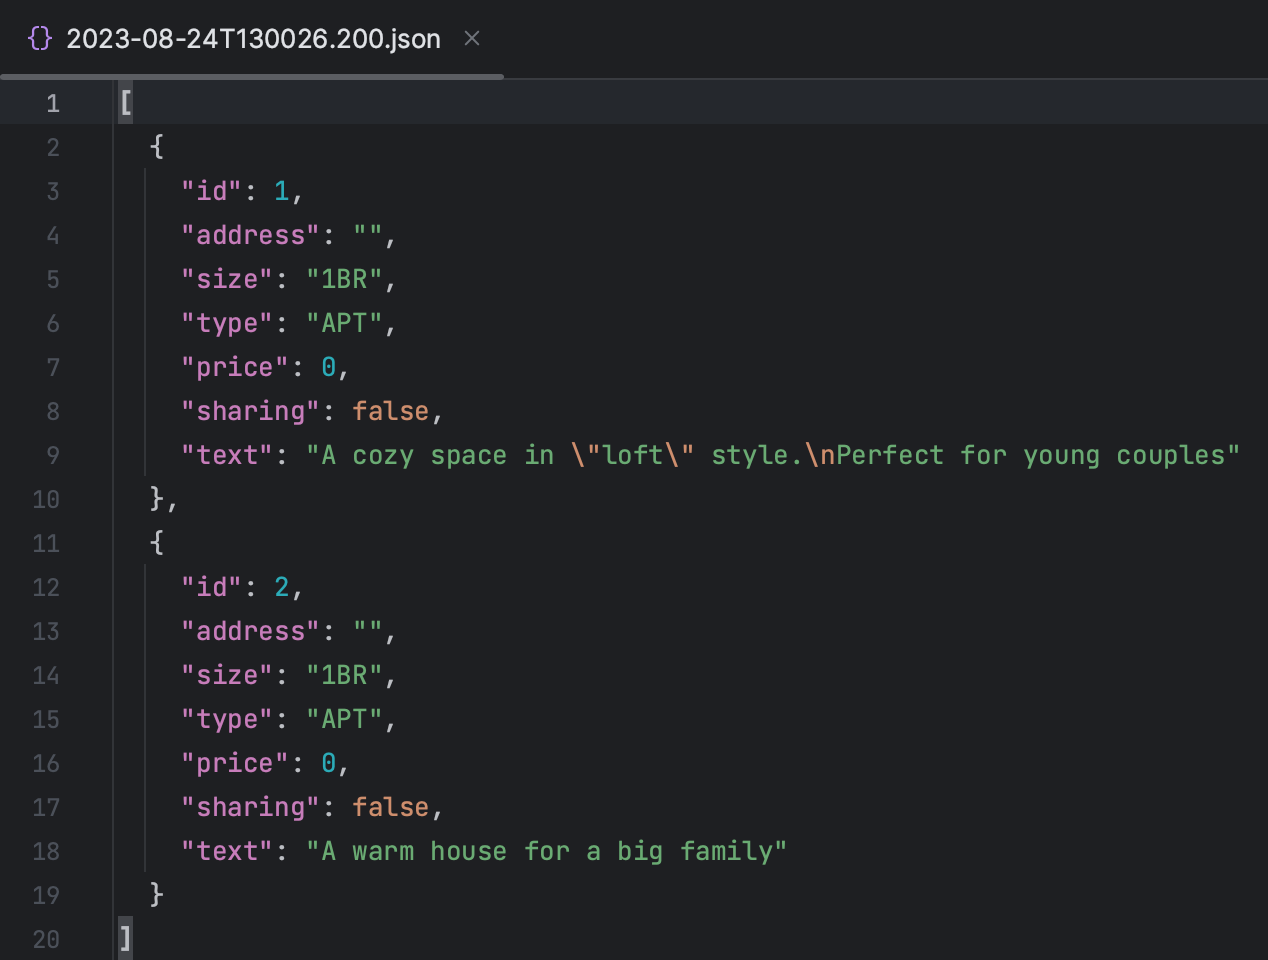
We’ve created two situations of the Provide mannequin and saved them into the database by utilizing the built-in save() technique.
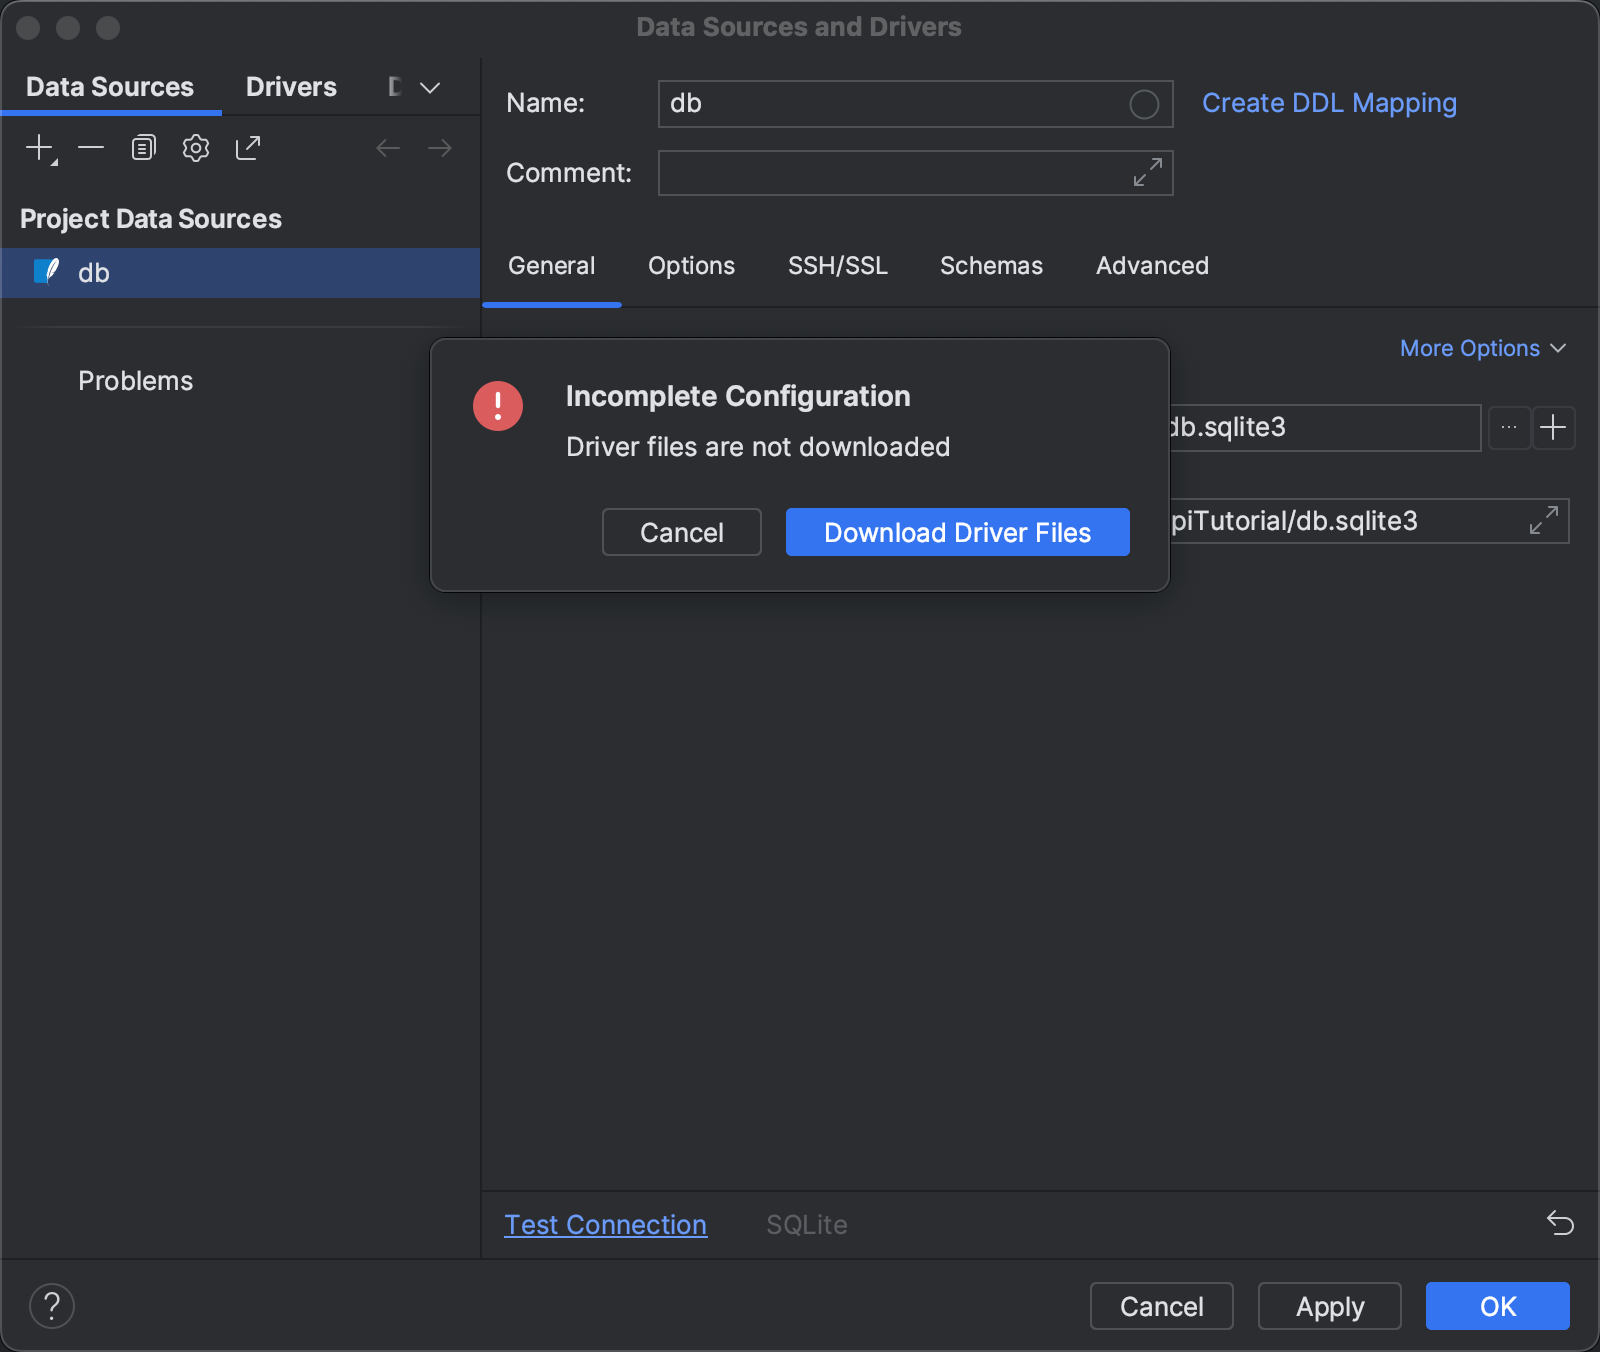
Now let’s open the database. Your challenge comprises db.sqlite3, which might be opened both from the Undertaking instrument window or by utilizing Search All over the place. While you open the database for the primary time, PyCharm will register it because the challenge knowledge supply. The Information Sources and Drivers window will open.
Click on Take a look at Connection. If you happen to see a warning saying that you might want to set up, replace, or swap the database driver, carry out the required motion. Then click on OK to complete including the information supply to the challenge.
When the Database instrument window opens, develop the construction of the db knowledge supply till you see the rental_offer desk.
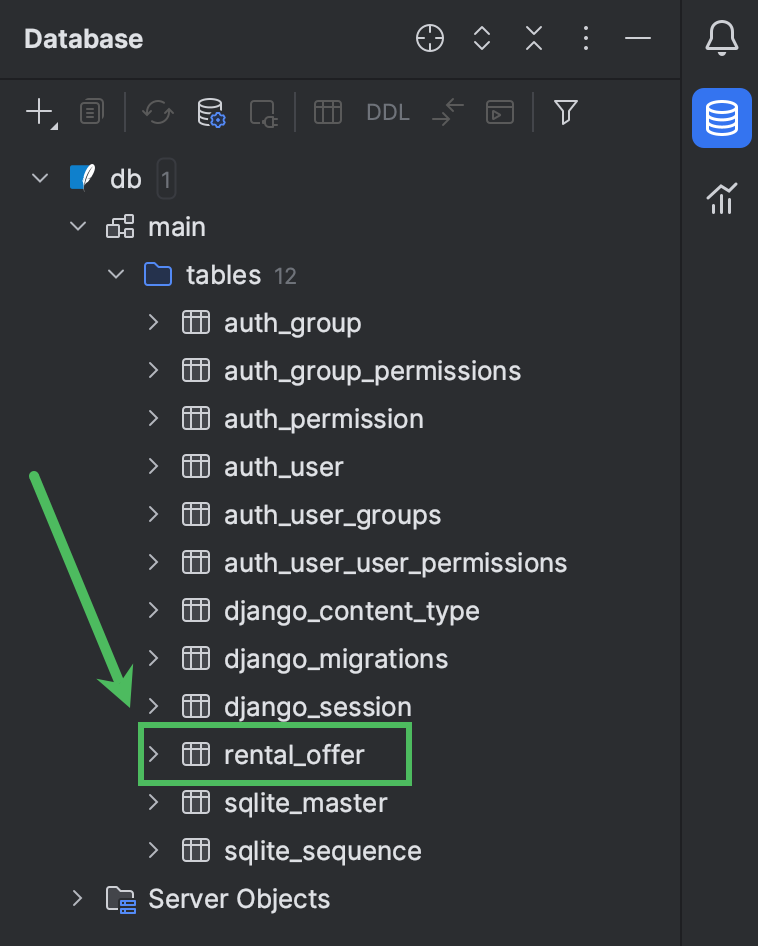
Click on it to browse its contents within the editor.

As you’ll be able to see, there are two information within the database desk now. We didn’t present values in any of the fields besides textual content, which is why the default values from the mannequin definition have been used.
Offering REST API logic
Writing function-based views
We’ve efficiently added two rental gives manually, however we would like the API to have the ability to try this routinely based mostly on the incoming requests. Let’s begin creating the API’s logic in rental/views.py. Open the file and fill it with the next code:
from rest_framework import standing
from rest_framework.decorators import api_view
from rest_framework.response import Response
from rental.fashions import Provide
from rental.serializers import OfferSerializer


@api_view(['GET', 'POST'])
def offer_list(request):
    if request.technique == 'GET':
        gives = Provide.objects.all()
        serializer = OfferSerializer(gives, many=True)
        return Response(serializer.knowledge)

    elif request.technique == 'POST':
        serializer = OfferSerializer(knowledge=request.knowledge)
        if serializer.is_valid():
            serializer.save()
            return Response(serializer.knowledge, standing=standing.HTTP_201_CREATED)
        return Response(serializer.errors, standing=standing.HTTP_400_BAD_REQUEST)
We’ve added a function-based view known as offer_list. It is going to be used to supply details about accessible rental gives, in addition to so as to add new gives to the database. Right here’s what’s inside:
@api_view(line 8) is the Django REST framework decorator for function-based views.GETandPOSTare the strategies accepted by this view.- If the request technique is
GET, a queryset with all gives within the database is created (line 11) and serialized (line 12). On this case, the physique of the response comprises knowledge about all accessible gives in JSON type. The response is shipped with the default standing code (200 OK). - If the request technique is
POST,OfferSerializeris used to deserialize knowledge from the request (line 16). If the information is validated efficiently (line 17), it’s saved to the database (line 18). The response comprises the saved knowledge and has the standing code201 Created(line 19). - If validation fails, the API will return the error information with the standing
400 Dangerous Request.
It might even be helpful if we may receive details about any particular supply, edit that data, and take away gives from the database. Let’s add one other view and name it offer_detail:
@api_view(['GET', 'PUT', 'DELETE'])
def offer_detail(request, pk):
    strive:
        supply = Provide.objects.get(pk=pk)
    besides Provide.DoesNotExist:
        return Response(standing=standing.HTTP_404_NOT_FOUND)

    if request.technique == 'GET':
        serializer = OfferSerializer(supply)
        return Response(serializer.knowledge)

    elif request.technique == 'PUT':
        serializer = OfferSerializer(supply, knowledge=request.knowledge)
        if serializer.is_valid():
            serializer.save()
            return Response(serializer.knowledge)
        return Response(serializer.errors, standing=standing.HTTP_400_BAD_REQUEST)

    elif request.technique == 'DELETE':
        supply.delete()
        return Response(standing=standing.HTTP_204_NO_CONTENT)
This view accepts three strategies (GET, PUT, and DELETE) and works as follows:
- To start with, it checks whether or not the supply whose ID has been specified within the
pkparameter exists within the database (line 4). If it doesn’t,404 Not Discoveredis returned. - For
GETrequests, the API serializes the supply knowledge (line 9) and returns it within the response physique. - For
PUTrequests, the API serializes the supply knowledge from the database and merges it with the information from the request physique (line 13). If the validation is profitable (line 14), the up to date supply is saved to the database (line 15) and returned within the response physique (line 16). In any other case, the error information is returned with the400 Dangerous Request standing. - Lastly, for
DELETErequests, the API deletes the supply and returns204 No Content material.
Now that we’ve outlined the API’s logic, we have now just one step left earlier than we will use our API. We have to outline Django URLs, also referred to as API endpoints.
Defining and testing API endpoints
Let’s begin by creating urls.py within the app listing and filling it with the next code:
from django.urls import path
from rental import views

urlpatterns = [
    path('offers/', views.offer_list),
    path('offers/<int:pk>/', views.offer_detail),
]
We’ve outlined two endpoints for our two views. Don’t neglect to incorporate rental/urls.py within the challenge’s urls.py file:
from django.urls import path,embrace

urlpatterns = [
    path('', include('rental.urls')),
]
Let’s open the Endpoints instrument window. In case you haven’t used it earlier than, you will discover it below the meatball menu on the left.
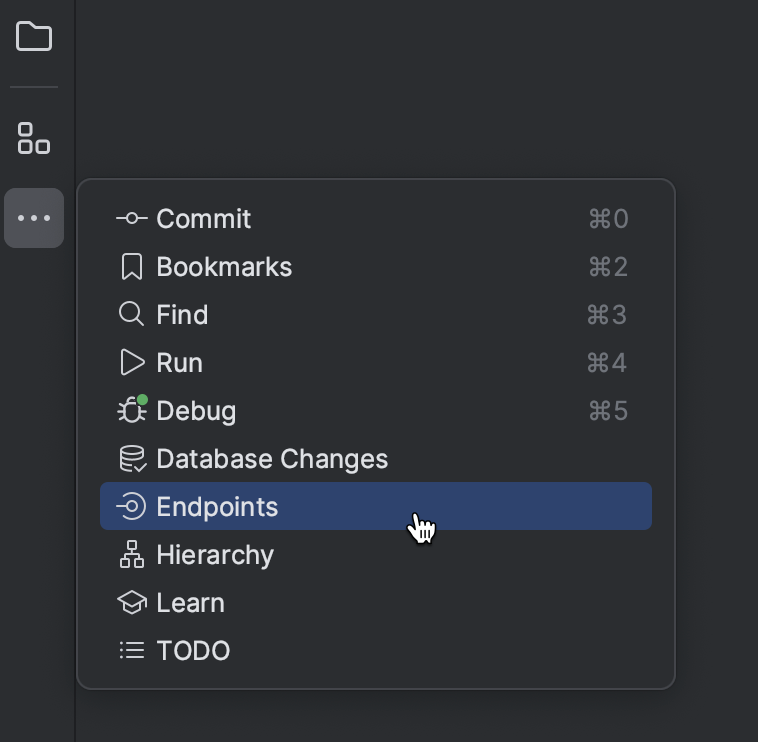
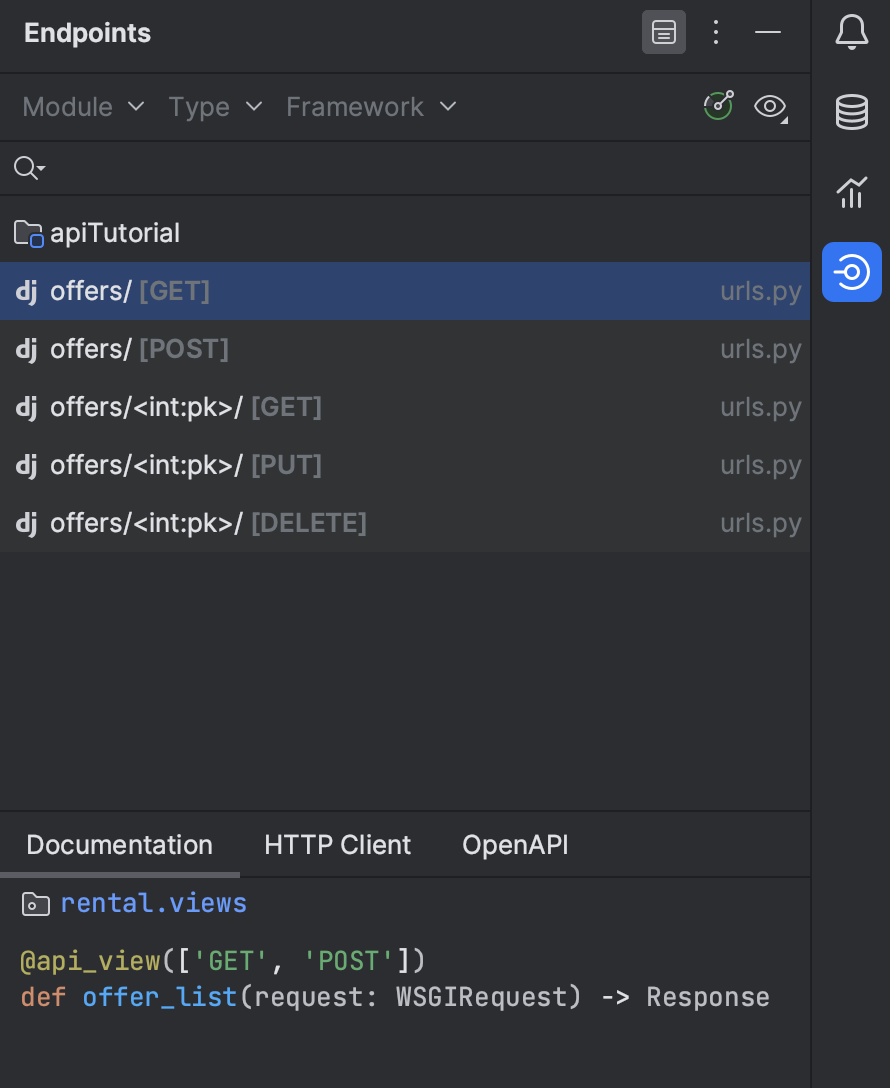
The instrument window shows all accessible endpoints and strategies.
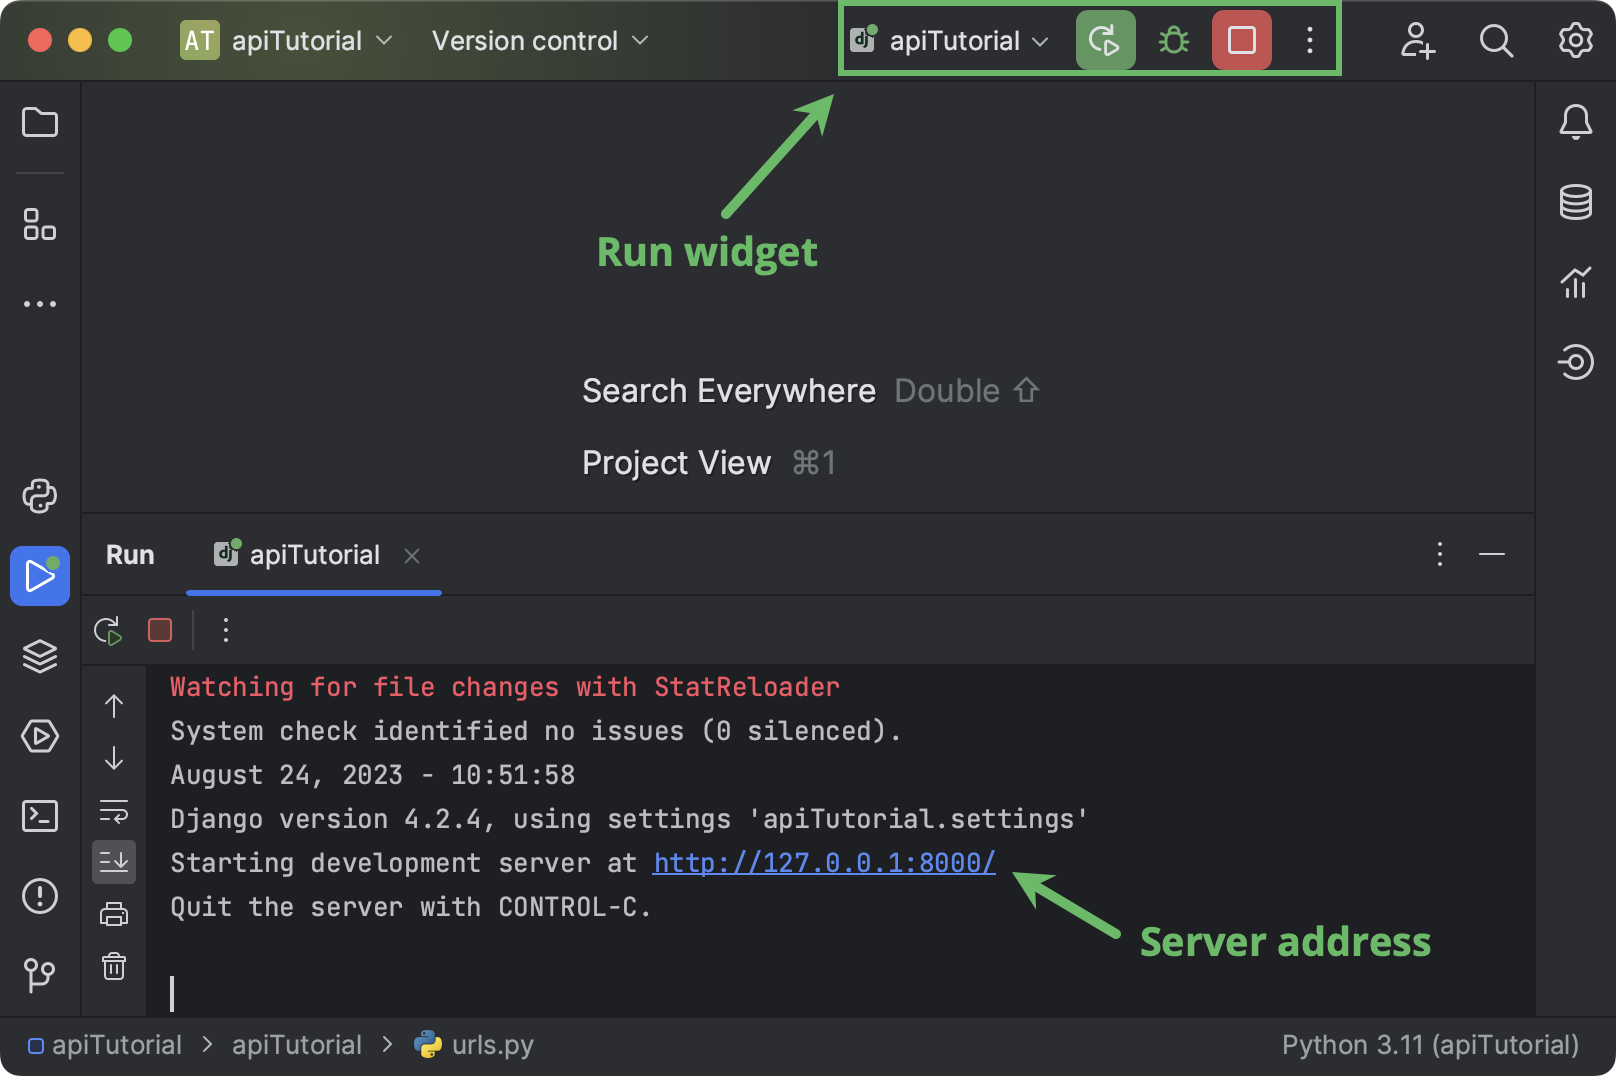
Earlier than testing the API, ensure that the Django server is operating. On challenge creation, PyCharm routinely arrange the run configuration. Simply launch it from the Run widget within the window header. Be aware the server handle (normally, localhost) and port quantity within the Run instrument window that opens.
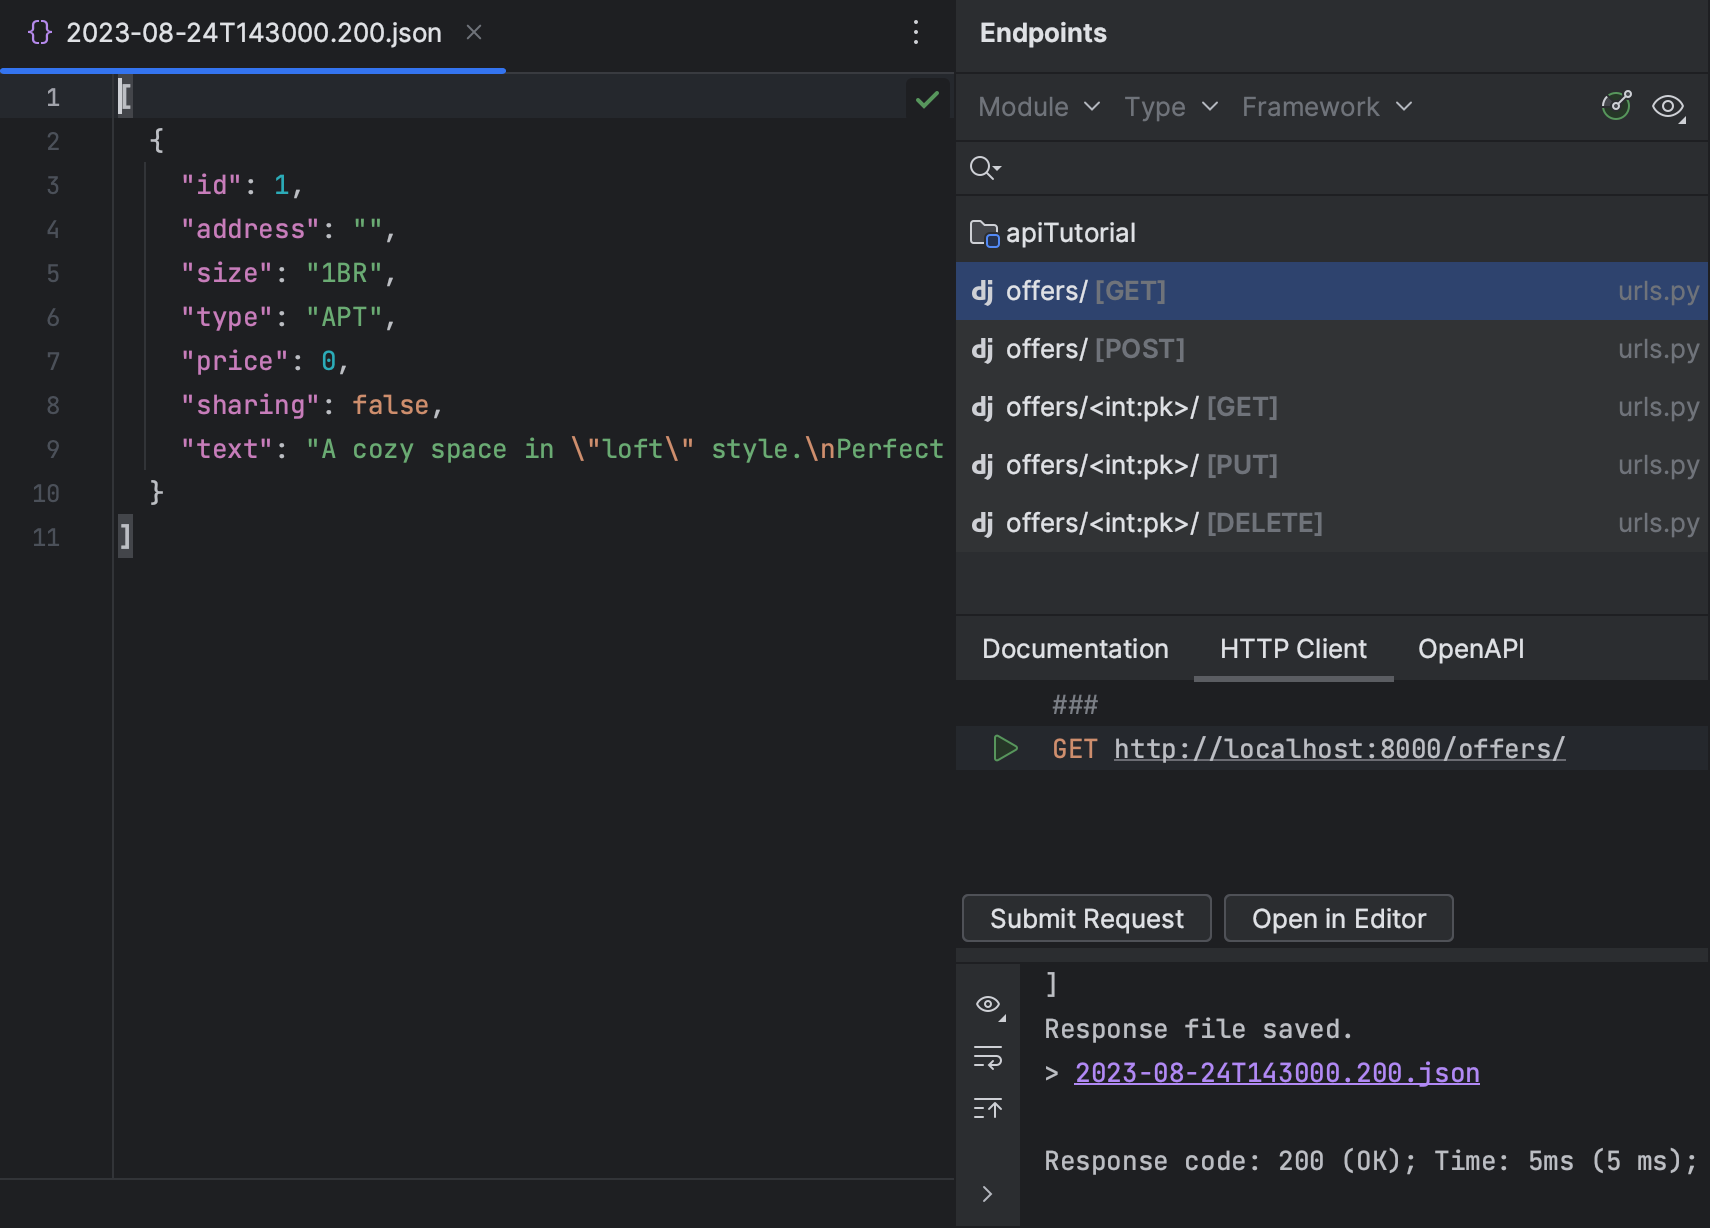
Let’s return to the Endpoints instrument window. Choose gives/GET within the record and swap to the HTTP Shopper tab on the backside. Edit the port quantity if wanted after which click on Submit Request.
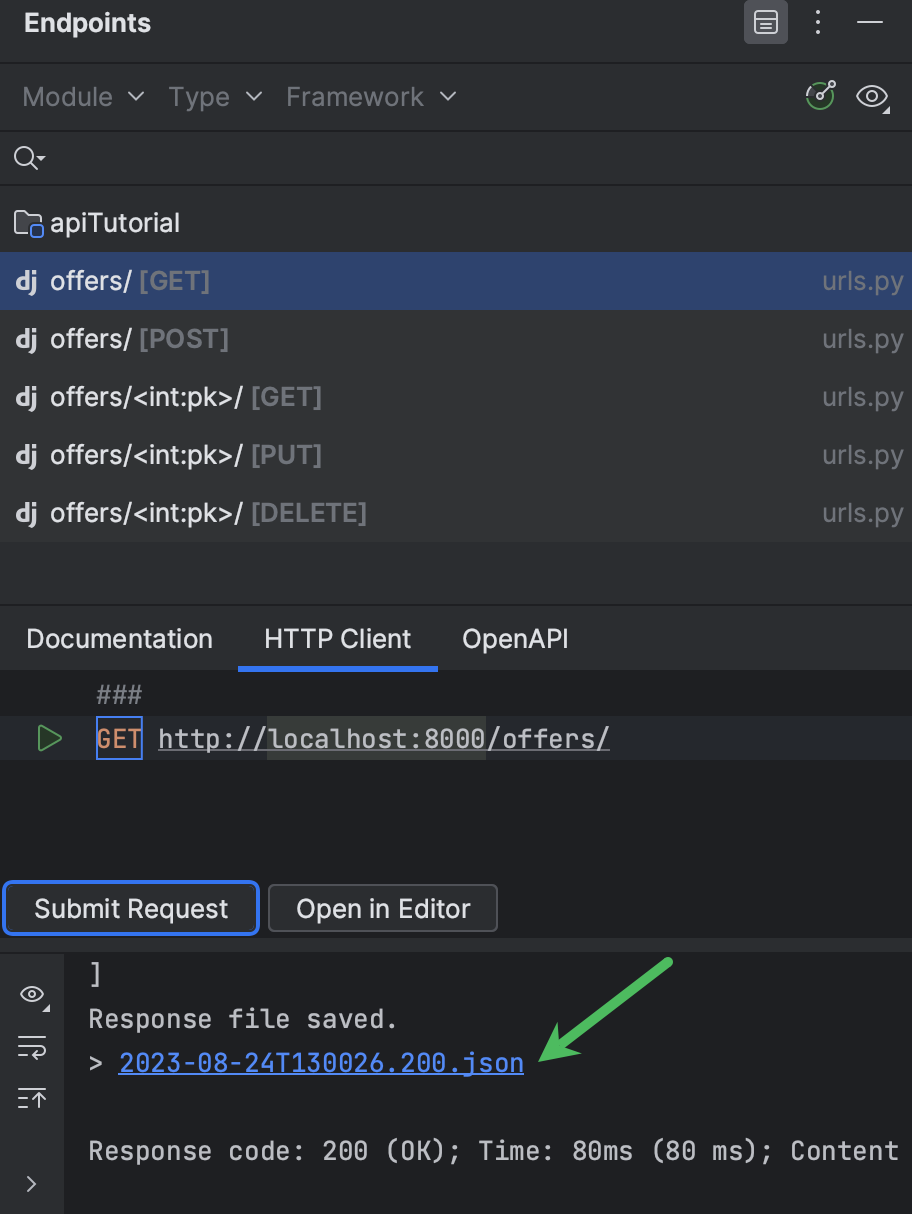
PyCharm runs the request and saves the response physique to a file. You possibly can both scroll as much as discover the response or click on the hyperlink to open the file within the editor.
Let’s submit a DELETE request to take away the second supply (DELETE http://localhost:8000/gives/2/) after which submit one other request for the record of accessible gives. Now just one supply is offered.
One other wonderful function of Django REST framework is its browsable API. Opening http://127.0.0.1:8000/gives/ in your browser brings you to a web page the place you’ll be able to view the record of accessible gives and add new ones.

Implementing generic class-based views
When talking concerning the wonderful options of Django REST framework, it’s unimaginable to not point out generic class-based views. Let’s use them to rewrite the code in rental/views.py:
from rest_framework import generics
from rental.fashions import Provide
from rental.serializers import OfferSerializer


class OfferList(generics.ListCreateAPIView):
    queryset = Provide.objects.all()
    serializer_class = OfferSerializer


class OfferDetails(generics.RetrieveUpdateDestroyAPIView):
    queryset = Provide.objects.all()
    serializer_class = OfferSerializer
Now every view is simply three traces of code! You solely want to fret about selecting the best generic class to inherit from. As we’re not utilizing feature-based views anymore, we have to replace rental/urls.py:
urlpatterns = [
    path('offers/', views.OfferList.as_view()),
    path('offers/<int:pk>/', views.OfferDetails.as_view()),
]
Will the API work now? Let’s verify. This time, we’ll try to submit invalid knowledge to see how validation works.
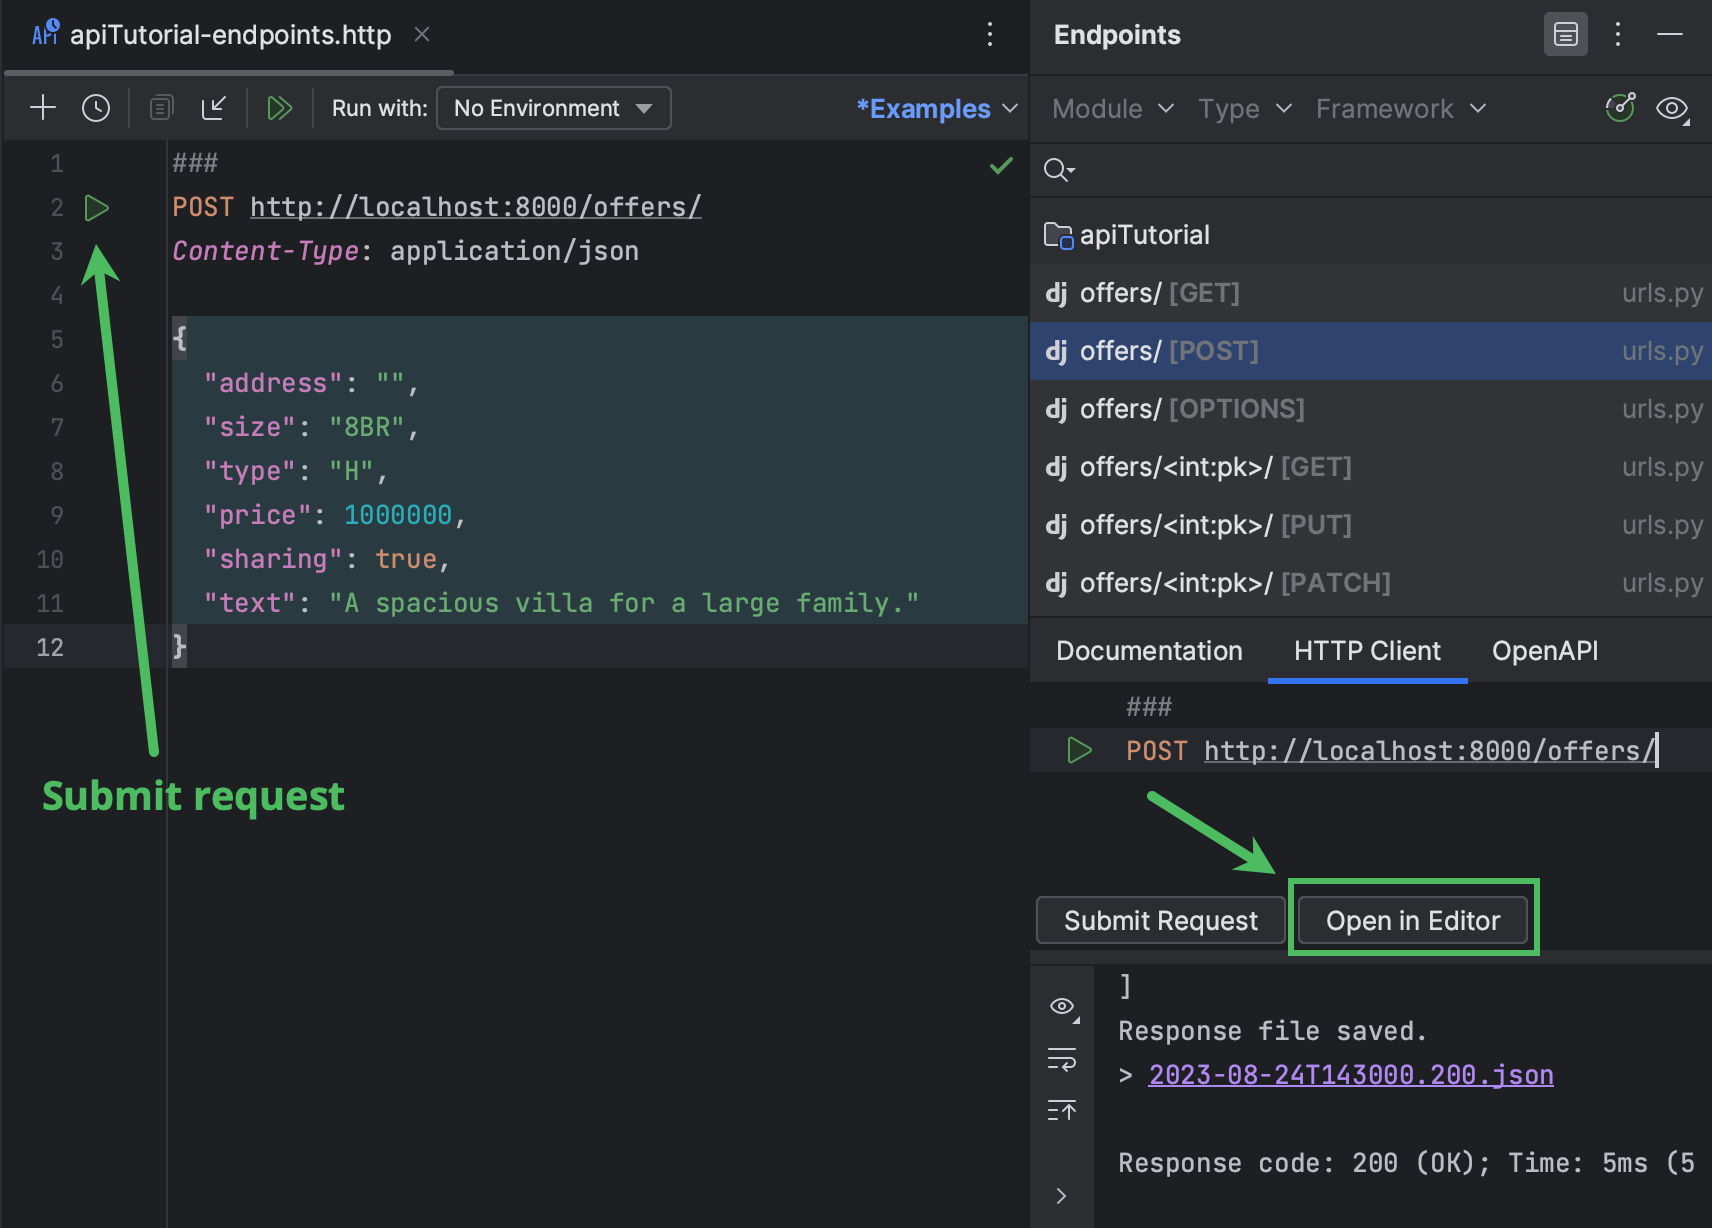
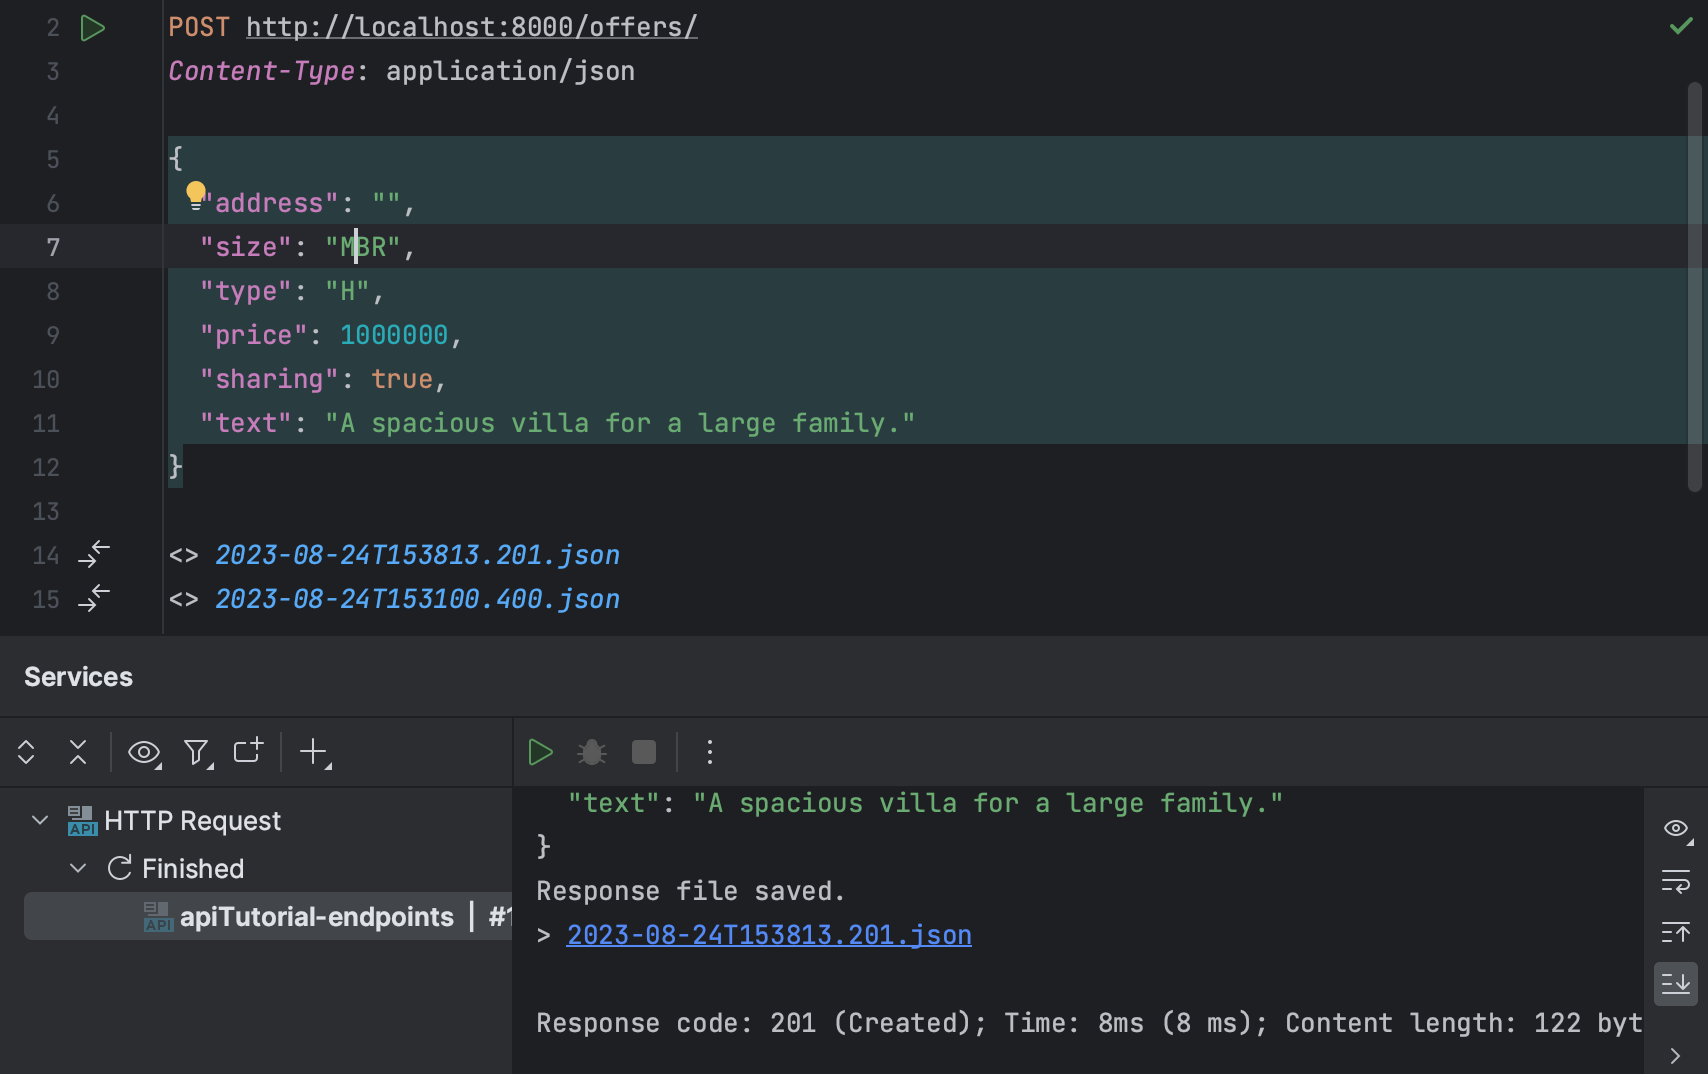
Go to the Endpoints instrument window. Now there are extra OPTIONS and PATCH strategies, which come from generic views. Choose gives/[POST] from the record of endpoints and click on Open in Editor. PyCharm creates an .http file and copies the endpoint into it. Present the request physique in JSON format and submit the request.
POST http://localhost:8000/gives/
Content material-Kind: utility/json

{
  "handle": "",
  "measurement": "8BR",
  "kind": "H",
  "value": 1000000,
  "sharing": true,
  "textual content": "A spacious villa for a big household."
}
Within the Providers instrument window that opens, you’ll discover that the response has the 400 Dangerous Request standing. Click on the hyperlink to open the JSON file with the response.
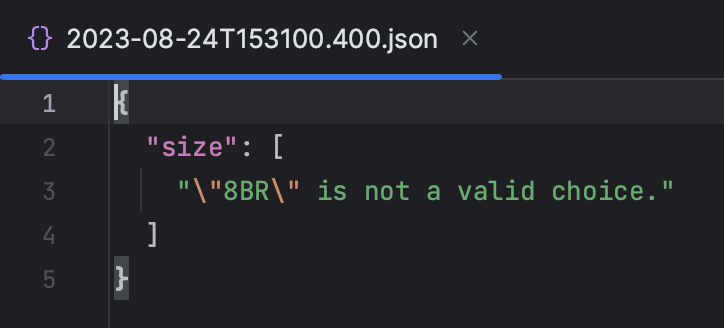
As you’ll be able to see, the supply hasn’t been added, as a result of we specified the improper worth in measurement. In line with the Provide mannequin, we must always use MBR when there are greater than 3 bedrooms. Let’s edit the request and submit it once more.
Enabling authentication and permissions
In the intervening time, anybody who is aware of the endpoint handle can add, edit, and take away gives. This isn’t a standard scenario in the actual world. Usually, you’d prefer to have management over who can do what together with your API. That may be achieved by implementing authentication and permissions.
Introducing customers
To start with, we have to introduce the idea of customers. Let’s begin by including the writer subject to the Provide mannequin:
writer = fashions.ForeignKey('auth.Consumer', related_name="gives", on_delete=fashions.CASCADE)
This subject has the ForeignKey kind, which signifies that it’s used to signify the relationships between gives and the customers who create them.
As we’ve up to date the mannequin, we have to reset the database and recreate the rental_offer desk in it, now with the writer subject. To realize this, carry out the next steps:
- Open the handle.py console ( ⌥R / Ctrl+Alt+R ) and run the next instructions separately:
> flush
> migrate rental zero
- Within the rental/migrations listing, take away all migrations, holding solely __init__.py.
- Then proceed within the handle.py console:
> makemigrations
> migrate
To just remember to are able to proceed, go to the Database instrument window and open the rental_offer desk. It ought to have the author_id column.
Then open rental/serializers.py and add UserSerializer. We are going to use Django’s built-in authentication system, so we are going to simply import the present Consumer mannequin:
from django.contrib.auth.fashions import Consumer
...

class UserSerializer(serializers.ModelSerializer):
    gives = serializers.PrimaryKeyRelatedField(many=True, queryset=Provide.objects.all())

    class Meta:
        mannequin = Consumer
        fields = ['id', 'username', 'offers']
Replace OfferSerializer to adjust to the newly added writer subject:
class OfferSerializer(serializers.ModelSerializer):
    writer = serializers.ReadOnlyField(supply="writer.username")

    class Meta:
        mannequin = Provide
        fields = ['id', 'address', 'size', 'type', 'price', 'sharing', 'text', 'author']
We additionally must outline two new views in rental/views.py: one for managing the record of all customers and one other one for person particulars. The Consumer mannequin needs to be imported right here, too, and don’t neglect to import the newly created UserSerializer from serializers.py as properly.
from rental.serializers import OfferSerializer, UserSerializer
...
from django.contrib.auth.fashions import Consumer
...

class UserList(generics.ListAPIView):
    queryset = Consumer.objects.all()
    serializer_class = UserSerializer


class UserDetails(generics.RetrieveAPIView):
    queryset = Consumer.objects.all()
    serializer_class = UserSerializer
Replace the OfferList class to override the default perform_create() technique in order that the extra writer subject is handed when creating a suggestion:
class OfferList(generics.ListCreateAPIView):
    queryset = Provide.objects.all()
    serializer_class = OfferSerializer

    def perform_create(self, serializer):
        serializer.save(writer=self.request.person)
Add the next endpoints for customers to rental/urls.py:
urlpatterns = [
    path('offers/', views.OfferList.as_view()),
    path('offers/<int:pk>/', views.OfferDetails.as_view()),
    path('users/', views.UserList.as_view()),
    path('users/<int:pk>/', views.UserDetails.as_view()),
]
Making authentication required
Now we have to be certain that solely authenticated customers are in a position so as to add gives by way of the API. Replace each the OfferList and OfferDetails views with the next properties to set permissions. Authenticated customers will be capable of add and edit gives, and others will be capable of view them:
...
from rest_framework import permissions


class OfferList(generics.ListCreateAPIView):
    queryset = Provide.objects.all()
    serializer_class = OfferSerializer
    permission_classes = [permissions.IsAuthenticatedOrReadOnly]

    def perform_create(self, serializer):
        serializer.save(writer=self.request.person)


class OfferDetails(generics.RetrieveUpdateDestroyAPIView):
    queryset = Provide.objects.all()
    serializer_class = OfferSerializer
    permission_classes = [permissions.IsAuthenticatedOrReadOnly]
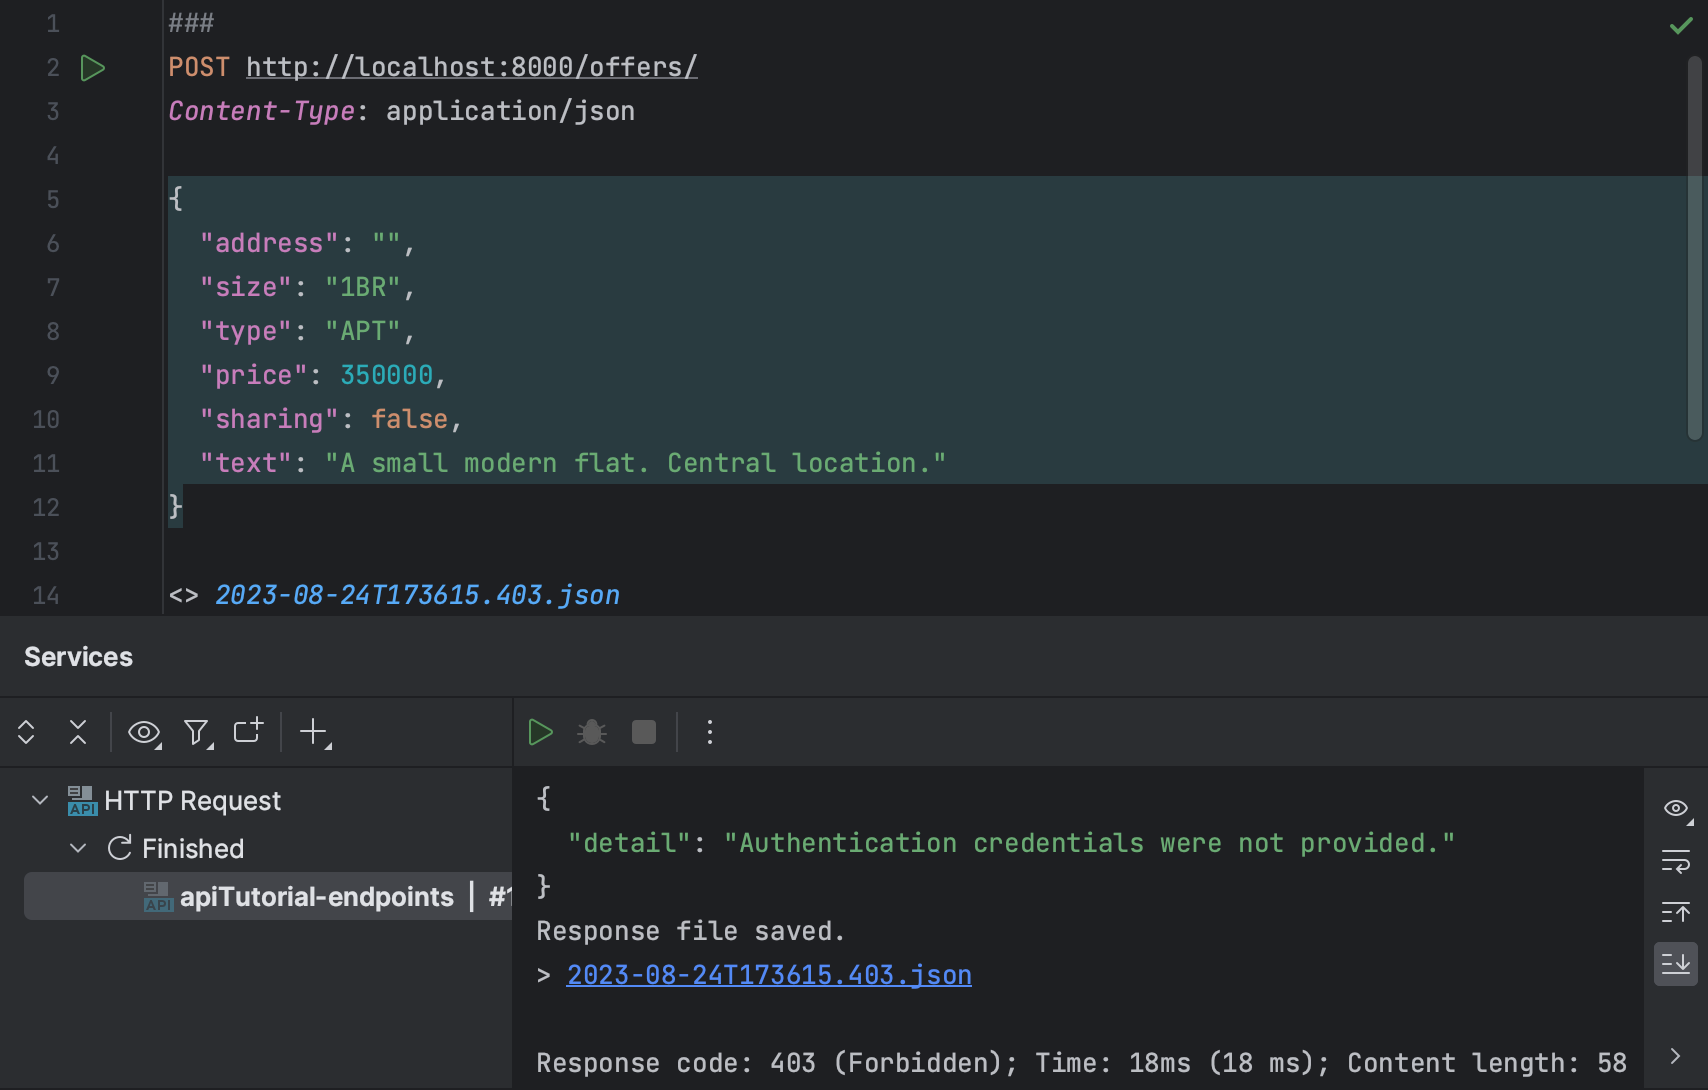
To ensure that issues work as anticipated, let’s run a POST request with out authentication:
POST http://localhost:8000/gives/
Content material-Kind: utility/json

{
  "handle": "",
  "measurement": "1BR",
  "kind": "APT",
  "value": 350000,
  "sharing": false,
  "textual content": "A small trendy flat. Central location."
}
You need to get a 403 Forbidden response.
Let’s create customers. Go to the handle.py console and run the createsuperuser command. Bear in mind the username and password you present.
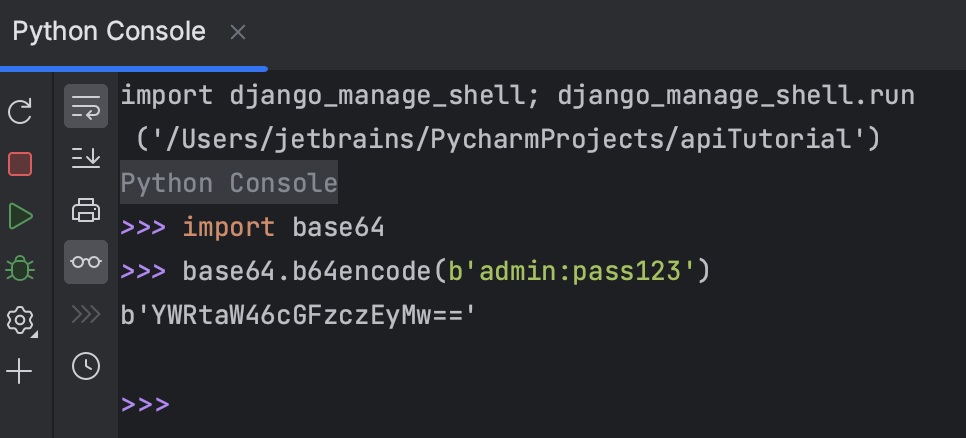
Earlier than continuing to the following step, you’ll want the Base64-encoded string consisting of the username and password joined by a single colon. For instance, we’ve created ‘admin’ with the password ‘pass123’ (merely for example; in actual life, it’s best to at all times use a a lot stronger password). Open the Python console and run the next, changing ‘admin:pass123’ together with your person credentials:
>>> import base64
>>> base64.b64encode(b'admin:pass123')
Now let’s run the identical request however with the Authorization header.
POST http://localhost:8000/gives/
Authorization: Fundamental YWRtaW46cGFzczEyMw==
Content material-Kind: utility/json

{
  "handle": "",
  "measurement": "1BR",
  "kind": "APT",
  "value": 350000,
  "sharing": false,
  "textual content": "A small trendy flat. Central location."
}
You need to get a 201 Created response.
Elaborating on permissions
In the intervening time, any authenticated person can edit any supply. Let’s arrange permissions so that provides can solely be edited by their authors.
Create rental/permissions.py and fill it with the next code:
from rest_framework import permissions


class IsAuthorOrReadOnly(permissions.BasePermission):
    def has_object_permission(self, request, view, obj):
        return request.technique in permissions.SAFE_METHODS or obj.writer == request.person
The IsAuthorOrReadOnly class is subclassed from the Django REST framework BasePermission class. Permission is unconditionally granted if the request technique is among the SAFE_METHODS, that are GET, HEAD, and OPTIONS. In any other case, the requesting person have to be the supply’s writer as a way to get permission.
Go to views.py, import the newly created permission, and replace permission_classes in OfferDetails:
from rental.permissions import IsAuthorOrReadOnly
...

class OfferDetails(generics.RetrieveUpdateDestroyAPIView):
    queryset = Provide.objects.all()
    serializer_class = OfferSerializer
    permission_classes = [
        permissions.IsAuthenticatedOrReadOnly,
        IsAuthorOrReadOnly
    ]
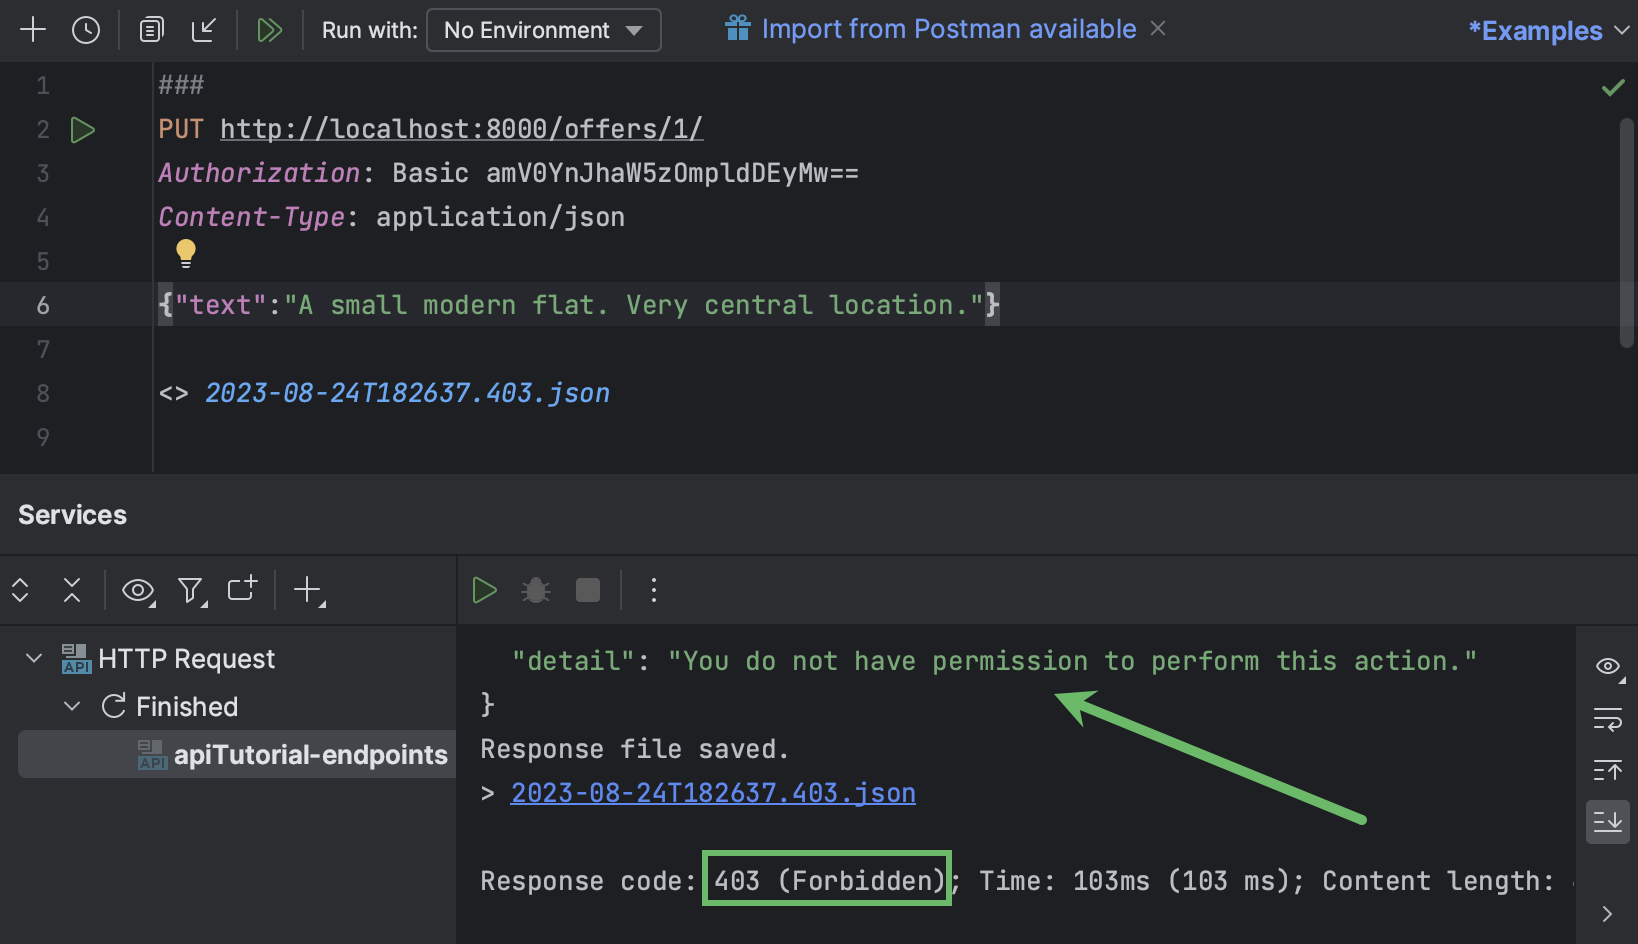
Now create one other person by operating createsuperuser within the handle.py console (we’ll use ‘jetbrains:jet123’). Then submit the next request to replace the supply with ID 1 (created by the admin person):
PUT http://localhost:8000/gives/1/
Authorization: Fundamental amV0YnJhaW5zOmpldDEyMw==
Content material-Kind: utility/json

{"textual content":"A small trendy flat. Very central location."}
You need to get 403 Forbidden with “You wouldn’t have permission to carry out this motion” within the response particulars.
Then strive the identical however with admin’s credentials:
PUT http://localhost:8000/gives/1/
Authorization: Fundamental YWRtaW46cGFzczEyMw==
Content material-Kind: utility/json

{"textual content":"A small trendy flat. Very central location."}
You need to get 200 OK.
Will we now even have authentication within the browsable API? Let’s see. Open http://127.0.0.1:8000/gives/1/ within the browser. There’s not a type related to the POST technique, and the DELETE button is gone as properly. We have to allow the login web page to have the ability to use browsable API for such operations.
Go to the challenge’s challenge urls.py and replace it as follows:
from django.urls import path, embrace

urlpatterns = [
    path('', include('rental.urls')),
    path('api-auth/', include('rest_framework.urls')),
]
Now replace the web page within the browser. You need to see Log in within the higher proper nook. Click on it and enter credentials of one of many beforehand created customers to have the ability to carry out actions on gives.
Conclusion
By finishing this tutorial, you could have discovered to implement the next options of Django REST framework:
ModelSerializerfor creating serializers based mostly on fashions.- Generic class-based views for writing API logic in a concise and idiomatic means.
- Browsable API for simple visualization of accessible endpoints and knowledge.
- Django authentication system for configuring person permissions.
Creating Django APIs in PyCharm Skilled is easy and straightforward because of the next:
- Handle.py and Python consoles with code completion.
- Endpoints toolwindow with the record of outlined endpoints and accessible strategies.
- Constructed-in HTTP Shopper that permits you to submit requests and examine the historical past of responses.
The assist of the Django REST framework in PyCharm can be additional prolonged. You possibly can observe the points in our process tracker to remain up to date.
Helpful hyperlinks
PyCharm documentation
Different sources
Subscribe to Weblog updates

[ad_2]