

[ad_1]
Matplotlib is a flexible and widely-used library for knowledge visualization in Python. Whereas it excels at creating static plots and charts, it’s additionally able to producing interactive visualizations. On this article, we’re going to discover the way to create such interactive plots in Matplotlib that enable customers to really work together with the graph, and drawn components utilizing the mouse cursor.
Let’s start!
What are Interactive Plots?
Interactive Plots are particular forms of graphs which permit the consumer to work together with them, and making adjustments to the graph in actual time. That is in distinction to static graphs, which solely render as soon as, and don’t change over the period of their lifetime.
There are two ways in which interactive plots are sometimes created in matplotlib. The primary technique entails the use of “widgets” like buttons and checkboxes which may management and modify the graph.
The second technique entails the usage of “occasions” and the mouse pointer. The consumer performs an motion utilizing the mouse, like a click on, which triggers an occasion, which in flip triggers a perform which runs no matter code we wish to. We will additionally incorporate advanced actions, similar to “mouse drag” and “scrolling” into our matplotlib functions with this technique.
Each strategies are equally efficient, every with their very own execs and cons. Nonetheless, we shall be specializing in the second technique on this tutorial.
What’s an Artist in Matplotlib?
This can be a time period that many who’ve been utilizing matplotlib, seemingly have no idea. This time period shall be used regularly by way of this tutorial, so it is crucial that we make clear its that means proper now.
In Matplotlib, an “artist” refers to a basic graphical object or entity that may be drawn on a canvas or axes, contributing to the visible illustration of a plot or chart. These artists embody a variety of graphical components, together with shapes (e.g., rectangles, circles), strains, textual content, photos, and extra.
In easy phrases, an artist is something that’s drawn to the display. A matplotlib form, graph, even textual content.
“Deciding on” an Artist utilizing Mouse Pointer
On this part, we’ll cowl the way to use the mouse pointer to click on on an artist, and retrieve its particulars (similar to place, kind, shade, and many others.). The approach that we’ll discover is a basic strategy, and can work on any, and all forms of artists in matplotlib.
We’ll start by introducing the code snippet-by-snippet, together with the suitable explanations.
import matplotlib.pyplot as plt
from matplotlib.patches import Rectangle, Circle
We’ve got imported the plotting module in matplotlib, and in addition some “shapes” like a Rectangle and Circle.
Subsequent, we create the matplotlib determine and axes object. The determine represents the window, whereas the axes represents the graph area the place the plotting is completed.
# Create a determine and axis
fig, ax = plt.subplots()
Now we create some objects which we shall be drawing to our matplotlib window. The primary parameter in each of those lessons controls the preliminary place, whereas the next parameters management the size of the article, and different points like shade.
# Draw some shapes for demonstration
rect = Rectangle((0.1, 0.1), 0.3, 0.4, fc="blue", picker=True)
circle = Circle((0.7, 0.7), 0.1, fc="pink", picker=True)
The vital factor to note right here is the picker=True parameter. This parameter allows the interactive characteristic that lets you click on on and choose the drawn artists on the plot. That is usually stored off by default for efficiency causes, as it isn’t wanted in static graphs. As soon as that is turned on, matplotlib will start monitoring actions associated to those objects (e.g. mouse clicks), and generate a decide occasion when an motion happens.
The subsequent step is so as to add the created shapes to the plot:
# Add these shapes to the graph
ax.add_patch(rect)
ax.add_patch(circle)
This step goes to differ a bit relying on the kind of object you might be plotting. For instance, scatter() could be used for a scatter plot, bar() could be used for a bar graph, and many others.
Defining the onClick() Perform
Earlier than we proceed any additional, we have to truly outline a perform which can execute after we work together (click on) on any of our objects.
Right here is our code for such a perform, which performs the easy process of retrieving the artist behind the decide occasion (utilizing .artist attribute), and prints out the related particulars primarily based on which object it was (which we work out utilizing the isinstance technique).
def onClick(occasion):
    artist = occasion.artist
    if isinstance(artist, Rectangle):
        print("Chosen Artist Sort: Rectangle")
        print(f"Artist Particulars: {artist.get_bbox()}")
    elif isinstance(artist, Circle):
        print("Chosen Artist Sort: Circle")
        heart = artist.heart
        radius = artist.radius
        print(f"Heart: ({heart[0]}, {heart[1]}), Radius: {radius}")
In case you might be questioning the place the occasion parameter got here from, that is robotically handed in by matplotlib while you join a perform to the decide occasion.
We’ll now join this perform to the decide occasion, and name the present() technique to show our graph.
# Join the decide occasion to the onClick perform
fig.canvas.mpl_connect('pick_event', onClick)
plt.present()
With the decide occasion, we will set off the onClick perform by utilizing any type of mouse click on (left/proper/scroll).
Right here is our output:
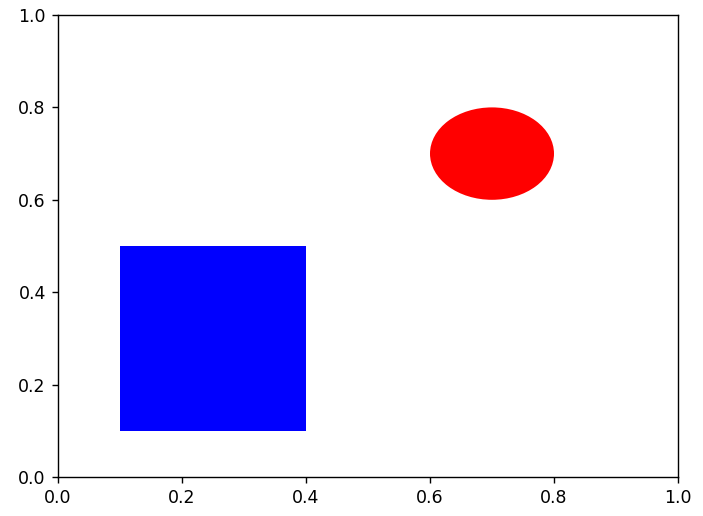
Clicking on the rectangle object right here provides us the next output:
Chosen Artist Sort: Rectangle
Artist Particulars: Bbox(x0=0.1, y0=0.1, x1=0.4, y1=0.5)
Equally, clicking on the circle object provides us the followiing:
Chosen Artist Sort: Circle
Heart: (0.7, 0.7), Radius: 0.1
Fairly cool, proper?
Interactive Plots the place you possibly can modify Artists
On this part, we’ll lengthen the earlier instance, and present you the way to modify artists upon deciding on them. Our purpose on this part shall be to create a system, the place we have now a number of objects in a matplotlib window, and might “choose” one in all them by clicking on it, upon which will probably be highlighted (by altering the colour of the article).
The bottom idea and code stays the identical, we simply want to alter what we put into the onClick() perform (or any perform related to the decide occasion). To simplify this instance a bit, we shall be utilizing solely rectangles.
Right here is the bottom code, with none of additional interactivity stuff:
import matplotlib.pyplot as plt
from matplotlib.patches import Rectangle, Circle

# Create a determine and axis
fig, ax = plt.subplots()

# Draw some shapes for demonstration
rect1 = Rectangle((0.1, 0.1), 0.3, 0.4, fc="blue", picker=True)
rect2 = Rectangle((0.4, 0.6), 0.2, 0.3, fc="blue", picker=True)
rect3 = Rectangle((0.8, 0.2), 0.1, 0.3, fc="blue", picker=True)

# Add these shapes to the graph
ax.add_patch(rect1)
ax.add_patch(rect2)
ax.add_patch(rect3)

plt.present()
Subsequent, we’ll outline the onClick perform.
def onClick(occasion):
    artist = occasion.artist
    if isinstance(artist, Rectangle):
        artist.set_facecolor('yellow')
    plt.draw()
There are two predominant strains of code right here. Line 4, the place we name the set_facecolor technique on the artist object, and Line 5, the place we name the plt.draw() technique to replace the matplotlib graph with our new adjustments.
We will then join our onClick perform, to the decide occasion, and show the graph.
fig.canvas.mpl_connect('pick_event', onClick)
plt.present()
Nonetheless, this code ends in an issue which is illustrated by the next picture of our present output (in spite of everything objects have been clicked as soon as):
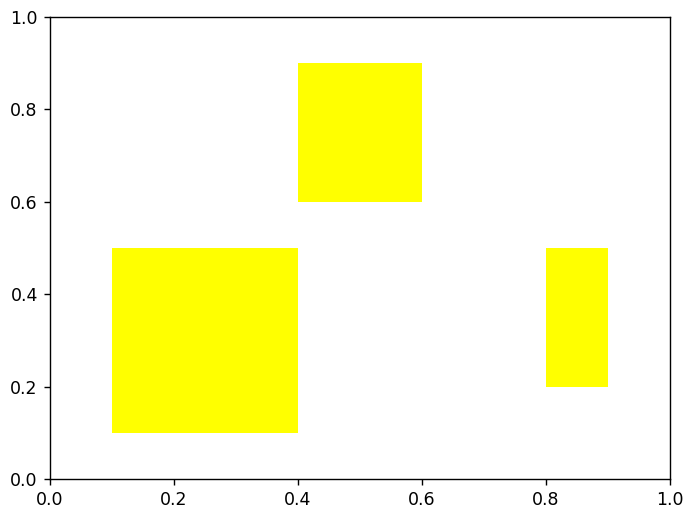
Managing de-selection
The present difficulty with the onClick perform is that after we click on on two objects consecutively, each stay highlighted. In a really perfect situation, clicking on, for instance, rectangle-1 ought to spotlight it, and after we subsequently click on on rectangle-2, it ought to change into highlighted whereas rectangle-1 turns into unhighlighted concurrently.
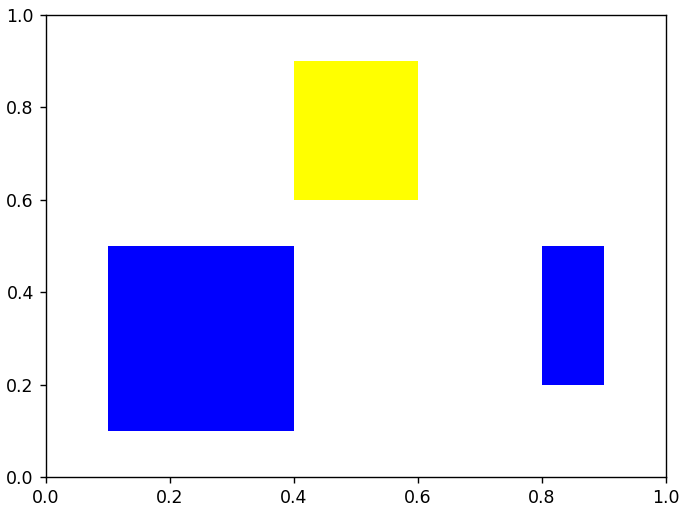
What we have to do now, is setup a system which retains tracks of the at present chosen object (which is none by default). For this, we will create a world variable (or a variable creating utilizing self if you’re utilizing OOP) referred to as current_artist.
We’ll now modify our onClick perform to utilize this variable so as to add the idea of “de-selection” into our system. In less complicated phrases, it will reset the colour of the previously-selected object, earlier than deciding on a brand new one.
def onClick(occasion):
    world current_artist
    artist = occasion.artist

    if isinstance(artist, Rectangle):
        if current_artist:
            current_artist.set_facecolor("blue")
        current_artist = artist
        artist.set_facecolor('yellow')
    plt.draw()
Now our code will work flawlessly, and correctly spotlight, and un-highlight objects as we work together with the graphs.
This marks the top of the Interactive Plots in Matplotlib Tutorial. Any recommendations or contributions for Coderslegacy are greater than welcome. Questions relating to the tutorial content material could be requested within the feedback part under.
[ad_2]